


Serverless Success Stories with Sharath from Azuga, a Bridgestone Company!
Introduction
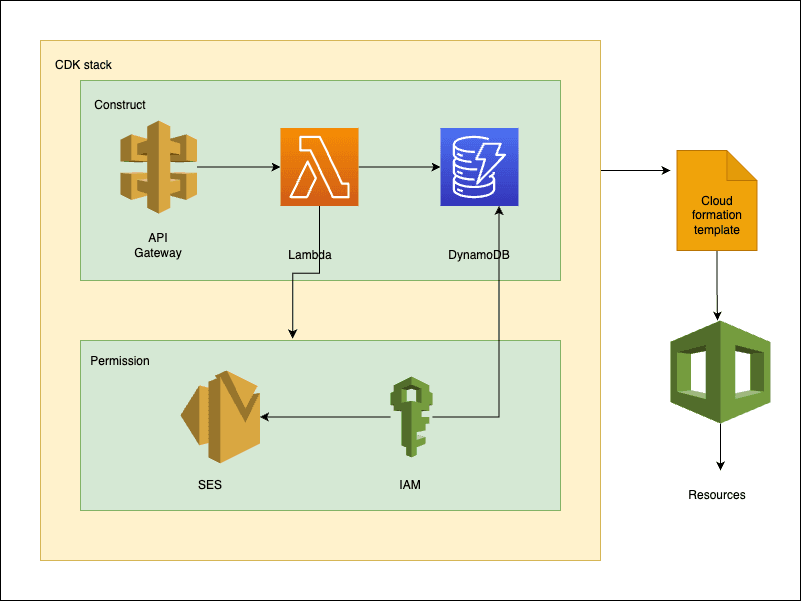
Jira is a popular application among Developers. Jira application helps teams plan, assign, track, report and manage work. Jira brings teams together for agile software development and customer support. Here we are going to create a miniature Jira app with basic functionalities using AWS CDK and python. We will be creating the application using multiple AWS services like,
- AWS Lambda
- DynamoDB
- IAM role
- API Gateway
- AWS SES
- AWS Cloud formation
We will learn how to create, manage, access multiple resources with different permissions using AWS CDK with python. This blog also explains how to select a database, why and when to choose different databases. Here we will be explaining how to design the backend of the application, and give a brief overview of the front end using a block diagram. Using cdk stack construct diagrams various steps involved in the application are explained.
You can add more features to the application, few suggestions are given in the blog itself. All the very best and happy learning.
Development
DATABASE SELECTION
Database selection is the most important part of Application Architecture. We need to choose the right database which suits our project the best.
mysql : SQL has a complex interface that makes it difficult to access it. The programmers who use SQL don’t have full control over the database because of the hidden business rules. Its operating cost is a bit high.
Postgres : Postgresql is a Relational Database Management System, it is an object oriented database. As our project does not have any relational queries we don’t choose postgres.
SQlite : SQLite locks the complete database on access, making it a very good tool for development or applications with no concurrent users, but not a good one for applications that actually have multiple users at the same time. This makes it not a good tool for production web sites.
NoSQL : NOSQL database provides much more flexibility when it comes to handling data. There is no requirement to specify the schema to start working with the application. Also, the NoSQL database doesn’t put a restriction on the types of data you can store together. It allows you to add more new types as your needs change. NoSQL is best suited for agile development which requires fast implementation.
No sql database suits best for our requirements. Dynamodb and Mongodb are the most popular nosql databases.
DynamoDB : Amazon DynamoDB is a fully managed, serverless, key-value NoSQL database designed to run high-performance applications at any scale. DynamoDB offers built-in security, continuous backups, automated multi-Region replication, in-memory caching, and data export tools. Setting up and installation process of DynamoDB is easy compared to other NoSQL databases like MongoDB.
We are going to make use of the property of dynamodb table to split the primary key into partition and sort key. A primary key is used to store, identify and capture data from the table. It is unique for each data. The multiple column-row table structure enables us to store large amounts of information under a single primary key.
DATA MODELLING
We need to create 5 dynamodb tables.

Once we decide on our database we can start designing our project.
WORKFLOW

Here when a user signs up his/her credentials are added to the employees table. A login will prompt after every signup. Login will check the credentials of the user and return a user id, which will be retained throughout the process. A verified user can view the dashboard with information about projects and their status. Users can create a new project with a unique projectkey either keeping him/her as the project manager or assign someone . A project manager can add group members from the employee list and send email notification to the selected group members. After project creation, the user will be redirected to the Scrumpage where he/she can view and create stories and tasks, add comments, update status of each task. Only project managers can delete a task. Once the work is done the user can safely sign out from the application.
Building Project
Choosing the right tools to build a project is also crucial. Here we are going to use AWS CDK.
AWS CDK : Is a serverless IaC tool specific to Amazon cloud services alone. In AWS CDK it is easy to define multiple infrastructure resources like DynamoDB tables and multiple IAM roles. To invoke the logs of a serverless function deployed using AWS CDK, you need to use another tool like AWS SAM or AWS CLI.
AWS CDK uses CDK metadata which does not give you access to configure, thereby making it safer from possible threats that may occur through tampering with the configuration. It allows you to use popular programming languages like JavaScript, TypeScript, Python, Java, C#, and .NET to define the resources needed for your serverless application. AWS CDK is excellent for use in deploying small to medium serverless projects . Let’s start building our project.
prerequisites:
AWS CLI : Install aws cli in your machine. https://docs.aws.amazon.com/cli/latest/userguide/getting-started-install.html
AWS account and User : Create a AWS account(free tier is sufficient).To deploy our app we need to have an account with credentials of administrator user. https://aws.amazon.com/premiumsupport/knowledge-center/create-and-activate-aws-account/
Node.js : Is required to use CDK . The AWS CDK uses Node.js (>= 10.13.0, except for versions 13.0.0 - 13.6.0). A version in active long-term support (16.x at this writing) is recommended. https://nodejs.org/en/download/
AWS CDK toolkit : Install the AWS CDK Toolkit . The toolkit is a command-line utility which allows you to work with CDK apps. https://docs.aws.amazon.com/cdk/v2/guide/cli.html
AWS verified email address : We also need to verify email addresses to send email through our lambda function. Follow this documents to verify. https://docs.aws.amazon.com/ses/index.html
python : Make sure python 3.9 or above is in your machine. https://www.python.org/downloads/
setting up your environment
After installing aws-cli, node.js, Open a terminal window and use aws configure to set up your environment. Type the access key ID and secret key and choose a default region
aws configure
Once you configure your environment, run the given command to install aws-cdk.
$ npm install -g aws-cdk
Now we can start creating our project.
cdk project
Open terminal
create a empty directory
$ mkdir minijira_app && cd minijira_app
Using cdk init create a sample app in python language. This init command will create a virtual environment in your directory. After running the init command open vscode(or any IDE) and open our folder or type code. in the terminal. We can see a few files and folders already created for us.
$ cdk init sample-app --language python
Activate virtual environment
linux/macos
source.venv/bin/activate
windows
.venv\Scripts\activate.bat
Once the virtual environment is activated install default dependencies specified in default requirement.txt in the sample app. Add boto3 == 1.24.3 to it and run the below command.
pip install -r requirements.txt
In the minijira_app folder we have a python module directory(minijira_app), within a minijira_app_stack.py. This stack.py file contains a custom cdk stack construct for use in our cdk application. A app.py file, this code loads and instantiates an instance of the cdkminijiraStack class from minijira_app/minijira_app_stack.py. Now we can edit these files into our requirements.
The most important Part of our application is in minijira_app_stack.py. This file creates all the resources for our application. This construct class also set the required permissions for our main lambda function. Create a lambda folder in your root directory (MINIJIRA_APP) beside your python directory(minijira_app). Inside lambda create a file called jira.py. This file contains our lambda handler function.
Go to minijira_app_stack.py, here we will specify all the resources, permissions, actions required by the application to work. (we can delete the sample stack,and create a new one)
Resource Creation
minijira_app_stack.py
Define our MinijiraAppStack with inherent properties of Parent Class Stack.
class MinijiraAppStack(Stack):

    def __init__(self, scope: Construct, construct_id: str, **kwargs) -> None:
        super().__init__(scope, construct_id, **kwargs)
Constructs are the basic building blocks of AWS CDK apps. A construct represents a “cloud component” and encapsulates everything AWS CloudFormation needs to create the component. AWS Construct library includes constructs that represent all the resources available on AWS.
First we will import necessary dependencies to create our stack.
from attr import Attribute
from constructs import Construct
from aws_cdk import (

    Stack,
    aws_lambda as _lambda,
    aws_apigateway as apigw,
    aws_dynamodb as dynamodb,
    aws_ses as _ses,aws_iam as iam,

)
Now we need to construct our resources.
Lambda Function
Defining lambda function is pretty straightforward. Give a name to our lambda function. Specify runtime, where to find our lambda code from created assets. Specify lambda handler function is defined in jira.py file. As you know lambda is an inbuilt function in python therefore we can’t use lambda as a variable name. Using _lambda instead.
 my_lambda = _lambda.Function( self, 'JiraHandler',
            runtime = _lambda.Runtime.PYTHON_3_8,
            code = _lambda.Code.from_asset('lambda'),
            handler = 'jira.handler',

)
Setting permissions to lambda function : We need our lambda function to send email to selected group members. We need verified employees email ids to send and recieve email. AWS SES verify email id for us and generate unique arn value for each email id. We need to add this verified list of ‘ARN’ values to the ses resources and give access permission to Lambda. Create a file in root directory env.py.
- IAM role : Give lambda to access ses to send email using IAM policy and SES. The resources parameter in policy statement will take value in
’ resources = [‘arn:aws:ses:
: :identity/ ’,’arn:aws:ses: : :identity/ ‘,etc..,]’ format. For security reasons we add this list of verified arn values in a separate env.py file, and import that file to your stack construct.
 from .env.py import mail_list

 my_lambda.add_to_role_policy(iam.PolicyStatement(
            effect = iam.Effect.ALLOW,
            actions = [
          'ses:SendEmail',
          'ses:SendRawEmail',
          'ses:SendTemplatedEmail',
],

resources = mail_list
)
)
- API Gateway : create a rest api and specify lambda handler for the api.
 apigw.LambdaRestApi(
            self, 'Endpoint',
            handler = my_lambda,
)
- DynamoDB table: Generating individual stack for individual dynamodb table. Specifying attributes, granting lambda to read and write permission to each table.Please note each dynamodb table stack should have unique id.
employeetable = dynamodb.Table(self,
        id = 'dynamodbtable',
        table_name = "employee",
        partition_key = dynamodb.Attribute(
            name = 'email',
            type = dynamodb.AttributeType.STRING
)
)
        employeetable.grant_read_write_data(my_lambda)
Similarly create all tables. for complete code refer < github link >
Now we have defined all assets required for our application .We can write our handler code.
The api-gateway we created will give you an endpoint url which supports all methods like GET, POST, PUT, DELETE etc by default. For simplicity we are using the POST method only. The POST request will be in json format. In the request, let the event body contain an action parameter, which decides which function/action to call or perform.
The action parameters are,
- signup
- login
- addproject
- addstory
- addtask
- addcomment
- employeelist
- update
- projectlist
- delete
- scrumpage
Instead of using action parameters we can also use multiple lambda functions for different api gateways or create different paths for different functions as well. Here we are using the action Parameter. Go to the lambda folder, open jira.py and we can add our handler function.
jira.py
First we need to import all the necessary python modules.
import json
import boto3
import string
import random
from boto3.dynamodb.conditions import Key
Boto3 is used to access all the services and resources we need for our application. Boto3 is the AWS SDK for Python to create, configure, and manage AWS services. String and Random modules are used to create our unique id for table entries. Key attribute is used for querying dynamodb tables.
Define handler function
def handler(event, context):

    event = json.loads(event['body'])
    action = event["action"]
Here according to action we can call different functions. In login action, after verifying credentials we retain email and username as primary_email and primary_user.
if action == "login":
       email = event["email"]
       password = event["password"]
       response = table_employee.query(KeyConditionExpression=Key('email').eq(email))
       for item in response['Items']:
           if item.get('password') == password :
               primary_user = item.get('username')
               primary_email = email
               message = "successfully logged in"
           else:
               message = "try again wrong credentials"
               primary_email = "invalid email"
               primary_user = 'Not a registred user'
Lets see how to create a project.
when we choose addproject action,event request body will look like this.
{
        "action" : "addproject",
        "projectkey" : "trialp1",
        "projectname" : "trialproject1",
        "projectmanager" : "pmuser",
        "groupmembers": "["user1@mail.io","user2@mail.io"]"
 }
Here groupmembers parameter is a list of employee email ids .We need these parameters to send email to selected groupmembers.
if action == "addproject":
        table_projects.put_item(
            Item = {
                'projectkey' :event["projectkey"],
                'projectname':event["projectname"],
                'projectmanager':event["projectmanager"],
                'groupmembers': event["groupmembers"]
                    }
                )
Once you add the details to the projects table we need to send email to group members. Here is the simplest form of email generation. Make sure you add verified email ids of group members which is in our resources.
        client = boto3.client('ses' )
        name = projectmanager
        projectname = projectname
        source = pm_email
        subject = 'projectupdate'
        body = f"""<html>
            <head></head>
            <body>
            <h2>'you have been added to project:{projectname}'</var></h2>
            <br/>

            </body>
            </html>
                        """

        destination = groupmembers
        _message = "Message from: " + name + "\nEmail: " + source + "\nMessage content: " + "added to new project"

        email_message = client.send_email(
            Destination = {
                'ToAddresses': [destination]
                },
            Message = {
                'Body': {
                    'Html': {
                        'Charset': 'UTF-8',
                        'Data': body,
                    },
                },
                'Subject': {
                    'Charset': 'UTF-8',
                    'Data': subject,
                },
            },
            Source = source,
    )
        message = "project added"+_message
We can add a task to our project . POST request event body will look like this
1. {
        'projectkey' :event["projectkey"] ,
        'taskid':taskid,
        'createdby':event["createdby"],
        'taskdescription':event["taskdescription"],
        'assignedto':event["assignedto"],
        'startdate':event["startdate"],
        'enddate':event["enddate"],
        'taskstatus':event["taskstatus"]
    }
add task to task table
   if action=="addtask":
      taskid = ''.join(random.choices(string.ascii_uppercase +
                             string.digits, k = 7))

      table_tasks.put_item(
         Item = {
            'projectkey' :event["projectkey"] ,
            'taskid':taskid,
            'createdby':event["createdby"],
            'taskdescription':event["taskdescription"],
            'assignedto':event["assignedto"],
            'startdate':event["startdate"],
                'enddate':event["enddate"],
                'taskstatus':event["taskstatus"]
        }
        )
        message="task added"
Lets see how to delete a task
    if action == "delete":
         projectkey = event["projectkey"]
         taskid = event["taskid"]
         email = event["email"]
         password = event["password"]

         response = table_p.query(KeyConditionExpression = Key('projectkey').eq(projectkey))
         for item in response['Items']:
            pm = item.get('projectmanager')

         response = table.query(KeyConditionExpression=Key('email').eq(email))
         for item in response['Items']:
            user = item.get('username')
            pw = item.get("password")

         if pm == user and password == pw:
              table_t.delete_item(Key = {'projectkey':projectkey, 'taskid': taskid})

              message = "item deleted by projectmanager"

         else:

            message = "please check your credentials,only project managers can delete items from task table."
lets update task status
if action == "update":
        change = event["change"]
        projectkey = event["projectkey"]
        taskid = event["taskid"]
According to the value of Change parameter we can change date, status etc . We can use KEY attribute to update expression .
if change == "status":

            table_t.update_item(
                    Key = {    'projectkey':projectkey,
                            'taskid': taskid,
                        },
                    UpdateExpression = "set taskstatus = :g",
                    ExpressionAttributeValues = {
                            ':g': event["taskstatus"]
                        },
                    ReturnValues = "UPDATED_NEW"
                )
            message = "task status changed"
Similarly you can write up all action codes.
The final piece of code is the scrum page. The scrum page will display all the details of your project. Using the ‘KEY’ attribute we can query any table for any value.
   if action == "scrumpage":
       projectkey = event["projectkey"]

       #getting project details
       response = table_p.query(KeyConditionExpression = Key('projectkey').eq(projectkey))
       for item in response['Items']:
           project = item

       #getting story details
       response = table_s.query(KeyConditionExpression = Key('projectkey').eq(projectkey))
       stories = []
       for item in response['Items']:
           stories.append(item)

       #getting tasks details
       tasks = []
       response = table_t.query(KeyConditionExpression = Key('projectkey').eq(projectkey))
       for item in response['Items']:
           tasks.append(item)

       #getting comments
       comments=[]
       response = table_c.query(KeyConditionExpression = Key('projectkey').eq(projectkey))
       for item in response['Items']:
           comments.append(item)

       message = {"project":project,
                "stories":stories,
                "tasks":tasks,
                "comments":comments
              }
Finally we can return our response
    response = {
        "statusCode": 200,
        'headers': {'Content-Type': 'application/json'},
        "body": json.dumps(message)
    }

    return response
You can refer to https://github.com/Divyapoonthottam/Miniature-JIRA-App-With-AWSCDK-in-Python for complete code .
Once you have saved your updated files.Our project stack needs to be synthesised. AWS CDK apps are effectively only a definition of your infrastructure using code. When CDK apps are executed, they produce (or “synthesise”, in CDK parlance) an AWS CloudFormation template for each stack defined in your application.
To synthesise a CDK app , use the cdk synth command . This will output a CloudFormation template.
cdk synth
To deploy the cloudformation template into your account we need to bootstrap it first. We can use the cdk bootstrap command to install the bootstrap stack into an environment.
cdk bootstrap
On successful bootstrapping, go to your aws console and can see a cdk tool kit in cloudformation service and a new asset bucket in your s3 bucket.
now we can deploy our app
cdk deploy
This will prompt a confirmation,enter Y and you can see the stack created into your account and region as you configured. Go to the AWS console cloudformation service and you can see your mini jira stack. In AWSlambda you can see your lambda function created. In the AWS DynamoDB table, 5 tables are created.
The endpoint url will be displayed in your terminal upon successful deployment.
You can test your api using POSTMAN .


