ChatGPT
  Perplexity
  Gemini
  Claude AI
 When you're building modern CI/CD workflows on AWS, the combination of AWS CDK Pipelines, GitHub, and CodeStar Connections offers a robust, scalable, and declarative approach to managing deployments. But setting this up isn't always as straightforward as the docs might suggest---especially when you bring GitHub (hosted outside AWS) into the mix via CodeStar.
In this post, we will go through the steps required to set up a simple Typescript CDK project with CDK Pipelines and see how we could use a Github repo as the source. We will also look at how an AWS CodeStar connection can authorize the deployment of code from said repository.
What is CDK?
AWS CDK (Cloud Development Kit) is an open-source framework which gives great depth to the concept of Infrastructure as Code. It's made up of individual building blocks called constructs which are modules that allow us to configure and use various AWS services within a CDK project.
It supports many popular programming languages like Python, Typescript, Java, etc. and for that matter, can be seen and maintained as any other code repository. This to a great extent helps blur the lines between application code and the infrastructure configuration that it requires to function.
Why CDK Pipelines?
One of the key components in any application development process is a deployment pipeline that helps push code changes from a repository to the infrastructure where the application is deployed.
Since CDK allows for the infrastructure, including said pipeline, to be part of the code itself, we are introduced to a grey area wherein the pipeline that is intended to deploy the code is also part of the same code.
CDK Pipelines is CDK's way of handling this. While using the AWS CodePipeline under the hood to handle deployments, it brings to the table a feature called self mutation or self updation. This means that whenever changes are pushed from a CDK project configured with CDK Pipelines, it first checks for any changes made to the pipeline itself. If there are no changes to the pipeline, it goes ahead and deploys the actual infrastructure stack.
However, if any changes have indeed been made to the pipeline, it will first deploy the changes to itself before triggering the deployment of the rest of the infrastructure stack. This means, once up and running, everything, including the pipeline that does the deployment itself, can be modified and updated by just pushing the code changes to the repository which triggers the pipeline.
Pre-requisites
- AWS CLI to be installed and configured
- AWS CDK to be installed
- Nodejs
What is AWS CodeStar Connection?
Even though the CodePipelineSource construct, which we would use later to configure the pipeline's source repository, contains a Github method, it requires a Github personal access token to be generated and stored in AWS Secrets Manager. This token would then authorize the pipeline with the repository. This could lead to issues when repository contributors change or when permissions are altered.
On the flip side, we have the CodeStar connection, which doesn't require creating personal Github access tokens and uses a Github application called AWS Connector for Github. This approach delegates authentication to a secure, IAM-managed integration that's explicitly designed for CI/CD scenarios.
Why Does It Matter for GitHub Integration?
What makes this a preferable approach, especially in multi-user or production environments, is the decoupling of pipeline access from individual user credentials. Instead of tying your pipeline's ability to deploy to a single developer's token, you're leveraging an application-level integration authorized once through the AWS Console.
Behind the scenes, AWS handles the secure setup of webhooks, OAuth tokens, and credential refresh, abstracting away the lifecycle headaches of managing PATs.
In short, using CodeStar means better security, less ops friction, and a cleaner fit with how CDK Pipelines expects to manage source integrations---especially at scale.
Steps to Creating AWS CodeStar Connection
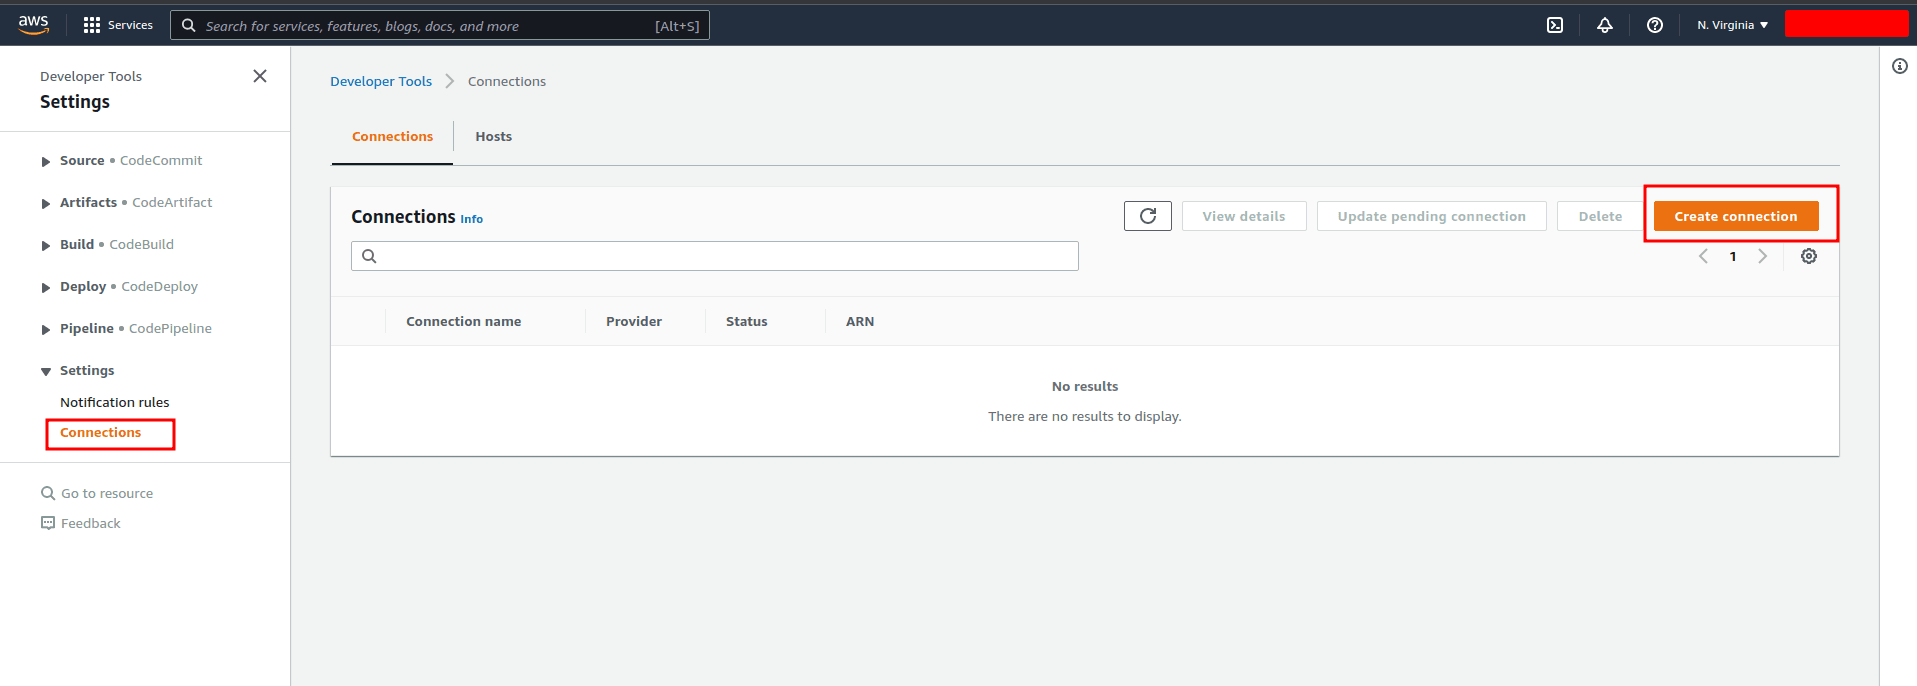
- Open the AWS CodePipeline console and navigate to the Connections page from the settings dropdown in the left hand menu. Click "Create Connection".
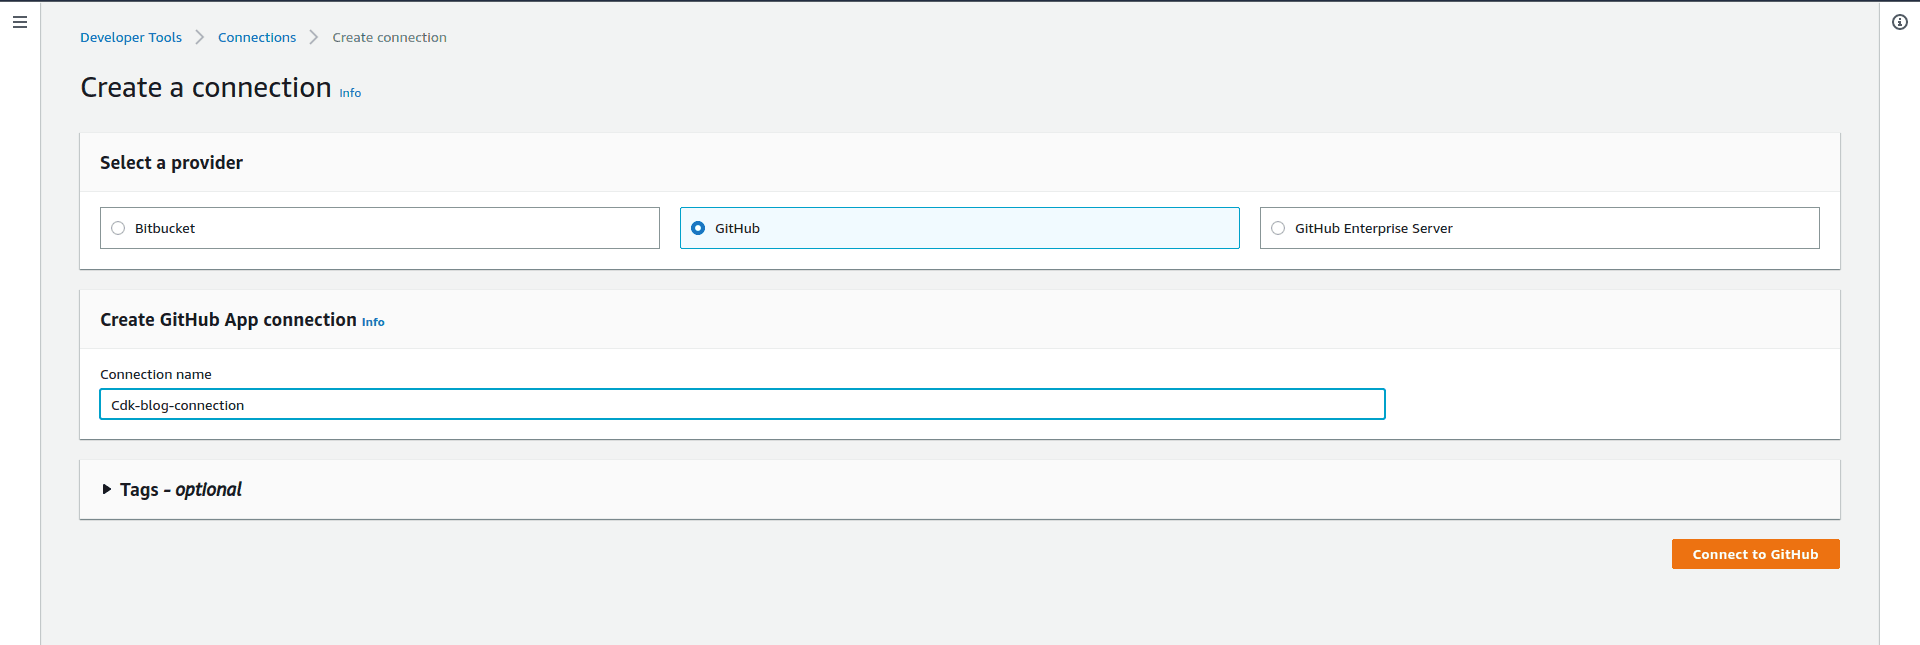
- Select the Github provider, give the connection a name, and hit Connect to Github.
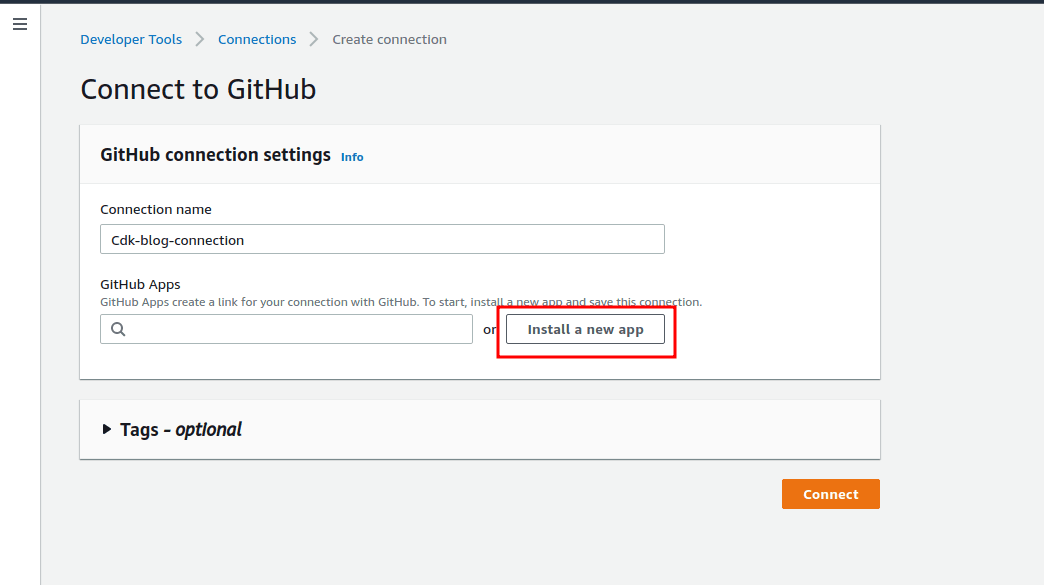
- On the next page, choose to install a new app.
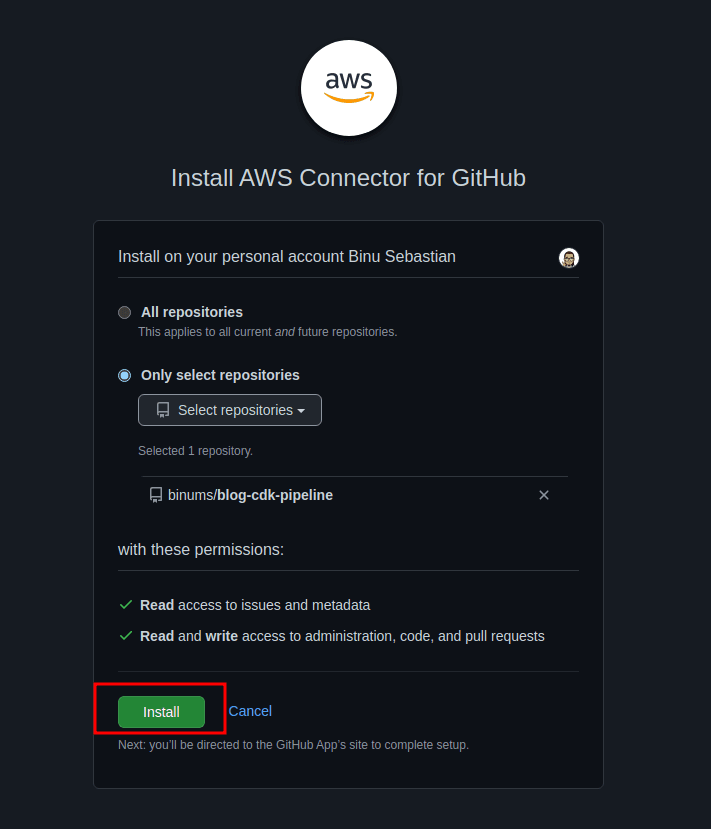
- Sign in with Github, select the repository the connector is to be used for, and click Install.
- Once back on the AWS console, make sure the newly installed app is selected and click Connect.
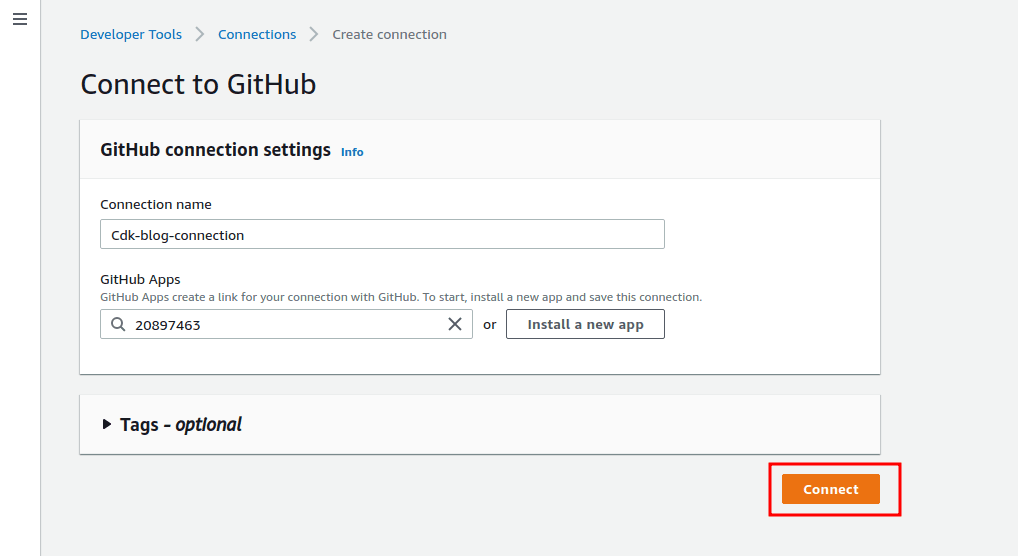
- With that, we have successfully setup our Codestar connection. Make a note of the ARN of the connection, which we will later use to set up the pipeline.

Let's Set Up Our CDK Project
Create a directory for the project, and run the following command to initialize your CDK Typescript project within that directory.
cdk init --language typescriptInstall the required constructs for our project. The @aws-cdk/pipelines construct will be used to set up the CDK Pipeline.
npm i @aws-cdk/aws-apigateway @aws-cdk/aws-lambda @aws-cdk/pipelinesOpen
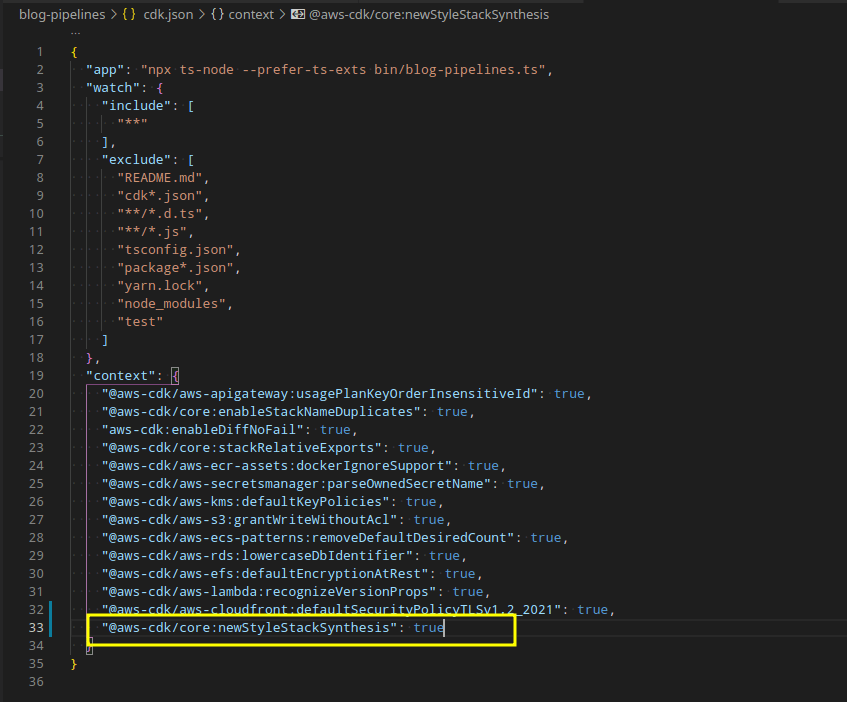
cdk.jsonin the project's root directory and add the following element to the context property. This will allow the@aws-cdk/pipelinesconstruct to use some new core features of the CDK framework called new style stack synthesis, which are required for our usecase."@aws-cdk/core:newStyleStackSynthesis": true
- Now we use the
cdk bootstrapcommand with the--cloudformation-execution-policiesflag in order to provide the required permissions to deploy the pipeline to your AWS account. Make sure you have the AWS CLI installed and configured with the right AWS account to be used.cdk bootstrap --cloudformation-execution-policies arn:aws:iam::aws:policy/AdministratorAccess
Creating the Pipeline Stack
Create a new file in the
/libdirectory calledpipeline-stack.ts. Here we use theCodePipelineSource.connection()method to specify the CodeStar connection we created.import * as cdk from "@aws-cdk/core"; import { CodeBuildStep, CodePipeline, CodePipelineSource } from "@aws-cdk/pipelines"; export class MyPipelineStack extends cdk.Stack { constructor(scope: cdk.Construct, id: string, props?: cdk.StackProps) { super(scope, id, props); const pipeline = new CodePipeline(this, "BlogPipeline", { pipelineName: "BlogPipeline", synth: new CodeBuildStep("SynthStep", { input: CodePipelineSource.connection( "<Repo owner>/<Repo name>", "main", { connectionArn: "ARN OF THE CODESTAR CONNECTION MADE EARLIER" } ), installCommands: ["npm install -g aws-cdk"], commands: ["npm ci", "npm run build", "npx cdk synth"] }) }); } }The next step is to make sure that this pipeline-stack will serve as the entry point for our CDK project and the resources defined within. So we update the
/bin/<name-of-your-project>.tsfile.#!/usr/bin/env node import "source-map-support/register"; import * as cdk from "@aws-cdk/core"; //Import our newly created pipeline stack import { MyPipelineStack } from "../lib/pipeline-stack"; const app = new cdk.App(); //Instantiate the pipeline stack new MyPipelineStack(app, "MyPipelineStack");Now that we have updated the entry point, we need a way to connect our resource stack(s) (which will contain our actual AWS resources to be deployed) to the pipeline stack. For this, we will create a new CDK Stage and add it to the pipeline stack. So create a new file in
/libcalledpipeline-stage.ts.import { Stage, Construct, StageProps } from "@aws-cdk/core"; export class BlogPipelineStage extends Stage { constructor(scope: Construct, id: string, props?: StageProps) { super(scope, id, props); } }Once the stage is created, update the
/lib/pipeline-stack.tsand add the stage to the pipeline.import * as cdk from "@aws-cdk/core"; import { CodeBuildStep, CodePipeline, CodePipelineSource } from "@aws-cdk/pipelines"; //***********Import the pipeline stage*********** import { BlogPipelineStage } from "./pipeline-stage"; export class MyPipelineStack extends cdk.Stack { constructor(scope: cdk.Construct, id: string, props?: cdk.StackProps) { super(scope, id, props); const pipeline = new CodePipeline(this, "BlogPipeline", { pipelineName: "BlogPipeline", synth: new CodeBuildStep("SynthStep", { input: CodePipelineSource.connection( "<Repo owner>/<Repo name>", "main", { connectionArn: "ARN OF THE CODESTAR CONNECTION MADE EARLIER" } ), installCommands: ["npm install -g aws-cdk"], commands: ["npm ci", "npm run build", "npx cdk synth"] }) }); //***********Instantiate the stage and add it to the pipeline*********** const deploy = new BlogPipelineStage(this, "Deploy"); pipeline.addStage(deploy); } }Within our
/libdirectory, we will find that we have a default stack, which is where we will be defining our AWS resources. And the job of connecting this, and any other stacks we might have, to the pipeline stack is done by the pipeline stage. All we need to do is, instantiate our resource stack(s) within the pipeline stage.import { Stage, Construct, StageProps } from "@aws-cdk/core"; //***********Import the resource stack*********** import { CdkPipelinesBlogStack } from "./blog-resources-stack"; export class BlogPipelineStage extends Stage { constructor(scope: Construct, id: string, props?: StageProps) { super(scope, id, props); //***********Instantiate the resource stack*********** new CdkPipelinesBlogStack(this, `CdkPipelinesBlogStack`); } }With that, our pipeline is ready. Next, commit and push the code to the
mainbranch of the Github repo selected while setting up the CodeStar connection.
Deploying the Pipeline
For the very first deployment, we are required to directly deploy the stack using the CDK CLI. This will setup the pipeline for us and deploy the code pushed into the github repo.
Build the project
npm run buildSynthesise and deploy
cdk synth && cdk deploy
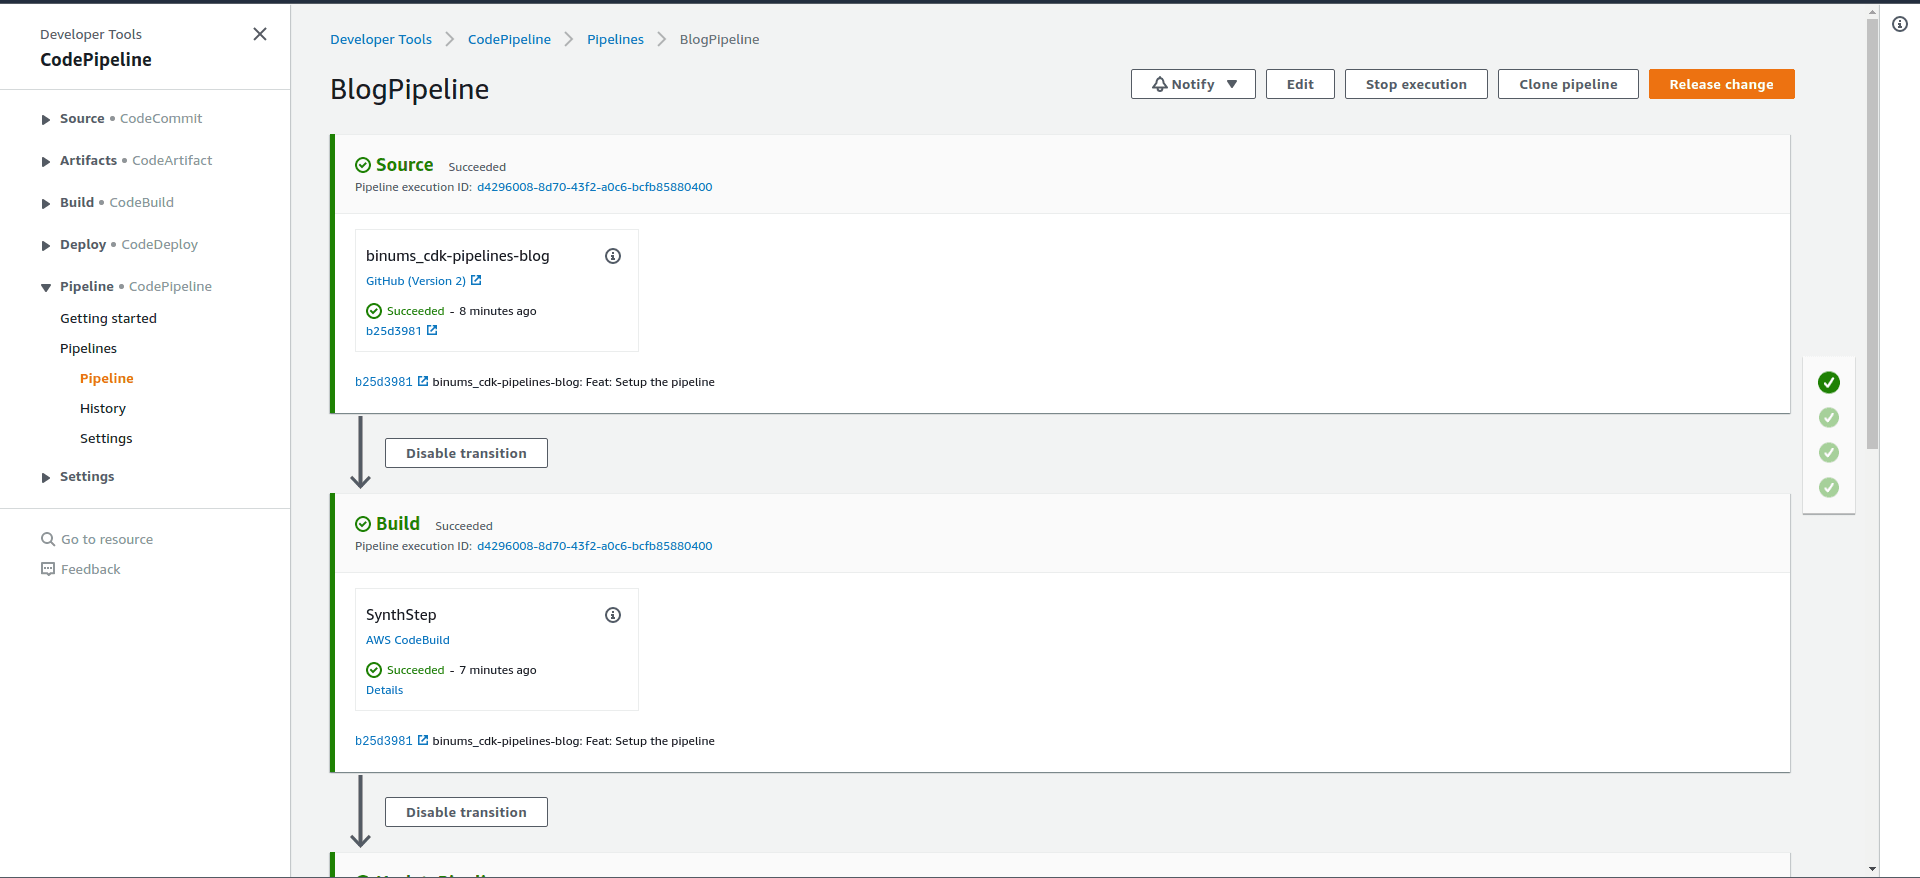
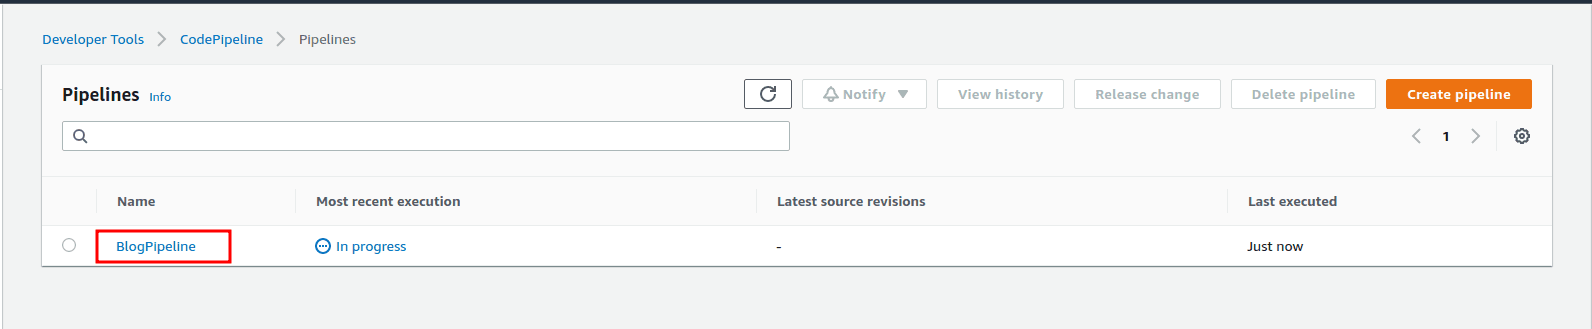
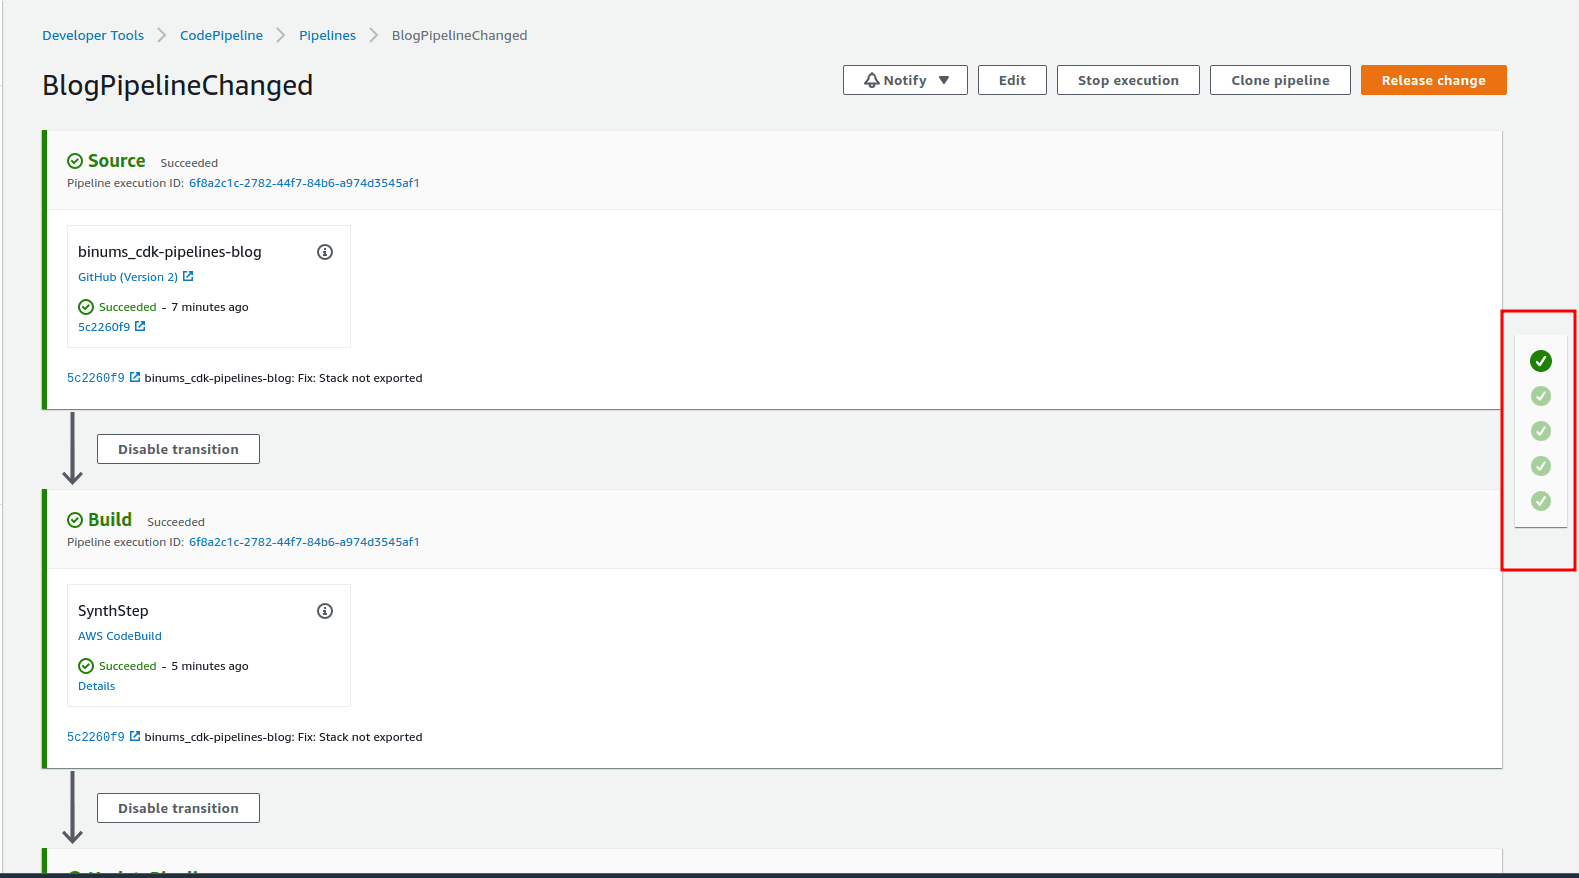
Let's move over to the AWS CodePipeline console to verify that the pipeline has been successfully deployed.
Creating the Resources Stack
Now that our pipeline is up and running, let's start pushing some changes to see how it handles. We will setup a simple application with an API Gateway and a Lambda function
Create a directory called
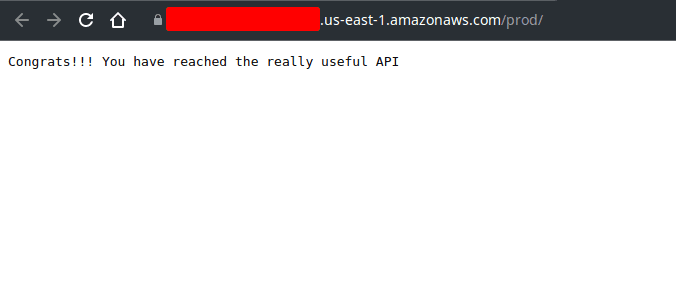
lambdain the root of our project and add a new file calledindex.js.exports.handler = async (event) => { return { statusCode: 200, headers: { "Content-Type": "text/plain" }, body: `Congrats!!! You have reached the really useful API` }; };Update the default resource stack
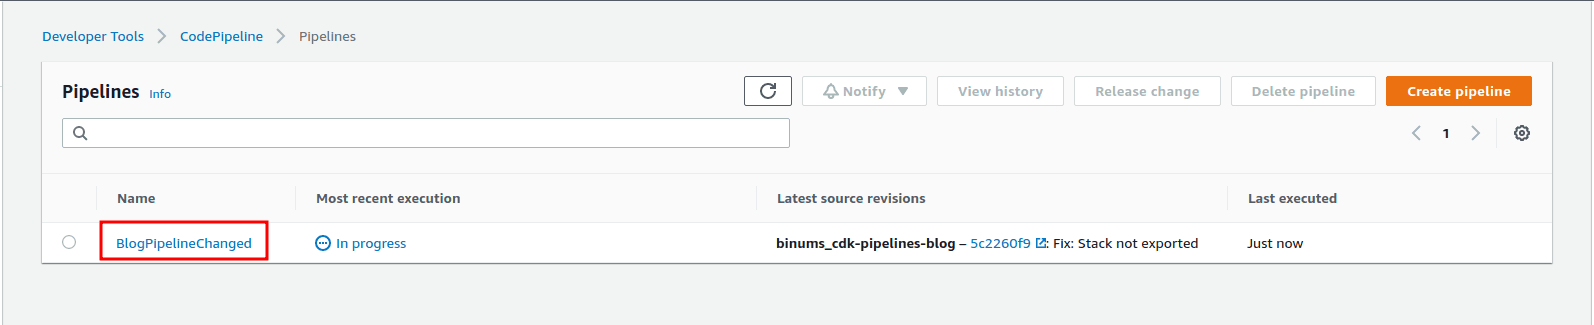
/lib/<name-of-your-project>-stack.ts.import * as cdk from "@aws-cdk/core"; //Import the lambda and apigateway constructs import * as lambda from "@aws-cdk/aws-lambda"; import * as apigw from "@aws-cdk/aws-apigateway"; export class BlogResourcesStack extends cdk.Stack { constructor(scope: cdk.Construct, id: string, props?: cdk.StackProps) { super(scope, id, props); const blogLambda = new lambda.Function(this, `BlogLambdaHandler`, { runtime: lambda.Runtime.NODEJS_14_X, code: lambda.Code.fromAsset("lambda"), handler: "index.handler" }); new apigw.LambdaRestApi(this, `BlogEndpoint`, { handler: blogLambda }); } }Now, let's make some changes to the pipeline itself to see if the self-mutating nature of the pipeline kicks in. Update the name of the pipeline in
/lib/pipeline-stack.tsfromBlogPipelinetoBlogPipelineChanged.import * as cdk from "@aws-cdk/core"; import { CodeBuildStep, CodePipeline, CodePipelineSource } from "@aws-cdk/pipelines"; import { BlogPipelineStage } from "./pipeline-stage"; export class MyPipelineStack extends cdk.Stack { constructor(scope: cdk.Construct, id: string, props?: cdk.StackProps) { super(scope, id, props); const pipeline = new CodePipeline(this, "BlogPipeline", { //***********Change the name of the pipeline*********** pipelineName: "BlogPipelineChanged", synth: new CodeBuildStep("SynthStep", { input: CodePipelineSource.connection( "<Repo owner>/<Repo name>", "main", { connectionArn: "ARN OF THE CODESTAR CONNECTION MADE EARLIER" } ), installCommands: ["npm install -g aws-cdk"], commands: ["npm ci", "npm run build", "npx cdk synth"] }) }); const deploy = new BlogPipelineStage(this, "Deploy"); pipeline.addStage(deploy); } }Make sure to add
!**/lambda/*.jsto.gitignoreto prevent the .js files in the lambda directory from being ignored*.js !jest.config.js #To prevent functions in our lambda directory from being ignored !**/lambda/*.js *.d.ts node_modules # CDK asset staging directory .cdk.staging cdk.out
Let’s Test How the Pipeline Works
- Commit and push the code to the
mainbranch of the Github repo. This will trigger a deployment byBlogPipeline.
- Since there was a change to the pipeline itself, self-mutation will be triggered.
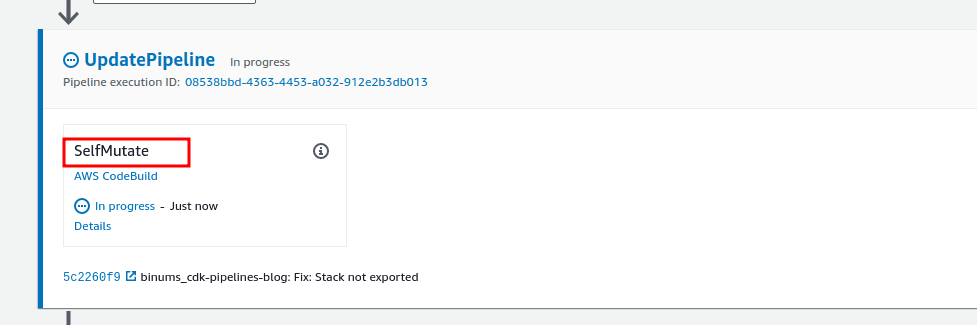
- Once the self-mutation is complete,
BlogPipelineChangedwill deploy the resource stack, which contains an API Gateway backed by a Lambda.
- Now let's test our application.

The code used in this post can be found in this repo
References: CDK Workshop Typescript
For questions and suggestions, feel free to reach out to us on Twitter
FAQs
1. Why use CodeStar Connection instead of a personal access token?
CodeStar is the AWS-recommended way to securely integrate third-party source providers like GitHub. It avoids storing sensitive credentials in plaintext and supports fine-grained IAM policies for access control. As such, I have used this method in this blog.
2. What versions of CDK and CDK Pipelines should I use?
Always use consistent versions across all CDK packages to avoid mismatches. CDK Pipelines is built into the aws-cdk-lib since v2, so no need for separate installs like in v1. Stick to the latest stable release unless your organization has a reason to lock versions.