The Hidden Cost of Status Quo: Why Healthcare CTOs Can't Afford to Delay Modernization
Introduction
We are always in search of something. Whether it’s the meaning of life or the delicious food near us, we heavily rely on search engines to get the answers. We already use apps such as Swiggy, Uber, Wikipedia, etc., daily. But did you know that these apps use Elasticsearch?
One might ask, why not use the DataBase directly instead of a separate tool? Because when we search for anything, we don’t always type the exact words or sentences. For example, we might search for “cinema” and need results for “theater”, searching for containers - get results for both box containers and docker containers, etc. In cases like these, the regular database queries will not give the desired result.
OpenSearch(Elasticsearch) is the leading free and open-source search and analytics solution. OpenSearch is a search engine based on the Lucene library. It provides a distributed, multitenant-capable full-text search engine and schema-free JSON documents.
There are a lot of tutorials online covering the basics of OpenSearch(Elastic Search). I recommend:
- Github: Crash Course to Elastic Stack
- Youtube: Beginner’s Crash Course to Elastic Stack
- Udemy: Complete Guide to Elasticsearch
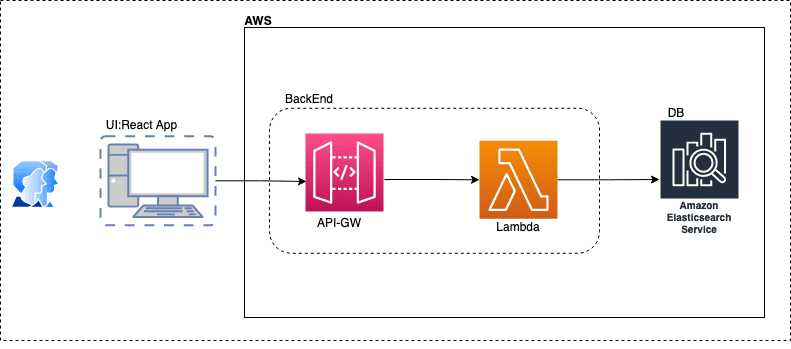
Here, we will build a Search Application for Marvel Movies using OpenSearch. We will upload a dataset of marvel movies to the OpenSearch domain and query it using lambda. Our tech stack includes lambda & API-gw for the backend, React for the frontend, and OpenSearch for the database. Check out the Architecture diagram below:

Pre-requisites
- Working knowledge of:
- basic OpenSearch(Elastic-Search) queries
- ReactJS
- AWS Lambda
- AWS API Gateway
- Active AWS account
Steps to Create the Application
Step 1: Create the resources for the backend:
1. Open-Search domain
- Go to OpenSearch console and create a domain.
- Configuration:
- Name: marvel-movies // can give any name
- Deployment type: Development and testing // To avoid large AWS bills we use the smallest instance available
- Version: 1.0 // Latest version of the tool
- Data Node: t3.small // this is the cheapest instance, which is enough for our application
- Network configuration: public // allow access to cluster over internet
- Enable Fine-grained access control (FGAC): with ‘Create Master User’ // User to login into OpenSearch Dashboard
- Access policy: Only use fine-grained access control
- Leave the rest to defaults and Review and create the domain.
- Note: Domain creation takes around 10-15mins.
2. Lambda function
- Go to the lambda console and create a new lambda function.
- Configuration:
- Function name: get-marvel-movies-from-opensearch
- Runtime: NodeJS
- Review and create the function
- Add an Environment variable
DOMAIN_URL, Example:search-marvel-movies-random-string.us-east-2.es.amazonaws.com - Note: You can get this url from AWS OpenSearch Console and make sure you remove
https://from Domain_url - Go to GitHub repo: repo, and copy-paste the lambda code
3. Now go to the api-gateway console and create an API gateway:
- Configuration:
- API type: HTTP API
- Integration: Add Integration -> select lambda we just created
- API Name: marvel-movie
- Configure routes: Method: GET, Resource path: /search, Integration target: lambda function you just created
- Review and create
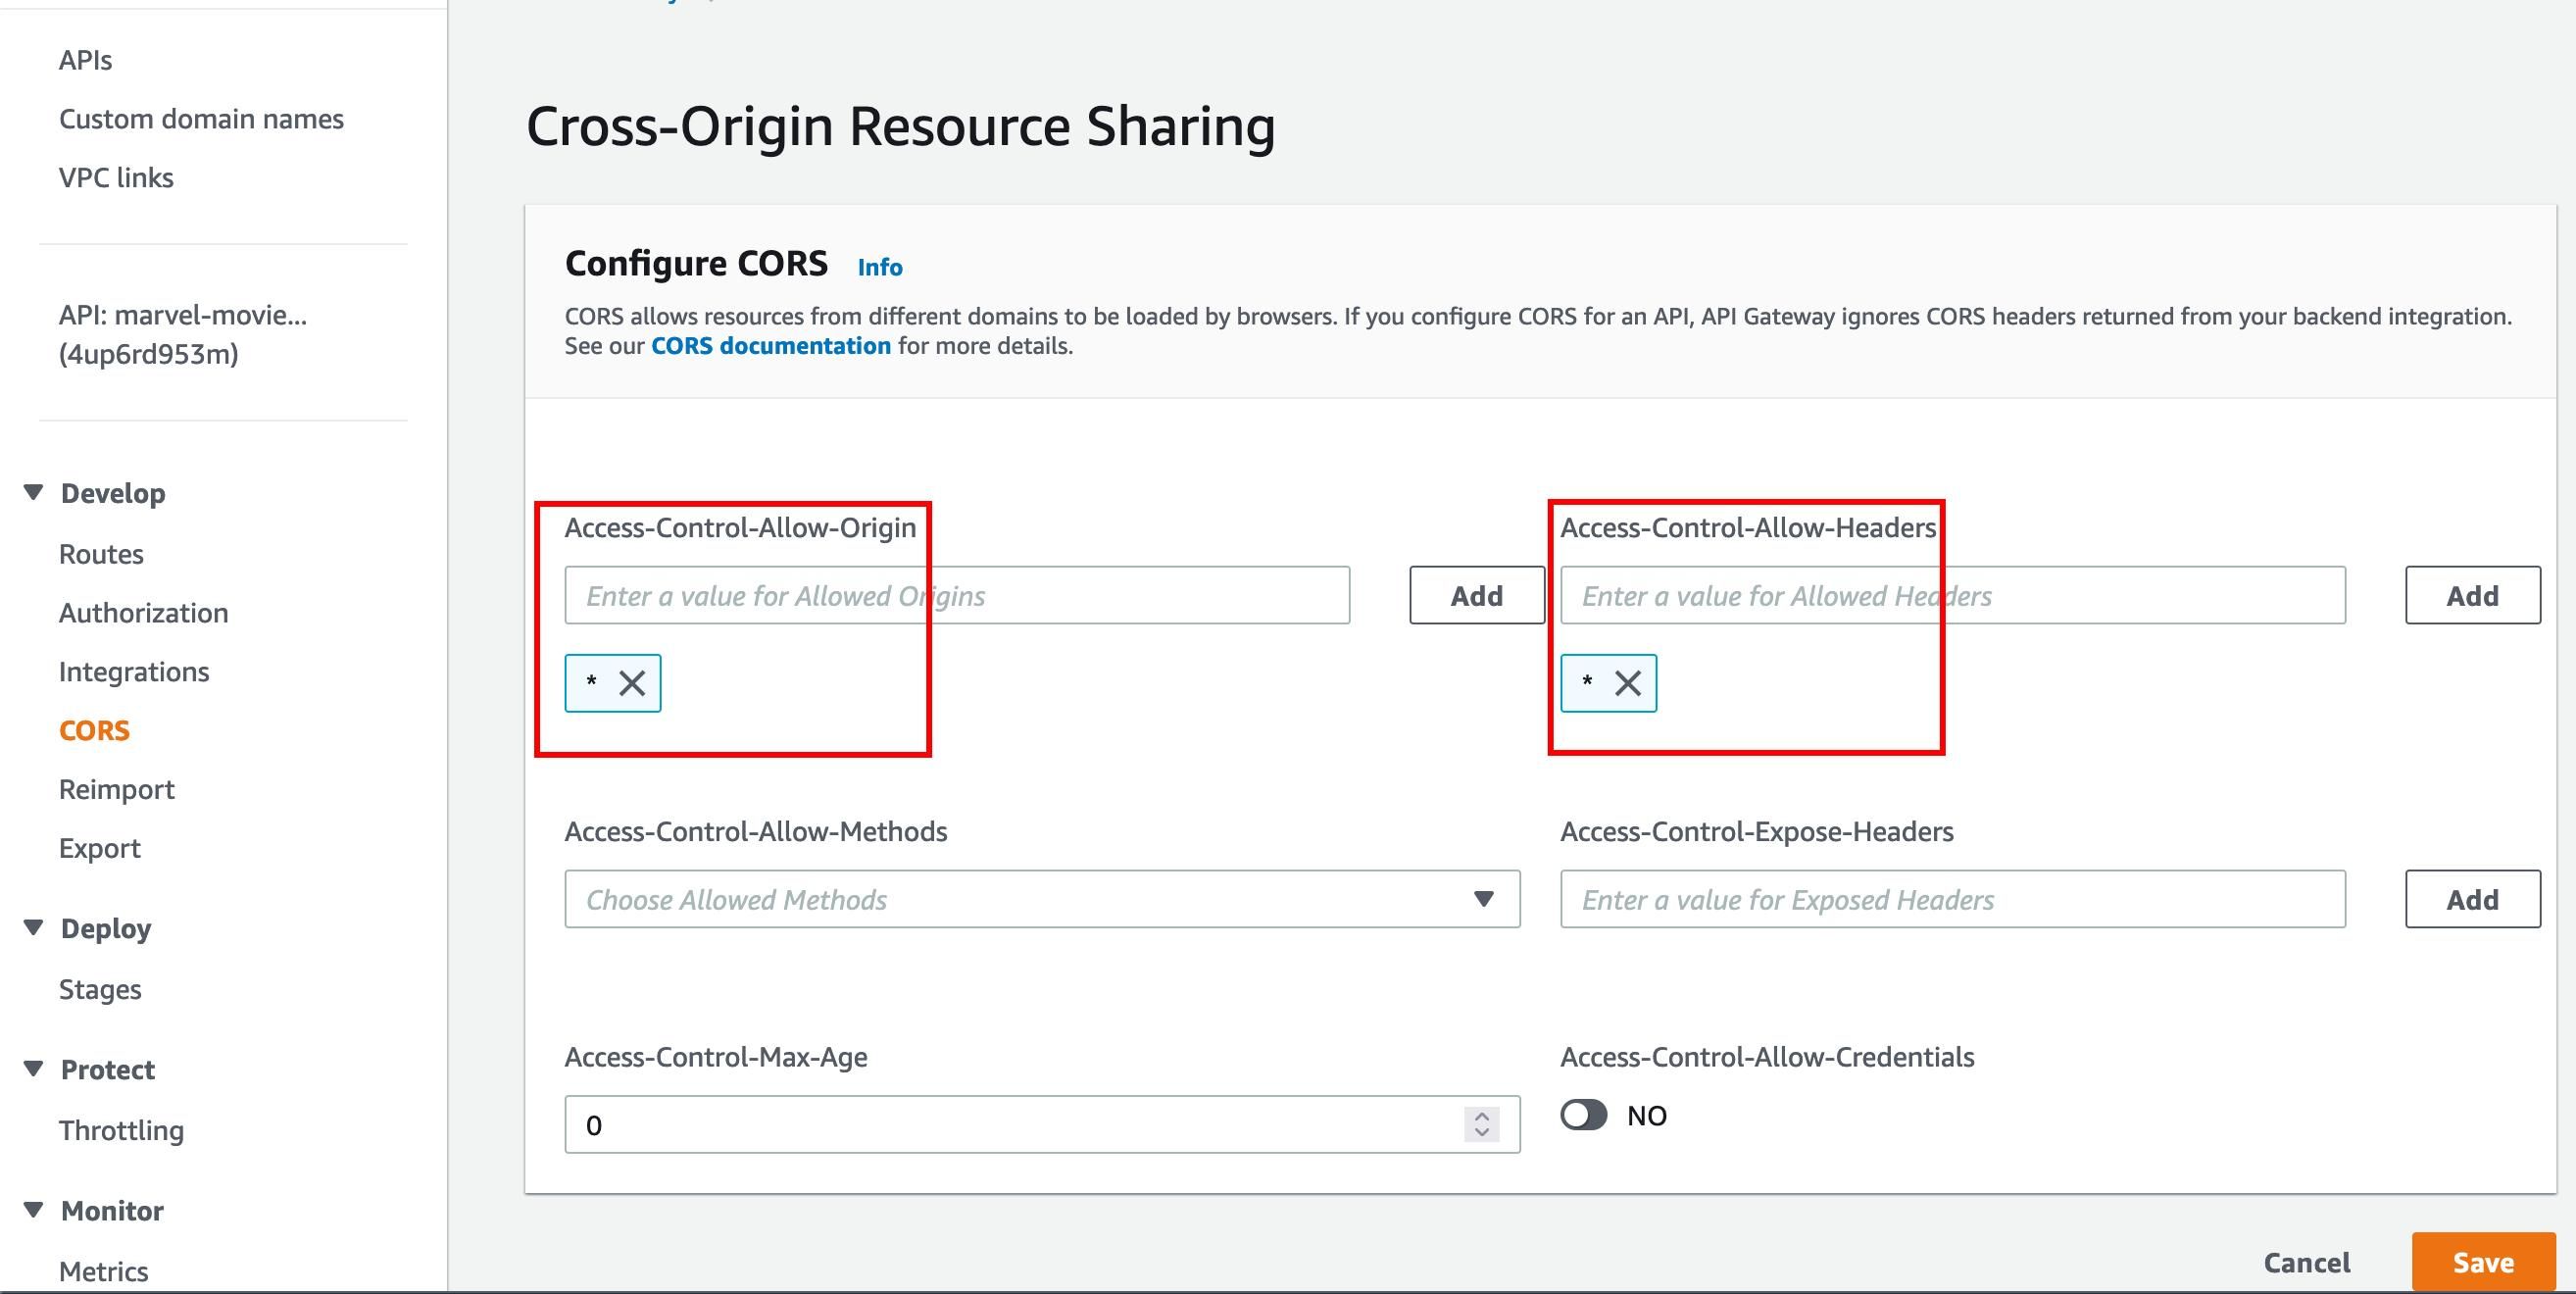
- Go to the API and configure CORS and add “*” for all the headers, so we dont get any
CORS errors.

Step 2: Upload the movie data to Open-Search domain
- Download the data-set from here and uzip it.
- Open terminal and run the following command:
curl -XPOST -u '<user-name>:<password>' 'https:// <domain-url> /marvel_movies/_bulk' --data-binary @path/to/file.json -H 'Content-Type: application/json' - Look out for this in the output:

Step 3: Giving Lambda permission to access data on OpenSearch
- When we have FGAC enabled, we need to map the role in Opensearch domain
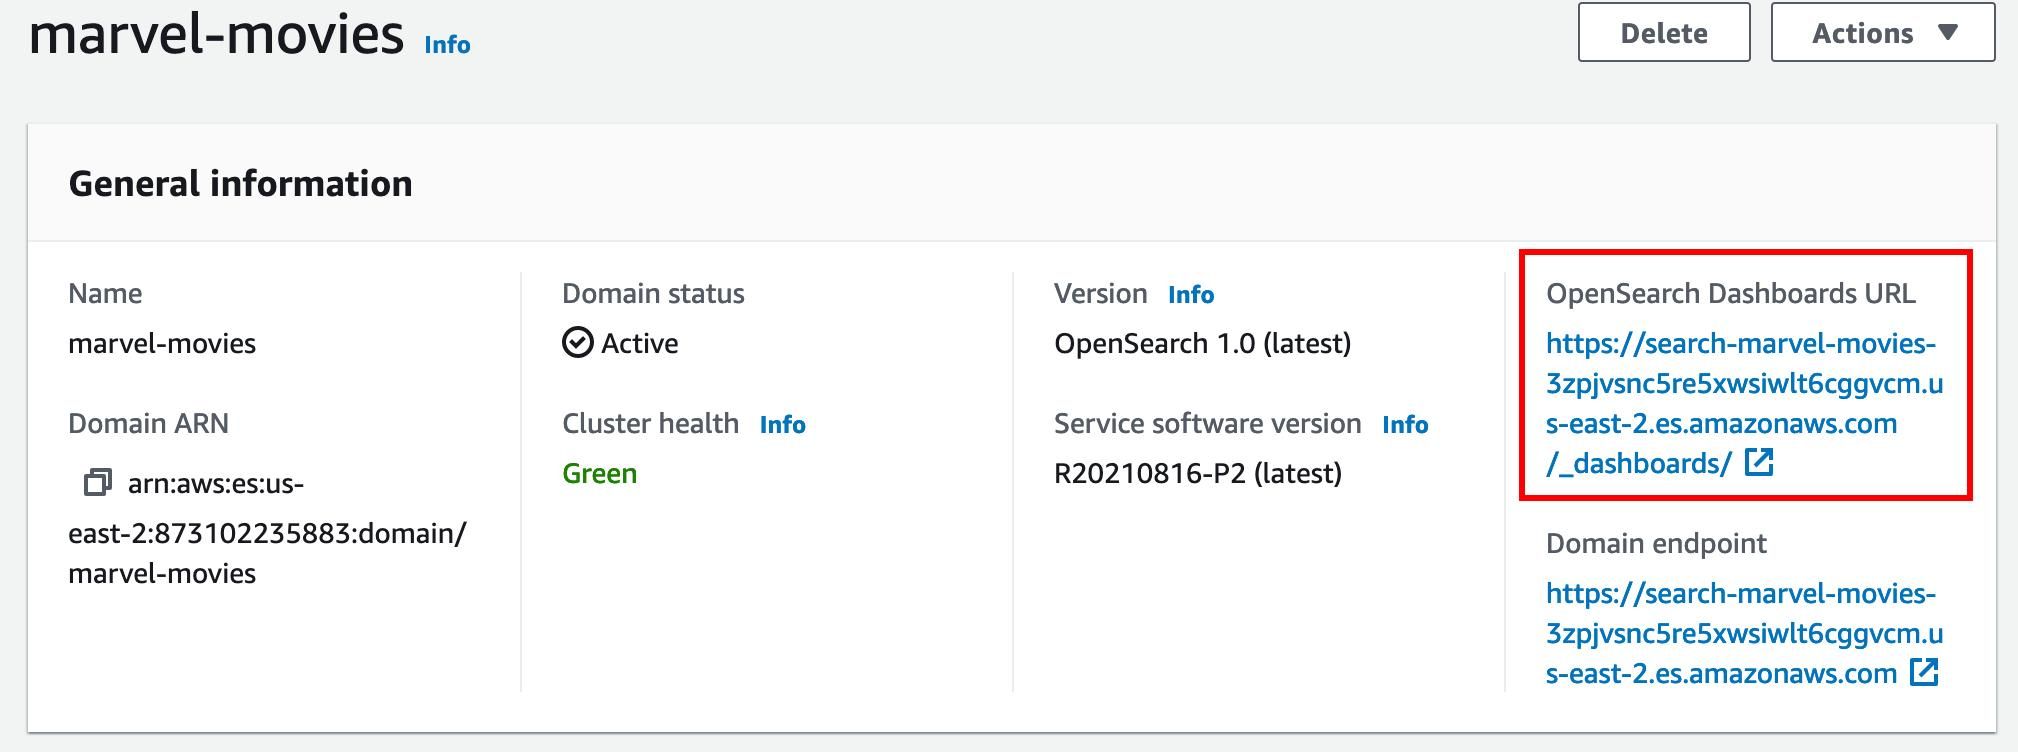
- Go to OpenSearch dashboard by clicking on the link:
![dashboard-url.jpeg]()
- Login into domain and open
securityunderOpenSearch Plugins. - Select
Roles - Note: Now either create a new role with appropriate permissions or use a existing role.
- We will use the existing role
all_access, click on it. - Now go to
Mapped usertab from the top bar and click onManage mapping. - Click on
Add another backend roleand enter thelambda IAM role ARN. - Then click on
Mapand we have added permissons.

Step 4: Setting up the front-end react app
- Clone the React app on your local system: repo
- Run
npm iin the app folder - Add the api-gw endpoint url to
REACT_APP_API_ENDPOINTin.envfile.![env-api-url.jpeg]()
- Finally run
npm start
step 5: Once we have everything in place, Let’s test our application
- Go to
http://localhost:3000![search-result.png]()


