

 ChatGPT
  Perplexity
  Gemini
  Claude AI
 Amazon OpenSearch is a powerful search and analytics engine used across organizations for log analytics, monitoring, and full text search use cases. While internal users and static credentials are sufficient for test environments, enterprise grade security requires centralized identity and access management.
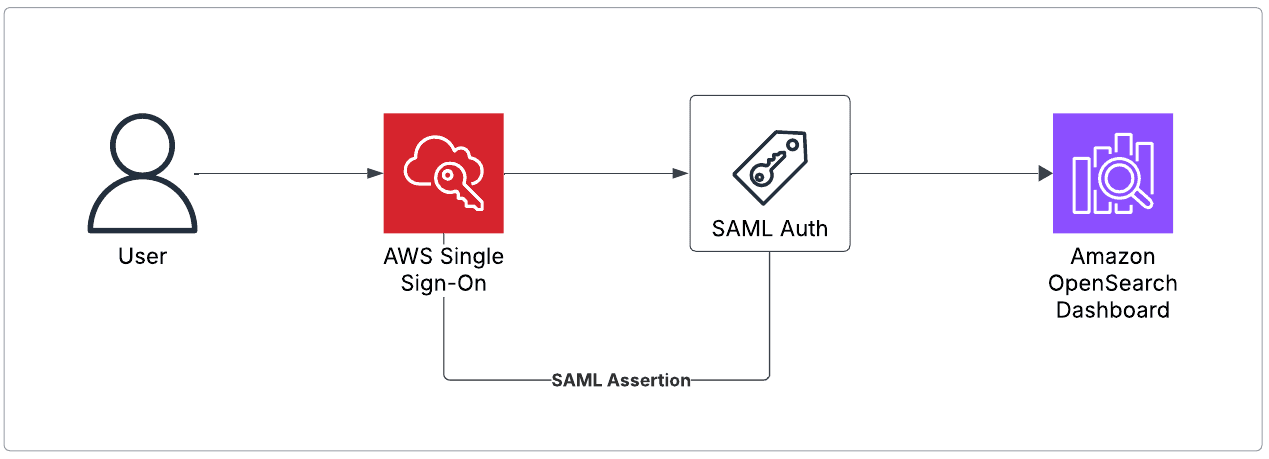
Managing access securely is crucial for any enterprise grade search setup. With AWS SSO integration using SAML, teams can log in to OpenSearch Dashboards using their existing AWS credentials without managing extra passwords. Here’s a clean, step-by-step way to make that happen.
This guide explains, integrating AWS IAM Identity Center (formerly AWS SSO) with OpenSearch using SAML 2.0 authentication. This enables users to log in to OpenSearch Dashboards using corporate credentials managed through a centralized directory.
Prerequisites
- An active Amazon OpenSearch domain with Dashboards enabled
- A custom domain name (Ex:
search.example.com) is configured for Dashboards access (recommended) - Access to AWS IAM Identity Center (SSO) with permission to create and manage applications
- Admin level access to the OpenSearch domain and AWS SSO
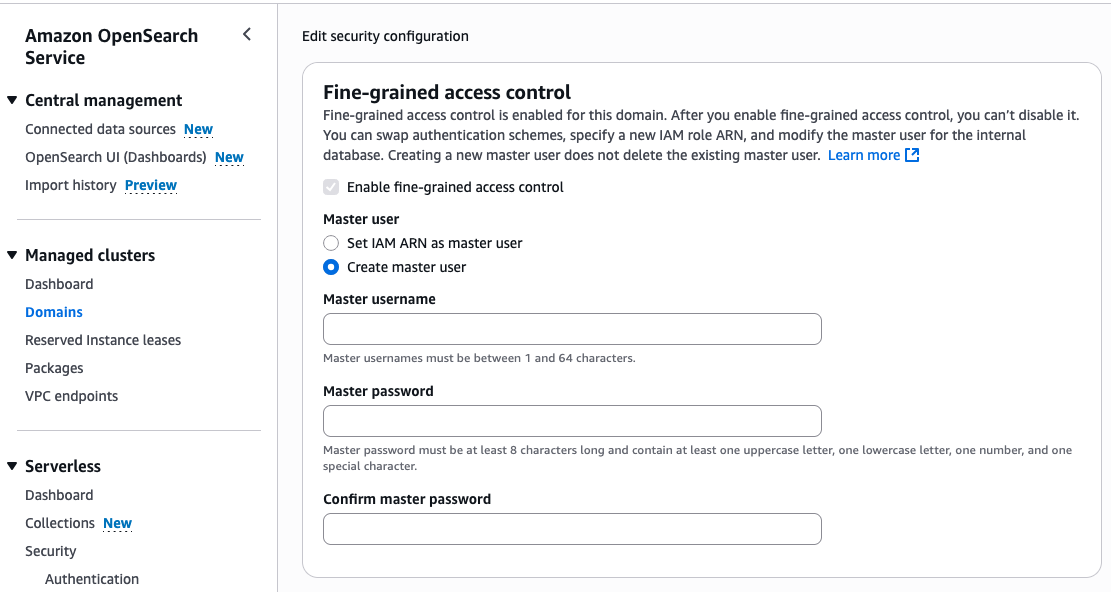
Step 1: Enable Fine Grained Access Contro
- Go to the Amazon OpenSearch Service console
- Select your OpenSearch domain
- In the Security configuration section, click Edit
- Enable:
- Fine grained access control
- Set a master user (Ex:
admin) for internal access - Or we can use the IAM user ARN to set the master user
- Save changes and wait for the configuration to apply (this can take several minutes)
Step 2: Enable SAML Authentication in OpenSearch
Once the fine grained access control is enabled, we can follow the steps below to set up SAML authentication.
- In the domain’s Security configuration section, scroll to SAML authentication
- Enable the SAML authentication checkbox
- Note the following:
- SP initiated SSO URL
- Service Provider Entity ID
These values will be used while configuring the IAM Identity Center application.
Step 3: Create a SAML Application in IAM Identity Center
- Go to the IAM Identity Center console
- Navigate to Applications and click Add application
- Choose the option: I have an application, then select SAML 2.0
- Fill in the following fields:
- Display name: Ex:
OpenSearch Dashboards - Provide description
- Download the XML file from “IAM Identity Center SAML metadata file”
- Set the session durations: Ex: 1 hour
- Application start URL: your custom Dashboards URL (Ex:
https://search.example.com/_dashboards)- This provides the option to go to the dashboard directly from the AWS SSO access portal’s application tab.
- ACS URL: Fill in the value “SP-initiated SSO URL” which is copied from Step 2
- SAML Audience: Fill in the value “Service Provider Entity ID” which is copied from Step 2
- Display name: Ex:
- Save the application
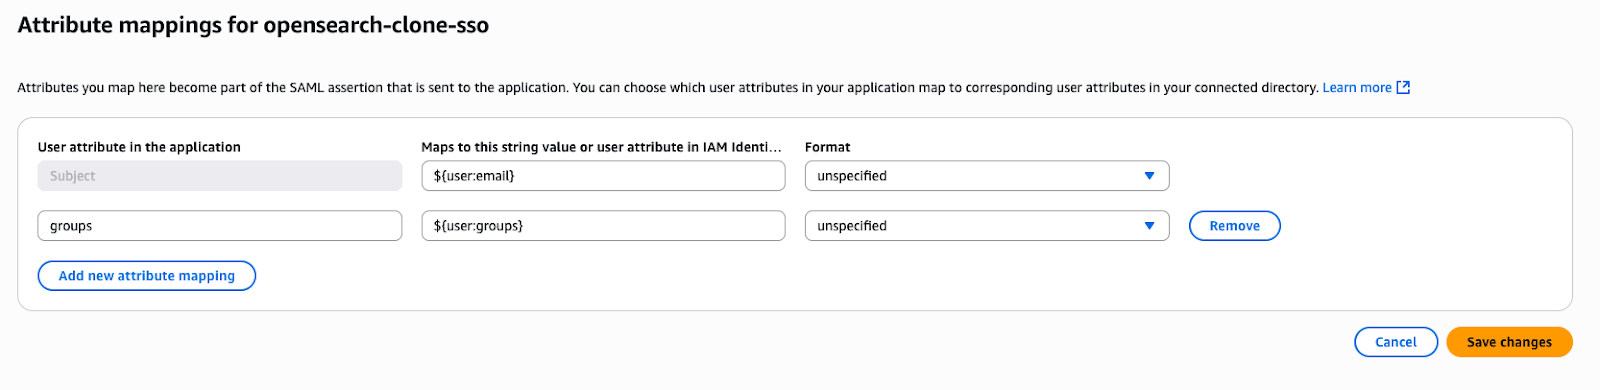
Step 4: Configure Attribute Mappings
- Inside the created SAML application, click Actions → Edit attribute mappings
- Add the following mappings:
Subject→${user:email} → unspecifiedgroups→${user:groups} → unspecified
- Save the configuration
Step 5: Assign Users or Groups
- In the SAML application, go to Assigned users and groups
- Choose Assign users or groups
- Search username or email or the group name
- Select the identities you want to add to OpenSearch
- Save
Step 6: Import SAML Metadata into OpenSearch
In IAM Identity Center, download the SAML metadata XML file for the application
Go to your OpenSearch domain’s Security configuration section
In the SAML authentication section, click Import from XML
Set the following fields:
- Roles key:
groups (second attribute name from sso app attribute mapping Step 4) - Subject key: Keep it blank
- Session timeout: Ex: 60 minutes
- Roles key:
Save changes and wait for the domain to update
By default, Subject Key uses the NameId element from SAML assertion for username (email), If SAML assertion is passing email in the different name other than NameID then we have to set the Subject Key accordingly
Roles Key will get mapped to backend roles in opensearch roles and permissions, which is typically a groupID or a group name from AWS IAM users
Step 7: Test Login via SSO
- Navigate to your OpenSearch Dashboards using the custom domain
Example:https://search.example.com/_dashboards - You should be redirected to the AWS SSO login page
- After authenticating, you’ll be redirected back to Dashboards
- You should see OpenSearch Dashboards with the assigned permissions
Alternatively, users can also log in through the AWS SSO portal and launch OpenSearch from the Applications tab.
Common Troubleshooting Tip
Issue: You are redirected to a blank screen or login fails.
Possible Cause: You used the OpenSearch VPC endpoint URL instead of a custom domain when using the browser based access.
Resolution: Always use the custom domain URL when using SAML, as VPC endpoints do not support browser based SAML authentication redirects.
If we are accessing programmatically from the lambda or any other compute service both VPC and custom domain will work.
Conclusion
By integrating Amazon OpenSearch with AWS SSO using SAML, organizations can have centralized identity management and fine grained access control without managing internal users and passwords. This setup is essential for production environments that require compliance, auditability, and ease of user access across teams.