ChatGPT
  Perplexity
  Gemini
  Claude AI
 Introduction
Smart devices such as Amazon’s firestick and echo, Google nest, etc have made their way to our homes. I decided to leverage these devices to increase my productivity. Most of my workplace communications happen over slack channels. I made some tweaks to send my slack notifications to echo dot. There is also a possibility to filter messages based on your needs. For example, if I am expecting an important message regarding a meeting, I can filter the messages I receive and get notified by echo only if I get the message containing the word “meeting". I eliminate the need to keep checking slack or sift through the other messages.
Let’s split the entire process into sub tasks:
Notify Me Skill
Notify Me is an Alexa skill that we will use to notify Alexa devices. We can also design custom skills but for our purpose this skill is apt.
AWS CDK App
We will use the CDK platform to create a serverless app. We create an API Gateway to which the slack events are passed. The API request triggers a Lambda that sends the notification message.
Slack Events API
Create a new App in your slack workspace and set the necessary permissions. It will require a Request URL.

Step 1: Enable Notify Me Skill
Go to the following link and log into your amazon account connected with the device. Click on the enable button. In case of trouble, try enabling the skill via the Alexa app on your mobile.
Give your device the command "Alexa, open Notify Me" and the skill will introduce itself and send your access code via email.
Once you have the access code, your device is set to receive notifications. If you did not receive your access code, follow the steps here to get them.
Step 2: The CDK App
Install NodeJS suitable for your build from here.
Install AWS CLI by following the instructions here.
Install AWS CDK from terminal/command prompt:
npm install -g aws-cdkConfigure your aws profile by following the instructions here.
Create a project directory and navigate to that directory:
mkdir notify-lex
cd notify-lex
Initialize the app using the following command:
cdk init app --language javascriptReplace the code in the stack file (notify-lex/lib/notify-lex-stack.js) and save it.
const cdk = require('aws-cdk-lib');
const lambda = cdk.aws_lambda;
const apigateway = cdk.aws_apigateway;

class NotifyLexStack extends cdk.Stack {
constructor(scope, id, props) {
    super(scope, id, props);

    const notifyFunction = new lambda.Function(this, 'Notify Function', {
    runtime: lambda.Runtime.NODEJS_14_X,
    handler: 'index.handler',
    code: lambda.Code.fromAsset('lambda')
    });

    const api = new apigateway.RestApi(this, "Notification API", {
    restApiName: "Notification Service",
    description: "This api is hit when we have an incoming notification"
    });

    const notifyIntegration = new apigateway.LambdaIntegration(notifyFunction);
    api.root.addResource('slack').addResource('events').addMethod('POST', notifyIntegration);

    }
}

module.exports = { NotifyLexStack }
Create a folder called lambda and navigate inside it. Create an npm package and install the dependency axios.
mkdir lambda
cd lambda
npm init -y
npm install axios
cd ..
Create a file called index.js and type the following code and save it.
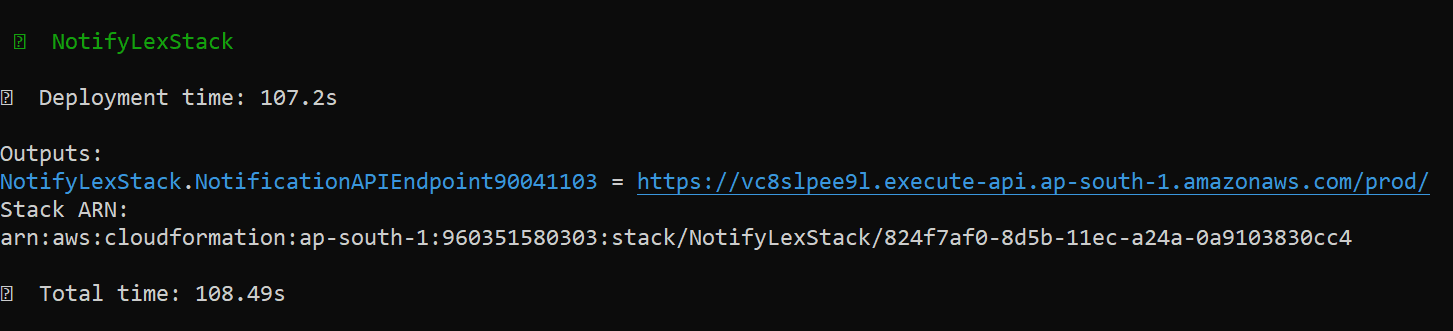
const axios = require('axios');

exports.handler = async (event, context, callback) => {
    const data = JSON.parse(event.body);
    const response = {
        statusCode: 200,
        body: data.challenge
    };
    return response;
}
Execute the command in terminal to deploy the CDK app. Type y to confirm the deployment.
cdk deploy –profile <Your AWS profile name>
Do you wish to deploy these changes (y/n)? y
Once the app is deployed, you will see an output with the URL. Keep note of this URL.
Step 3: Creating a Slack App
- Follow the link here and sign in to your slack account. Click on Create an app. Choose From scratch from the given options.

- Name your app and choose the workspace where you want to install it and click Create App.

- This page contains an overview of your app in addition to important credentials.

- Navigate to the OAuth & Permissions on the left sidebar and scroll down to the User Token Scopes section. Click Add an OAuth Scope and select all the below scopes.

- Scroll up to the top of the OAuth & Permissions page and click Install App to Workspace. You’ll be led through Slack’s OAuth UI, where you should allow your app to be installed in your development workspace.

- Once you authorize the installation, you’ll land on the OAuth & Permissions page and see a Bot User OAuth Access Token.

- Click Event Subscriptions on the left sidebar. Toggle the switch labelled Enable Events.

Add your Request URL. Slack will send HTTP POST requests corresponding to events to this Request URL endpoint.The request URL will be
<URL from previous step>/slack/events.Example:
If this is the URL: https://vc8slpee9l.execute-api.region.amazonaws.com/prod
Request URL will be: https://vc8slpee9l.execute-api.region.amazonaws.com/prod/slack/events
It will automatically process on adding the URL and you should see the verified sign.

- Scroll down to the Subscribe to events on behalf of users and select the below workspace events. Click on Save changes.

Step 4: Final Integration
Go to the CDK app and open the index.js file (notify-lex/lambda/index.js). Update the code and replace the ACCESS CODE with the one you received in Step 1.
const axios = require('axios');

exports.handler = async (event, context, callback) => {
    const data = JSON.parse(event.body);
    try {
        console.log(data);
        await axios({
            method: 'post',
            url: 'https://api.notifymyecho.com/v1/NotifyMe',
            data: {
                accessCode: 'ACCESS CODE',
                notification: `Message: ${data.event.text}`
            }
        });
    } catch (err) {
        console.log(err);
    } finally {
        const response = {
            statusCode: 200,
            body: 'User notified'
        };
        return response;
    }
}
Redeploy the app from terminal
cdk deploy –profile <Your AWS profile name>Once you send a message in Slack, the Alexa device will notify you with an alarm tone and light up yellow. Ask for the message with the command, Alexa, What are my notifications?. Alexa will give you the message.
Uninstallation
Delete CDK App.
cdk destroy –profile <Your AWS profile name>Delete the App from the Slack workspace.
Go to this link, select your app and scroll to the end of the page. Click on Delete App and confirm.
The repository can be found here.