ChatGPT
  Perplexity
  Gemini
  Claude AI
 Streaming AI
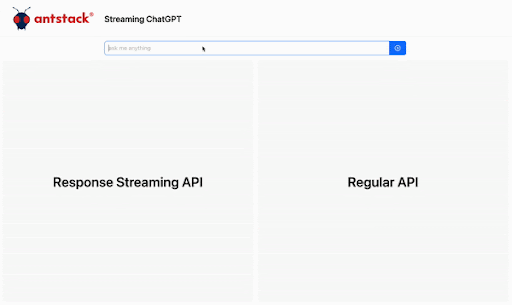
Generative AI models generally expose APIs to interact with them. Using these APIs we can build AI enabled applications. Once you start building these applications, you will notice that the APIs response times are quite large, around 10-30 seconds and sometimes much higher than that for complex applications. Luckily some of the AI models support streaming. By leveraging this feature, you can send the data incrementally from the APIs rather than waiting for the entire data set. When building serverless applications on AWS with Generative AI capabilities, we can leverage AWS Lambda’s response streaming functionality to build snappy, responsive applications.
Introduction to Lambda Response Streaming
AWS Lambda, one of the core serverless offerings from AWS, is a powerful compute engine and has a variety of use cases. AWS announced a new functionality in April 2023 called response streaming. What is it? Instead of waiting for the lambda to complete execution and then receiving the response data, you can now send the data instantly to the client as it becomes available. This enables your user to have a much better user experience. Check out the announcement page here. Here’s one of the use cases of how this functionality can improve user experience. Here is an example of the difference response streaming can make for AI Applications.
Generative AI and Lambda Response Streaming
From a programming language perspective, python is dominating this space with libraries like langchain making it easier to build AI based applications. Naturally, building AI applications on AWS is one of the progressive paths, and Lambda being the core of serverless we will definitely consume it, but this is where it gets tricky. Although python is one of the standard programming languages supported by AWS Lambda, response streaming is not directly supported on python runtime. Lambda response streaming is supported on NodeJs runtimes and custom runtimes. So, we need to build a custom runtime to enable response streaming on a python environment.
Lambda Custom Runtime
Before creating an effective custom runtime environment there are some concepts you should familiarise yourself with. When you trigger a lambda, it sends an event to a Lambda Runtime API. There are 2 main APIs, one for polling the next event and one for sending the response to the invoked event. And a bootstrap file controls the invocation of these APIs. It is the interface between the lambda service and the runtime API. Here’s a detailed explanation of what happens inside a lambda invocation
What happens inside an AWS Lambda
If you are new to building a custom runtime environment, check out this blog here.
Building a custom runtime on AWS Lambda
The documentation around using a custom runtime environment is poor. Here’s the official AWS Documentation link for implementing response streaming. The key aspect is to change the way the lambda response API is triggered. The API call needs to be updated with certain headers to let Lambda know to stream the data. Post that, you need to have a handler file which can send the response data in chunks.
The custom runtime allows you to control the bootstrap file, which is used to connect with the Lambda Runtime API and modify the required parameters.
Every language has a generative function capability which can be used to send the data in chunks rather than waiting for the entire data. In python, return statement is used to send the complete data whereas yield is used in generative functions to send data in chunks.
Streaming Bedrock on Python runtime
In this blog, we will be walking through the steps and configurations required for creating a response streaming lambda which is streaming the data from Amazon Bedrock. We will be using the cohere base LLM as it is the only LLM in bedrock that supports streaming. Before getting started check out this blog on Amazon Bedrock.
Getting started with Amazon Bedrock
For impatient readers, here’s the repo link to clone and try it out https://github.com/antstackio/a2lrs
Now, let's get into the code. There are 4 files required to complete this functionality
- bootstrap
- Dockerfile
- lambda_function.py
- requirements.txt
1. bootstrap
This file allows you to have control over the runtime api. This is where we will change the parameters of the lambda response api, thereby allowing streaming to happen.
#! /usr/bin/env python3.11
import os, sys, requests,json

# Get Lambda Environment Variables
AWS_LAMBDA_RUNTIME_API = os.getenv("AWS_LAMBDA_RUNTIME_API")
LAMBDA_TASK_ROOT = os.getenv("LAMBDA_TASK_ROOT")

# Set path to import your handler function
sys.path.append(LAMBDA_TASK_ROOT)
from lambda_function import handler

# API URL Templates and Headers
INVOCATION_URL = f"http://{AWS_LAMBDA_RUNTIME_API}/2018-06-01/runtime/invocation/next"
RESPONSE_URL_TEMPLATE = "http://{}/2018-06-01/runtime/invocation/{}/response"
HEADERS = {
      "Lambda-Runtime-Function-Response-Mode": "streaming",
      "Transfer-Encoding": "chunked",
}

# Run a loop to get the lambda invocation events
while True:
# When Lambda invocation event is received fetch the event
      response = requests.get(INVOCATION_URL, stream=True)
      # Extract event data
      event_data = json.loads(response.text)
      # Extract invocation id
      invocation_id = response.headers.get("Lambda-Runtime-Aws-Request-Id")
      # Create response URL
      response_url = RESPONSE_URL_TEMPLATE.format(AWS_LAMBDA_RUNTIME_API, invocation_id)
      # Post the response
      requests.post(response_url, headers=HEADERS, data=handler(event_data, None))
What’s happening in this file? The bootstrap file continuously polls for the next AWS Lambda invocation and takes action when a new event is received. We need to extract the event data and invocation id. ICYMI, the invocation id the unique identifier for every lambda execution. Then we format the response URL to have the unique invocation id as part of the URL. This makes sure that the responses are sent to the right invocation. Finally, we post the response to the formatted response url. In the sample shown, we are calling the handler function directly. The handler function is designed to send the data in chunks and since the headers of the response URL are set to stream, the data will be streamed for the lambda invocations.
2. Dockerfile
This file allows you to create the custom image required for the runtime. The code for the file can be found here
The docker file is straightforward. We install the ssl module, python3.11 and move the bootstrap file and the lambda handler file to their respective locations. To know more about what exactly happens in the an AWS Lambda, check out the blog here
3. Lambda_function.py and requirements.txt
The requirements file contains the required libraries for the lambda handler. To access the bedrock apis, the lambda needs to have the latest boto3 library. The explanation for the lambda handler file is as follows.
First we import the required packages and initialise the bedrock client
import json, boto3
client = boto3.client("bedrock-runtime")
Then, inside the handler function, we call the bedrock api
response_stream = client.invoke_model_with_response_stream(
    body=json.dumps({"prompt": event["body"], "max_gen_len": 512}),
    modelId="meta.llama2-13b-chat-v1",
    accept="application/json",
    contentType="application/json",
)
In our example, we are using the meta.llama2-13b-chat-v1 model as it supports streaming. For other supported models you can login to the AWS Console and use the playground in the Bedrock console to see the schemas, or you can refer to the detailed documentation here.
After the bedrock api is initialised, we need to capture the response stream from the api. That is done as follows
status_code = response_stream["ResponseMetadata"]["HTTPStatusCode"]
    if status_code != 200:
        raise ValueError(f"Error invoking Bedrock API: {status_code}")
    for response in response_stream["body"]:
        json_response = json.loads(response["chunk"]["bytes"])
        if llmType == "meta.llama2-13b-chat-v1":
            print(json_response["generation"])
            yield json_response["generation"].encode()
        elif llmType == "cohere.command-text-v14":
            if "text" in json_response.keys():
                if json_response["text"] != "<EOS_TOKEN>":
                    yield json_response["text"].encode()
Here, we check for a valid status code, then load the chunks. The code is specific to the cohere response schema and will vary for other LLMs. As we receive the response stream, we convert the string to bytes by encoding it and yield the response. With this implementation, the lambda handler function will continuously respond with the incoming bedrock stream.
Deployment
We are going to use the SAM CLI for deployment. The SAM CLI takes care of packaging the image and creating the ECR required for the docker images and eases the entire deployment process.
CustomImageLambda:
Type: AWS::Serverless::Function
Metadata:
	Dockerfile: Dockerfile
	DockerContext: ./custom-runtime
Properties:
	PackageType: Image
	Timeout: 900
		MemorySize: 1024
		Policies:
			- AdministratorAccess
		FunctionUrlConfig:
		AuthType: NONE
			InvokeMode: RESPONSE_STREAM

CustomImageUrlPublicAccess:
	Type: AWS::Lambda::Permission
	Properties:
		FunctionName:
			Ref: CustomImageLambda
		FunctionUrlAuthType: NONE
		Action: lambda:InvokeFunctionUrl
		Principal: "*"
Using SAM, we will create a lambda function, lambda url, enable response stream for the lambda url and create a public access permission for the lambda. There are 2 main resources used for the custom runtime, the lambda function (AWS::Serverless::Function) and the public access permission for the lambda function (AWS::Lambda::Permission). To use AWS::Serverless::Function, you need to add the serverless transform at the beginning of the cloudformation. If for any reason you don’t wish to use the serverless transform, then you need to split the AWS::Serverless::Function into AWS::Lambda::Function and AWS::Lambda::Url. The custom-runtime folder mentioned in the DockerContext has the bootstrap, Dockerfile, lambda_function.py, and the requirements.txt.
Once the setup is complete, run the sam build and sam deploy commands to deploy the resources in your AWS account. Once the deployment is complete, open the lambda from the AWS console to get the lambda url. And we’re done, use the lambda url in your client implementation to stream the data from lambda.
Note :
- Lambda Response Streaming can only be viewed through a client that is configured to receive streamed data. The AWS Lambda Console does not support this and you will not be able to view it from the console.
- Lambda Response Streaming needs to be consumed via a Lambda URL and cannot be consumed via the API Gateway.