ChatGPT
  Perplexity
  Gemini
  Claude AI
 Building a deep learning project locally on your machine is a great feat. What's even better is to actually deploy the project as an application in the cloud. Deploying an application gives a lot of knowledge as you will encounter a lot of issues which helps you understand the project on a great level. This blog covers how to build, train and deploy an Image Classifier using Amazon SageMaker, EFS, Lambda and even more.
There is a lot of content out there which details how to perform Image Classification using SageMaker, Lambda etc. While they were all great, I encountered a great number of issues while deploying my Image Classifier. Great number of things had to be configured properly, a lot of application breaking permission issues, all of which were not specified properly in any of the content I referred to, and that is the motivation behind writing this blog.
Disclaimer: This blog just concentrates on how to setup AWS Services around Image Classification. This blog is NOT a guide on how to perform an actual Image Classification. The blog assumes you have basic knowledge on AWS and Computer Vision.
Modules
I have divided this blog into three parts for better understanding about the tasks that we are going to achieve.
Part 1 covers building and training an Image Classifier using TensorFlow using Amazon SageMaker. Setting up SageMaker Studio, environment configuration, building and training the model is covered here.
Part 2 guides through on how to create and set up an EFS instance to later attach to a Lambda Function, and transfer the model from S3 to EFS using a service called DataSync. This part also covers how to properly configure a Security Group that will be attached to an EFS.
Part 3 details deploying a Lambda function using AWS SAM. Attaching EFS endpoint, permission policies and creating an API endpoint for inference will be covered here.
Services Used:
- SageMaker
- Elastic File System(EFS)
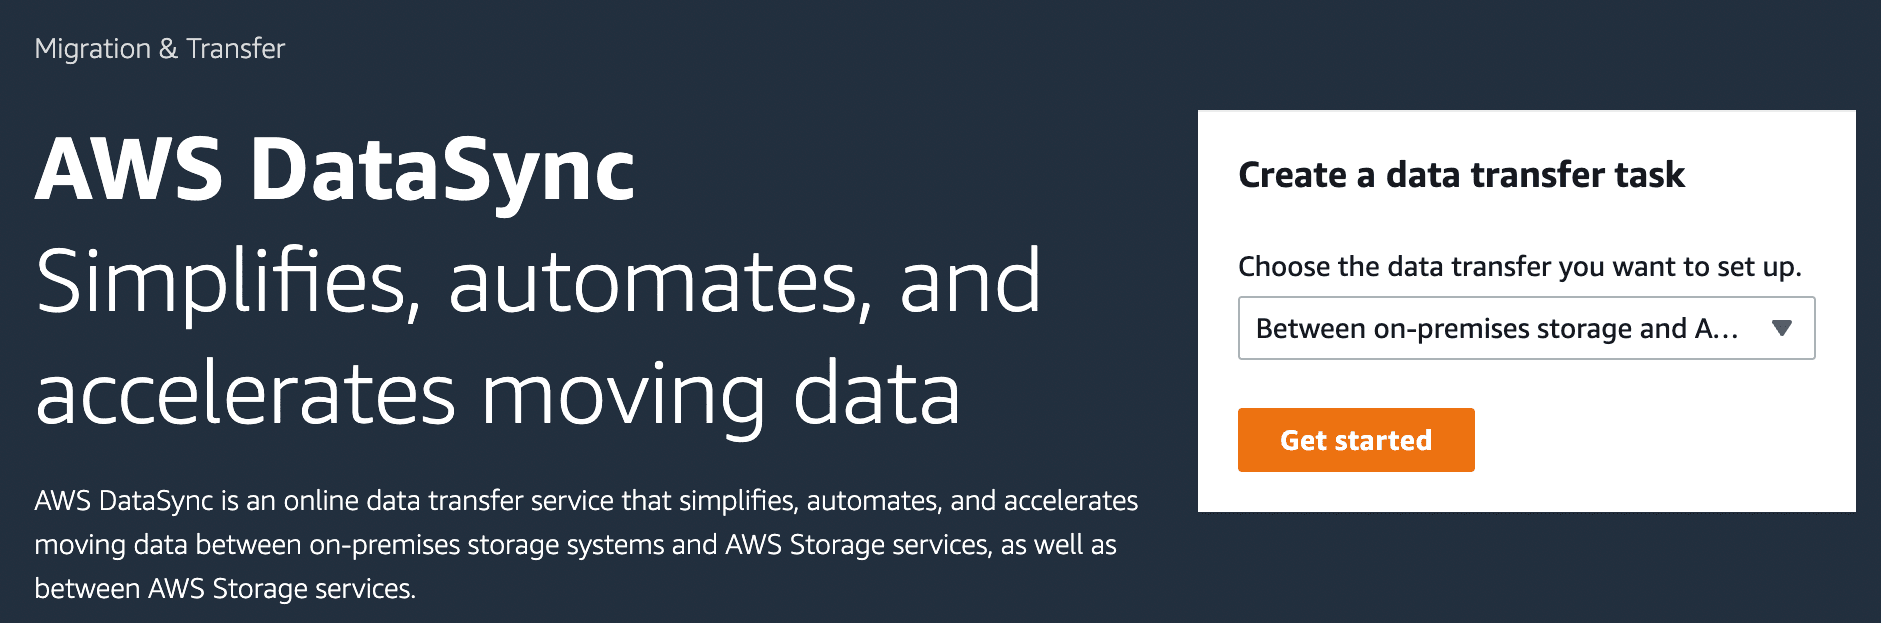
- DataSync
- Lambda
- API Gateway
- AWS SAM
Part 1: Building and Training an Image Classifier on Amazon SageMaker
To train a model on SageMaker, SageMaker Studio has to be set up first. Go to the Control Panel in Amazon SageMaker and add a user.
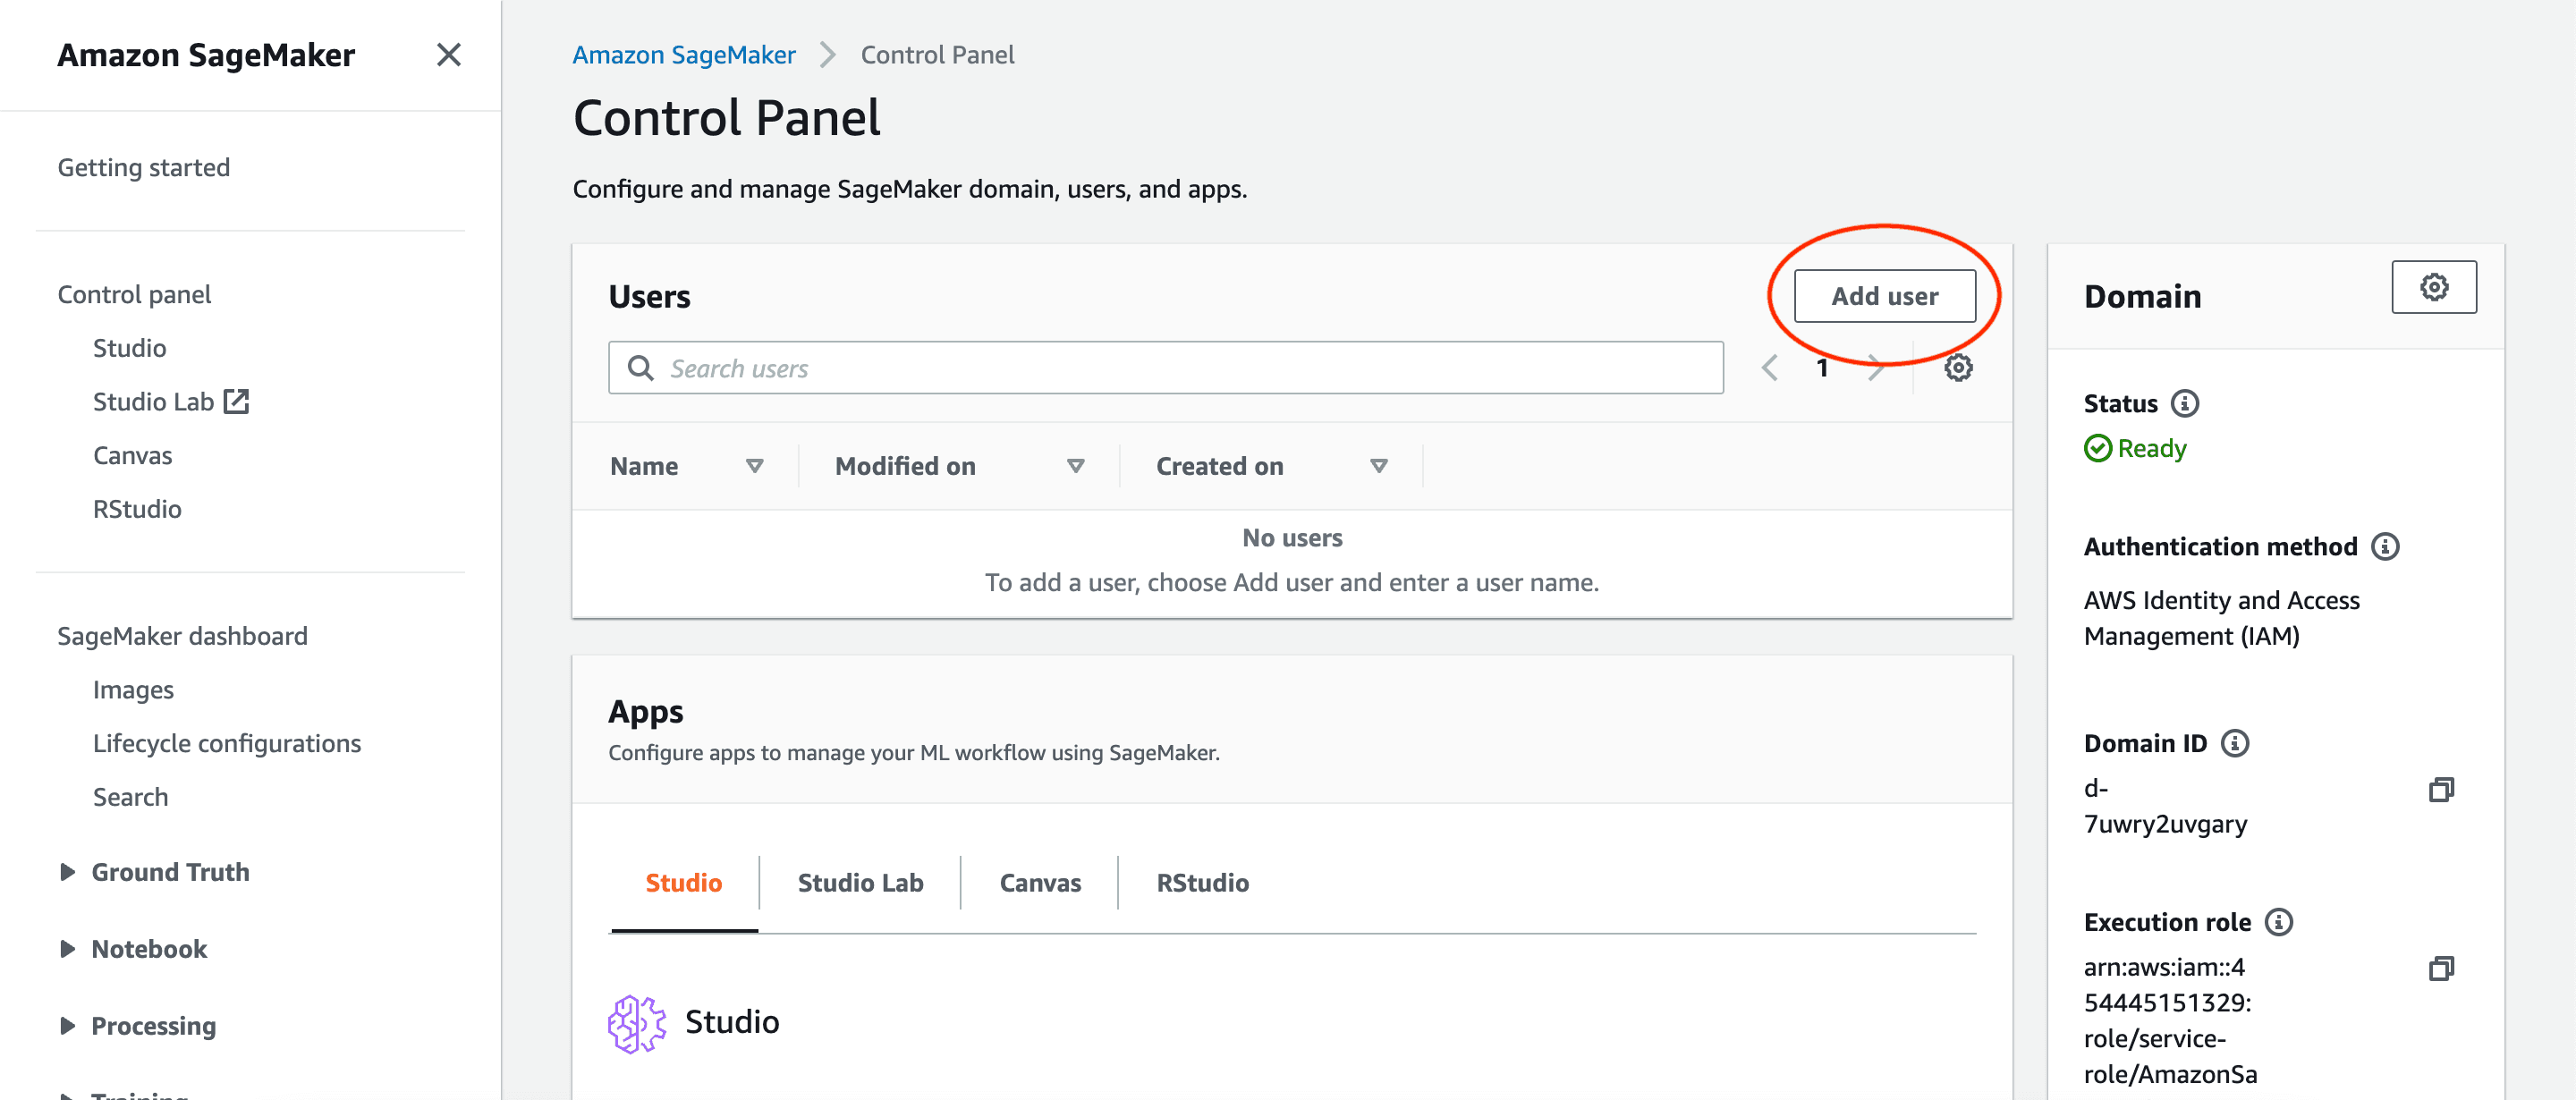
Change the default name if needed and proceed through the rest of the defaults. Make sure that Jupyter Lab 3.0 is selected.
After creating a user, launch the SageMaker Studio.
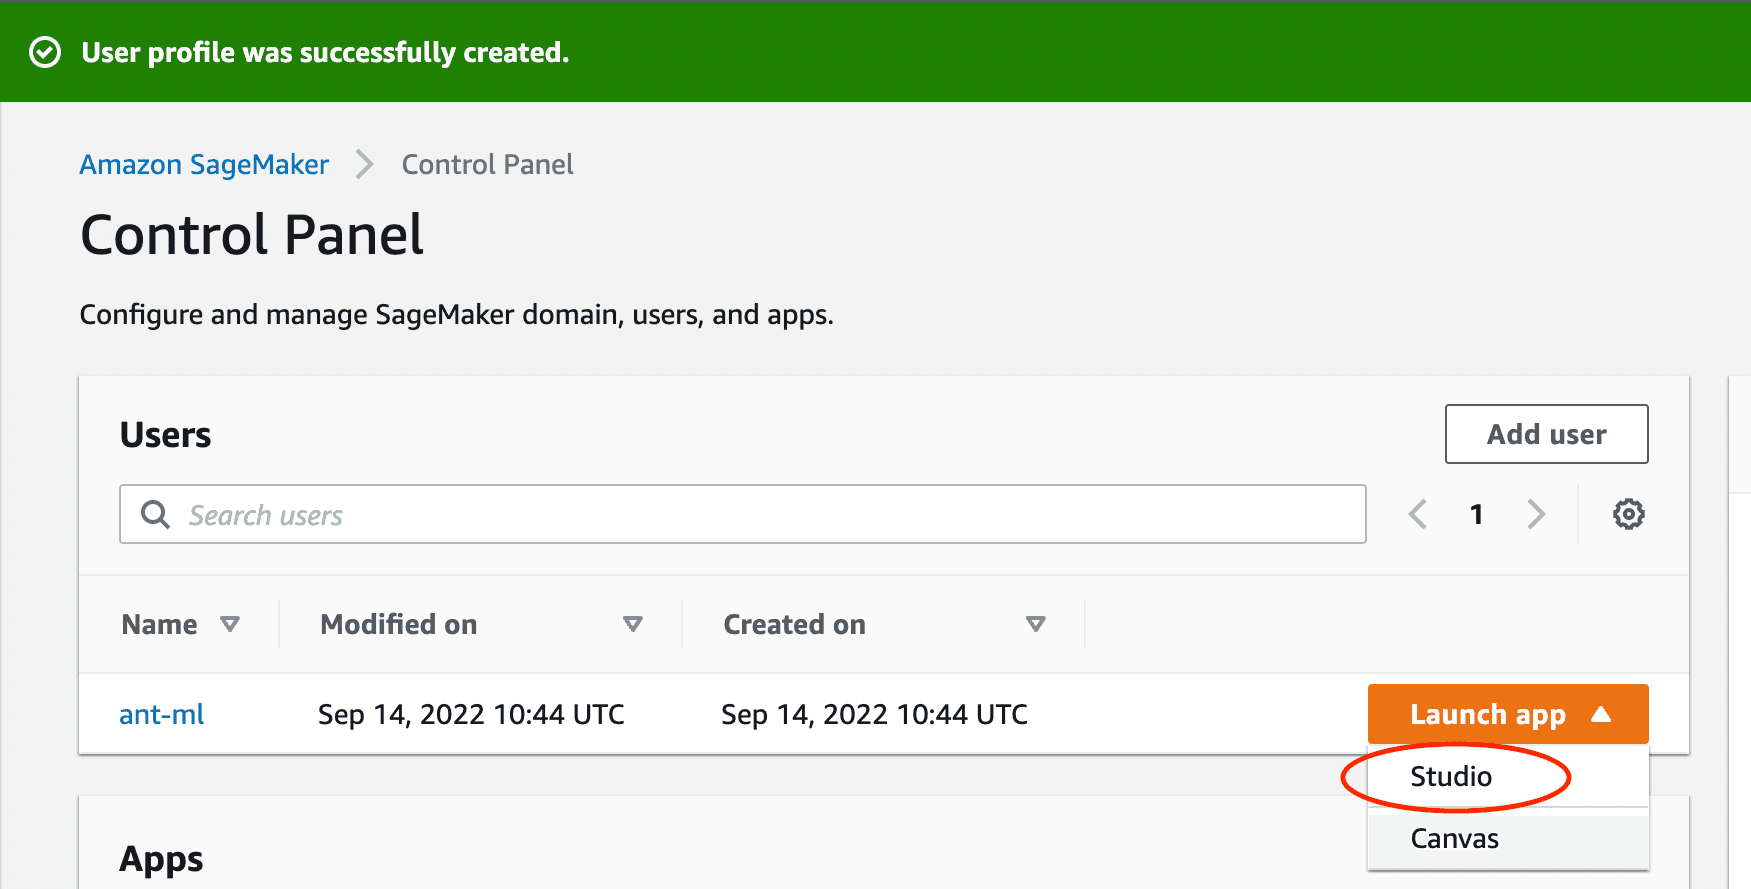
You will then be directed to SageMaker Studio's dashboard.
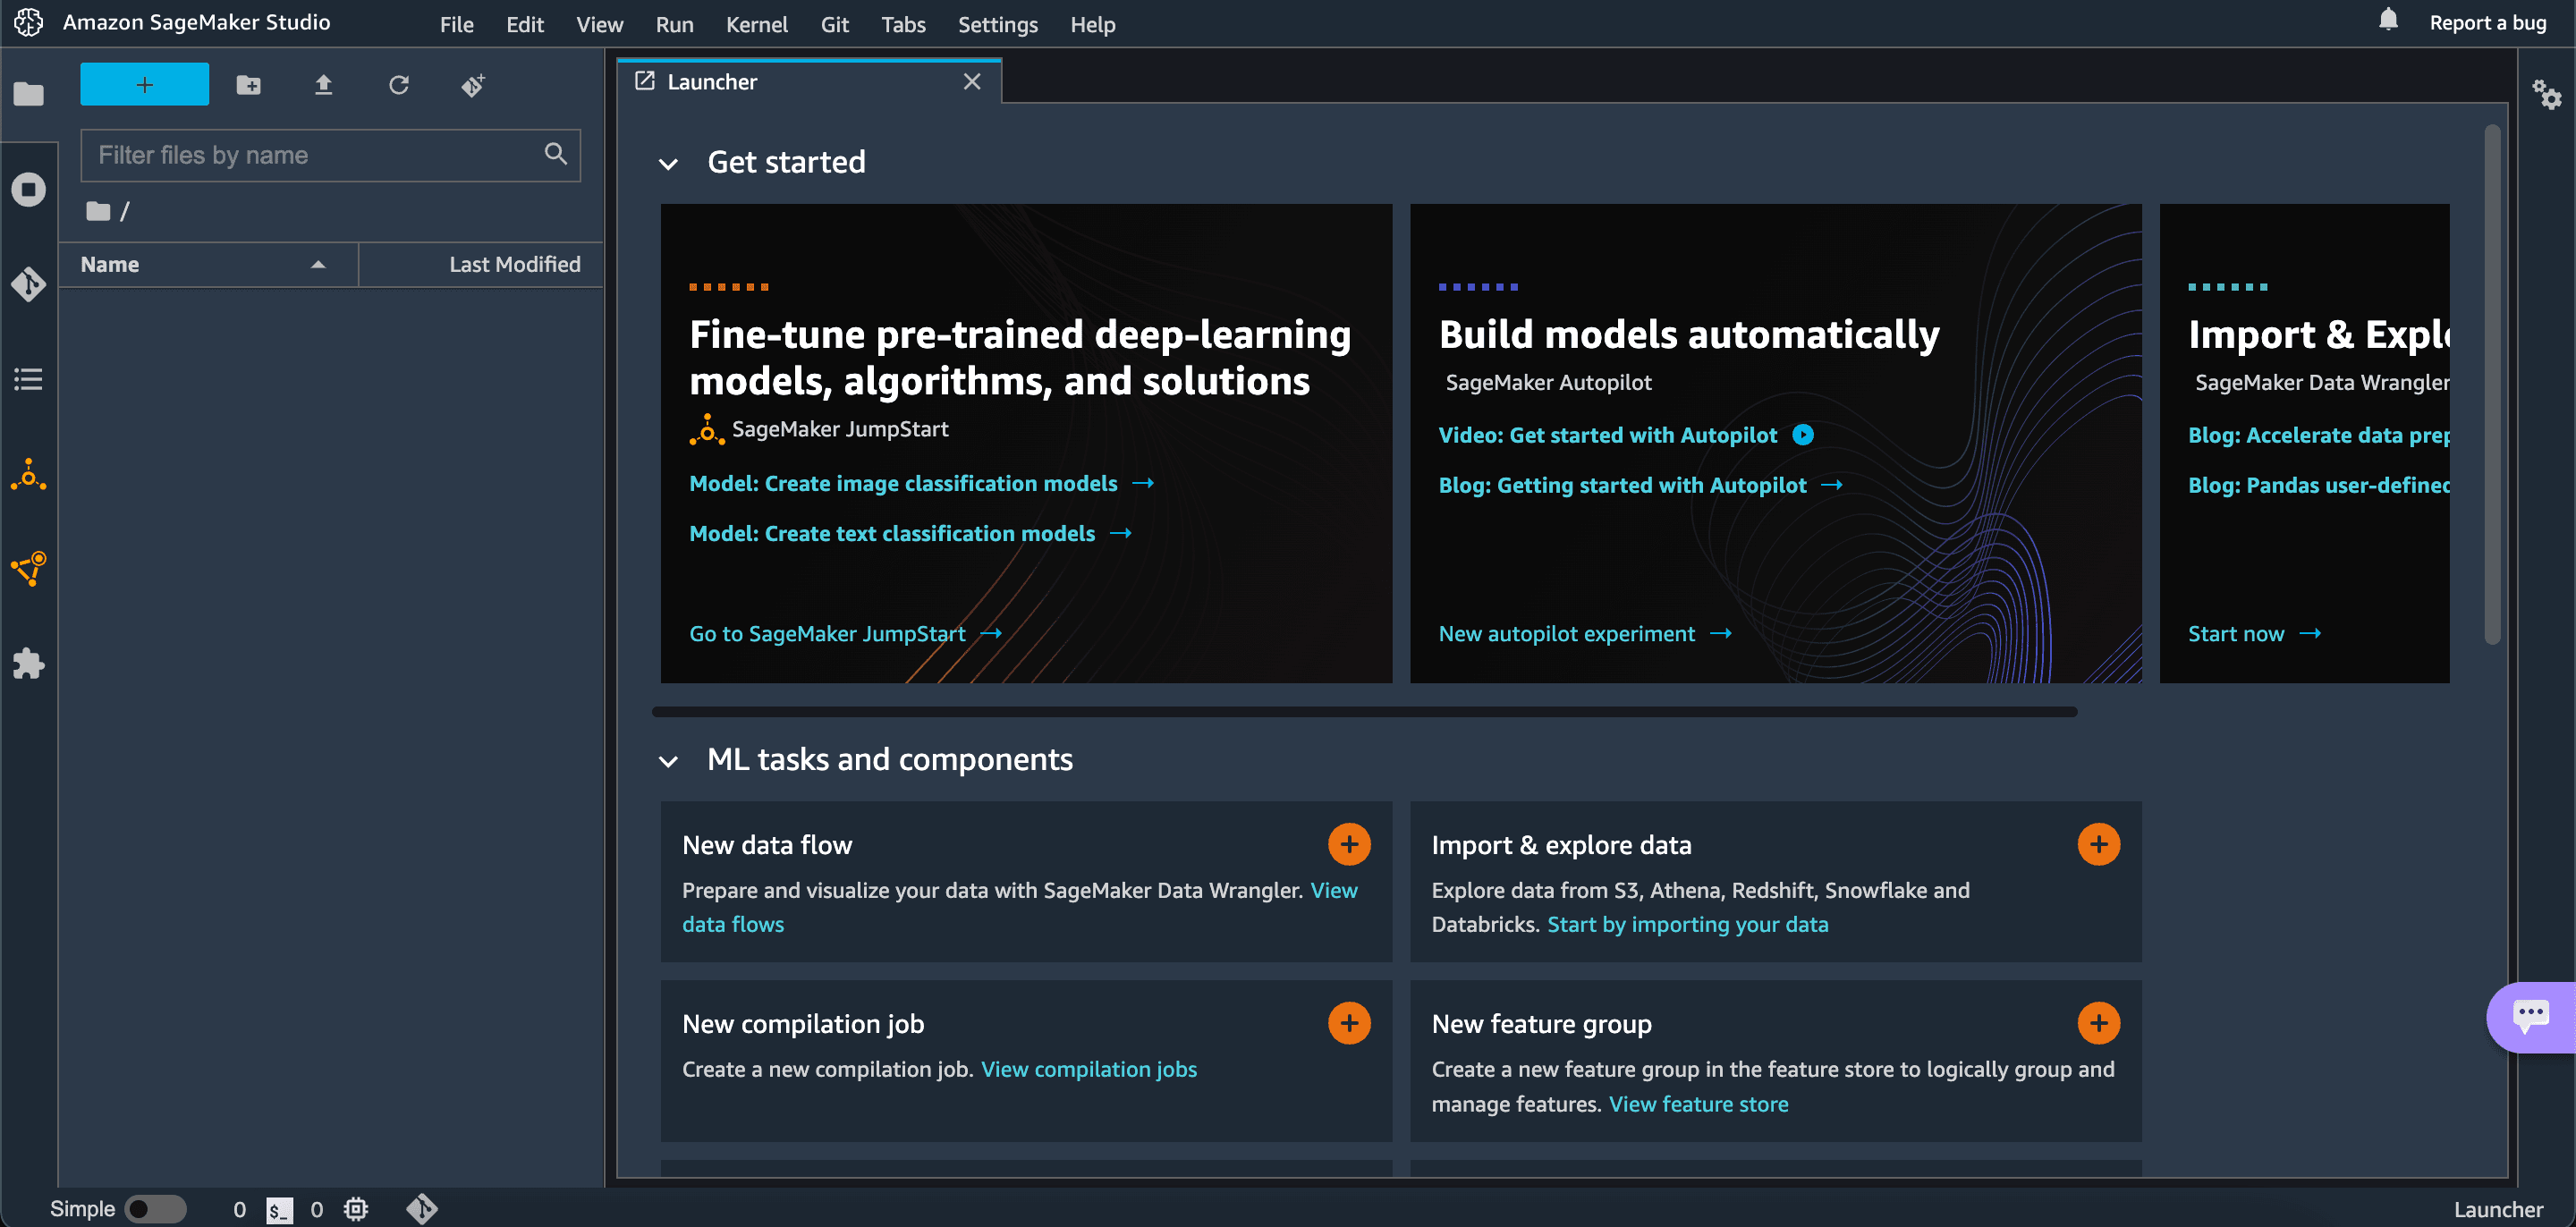
Upload the Notebook using the file upload option. The Notebook is taken from TensorFlow’s Image Classification example page and has been modified. If you need to know more about Image Classification, visit here.
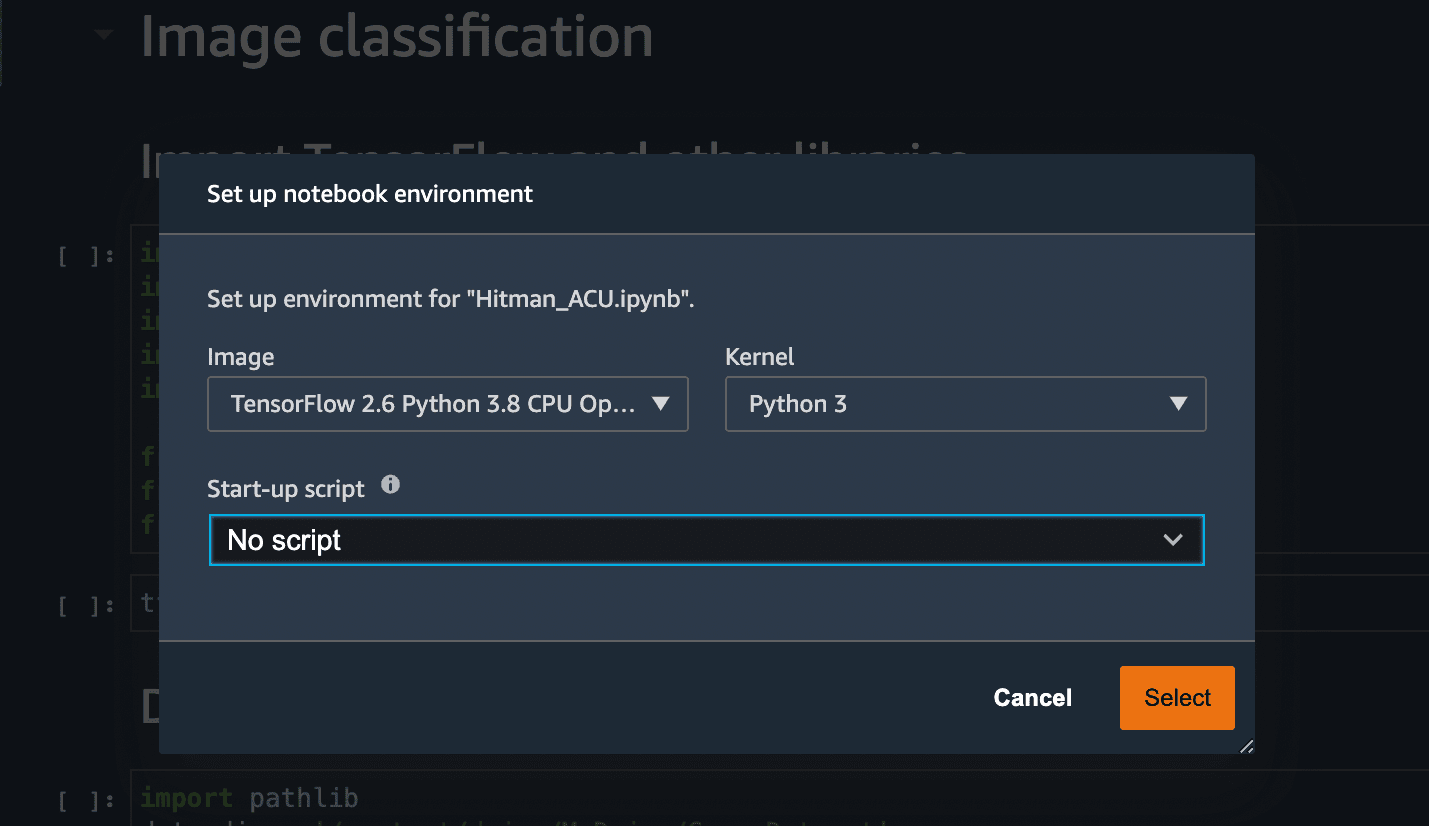
Open the notebook and select the latest TensorFlow Kernel.
Run all the cells in the notebook. The 3rd code cell has the dataset stored in an S3 bucket. I used my video game screenshots as a dataset for the Image Classifier. I had around 150 images of 2 games and I used the same to train the ML model. You are free to use any dataset to build and train your model.
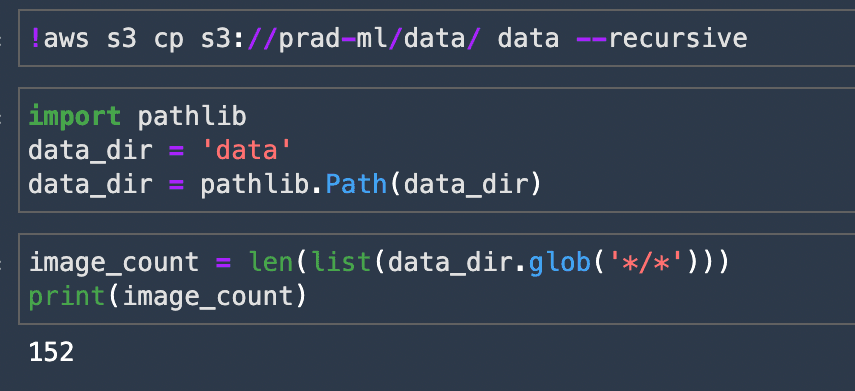
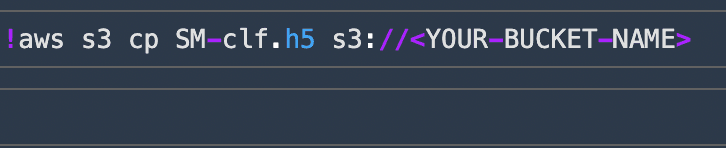
The Notebook walks you through on model creation, training and also saving it locally in the Studio. The last line of the Notebook(as shown below), has the command to upload the Image Classifier Model to a bucket. Give your own bucket URI and store the model.
After uploading the model to your bucket, make sure that you Shut Down your SageMaker Studio completely so that unnecessary costs are not incurred.
Part 2: Creating an EFS Instance and copying the model using DataSync
This module is about how to create an Elastic File System and upload the trained model to the EFS.
WHY USE EFS?
EFS can be mounted to a Lambda function and it will act as a local storage to it. Accessing the model and making predictions is significantly a lot faster than downloading a model from S3 to Lambda storage and then making a prediction. Even though AWS Lambda offers ephemeral storage up to 10GB, we need a way to permanently store our model after training, so storing in EFS is a better option.
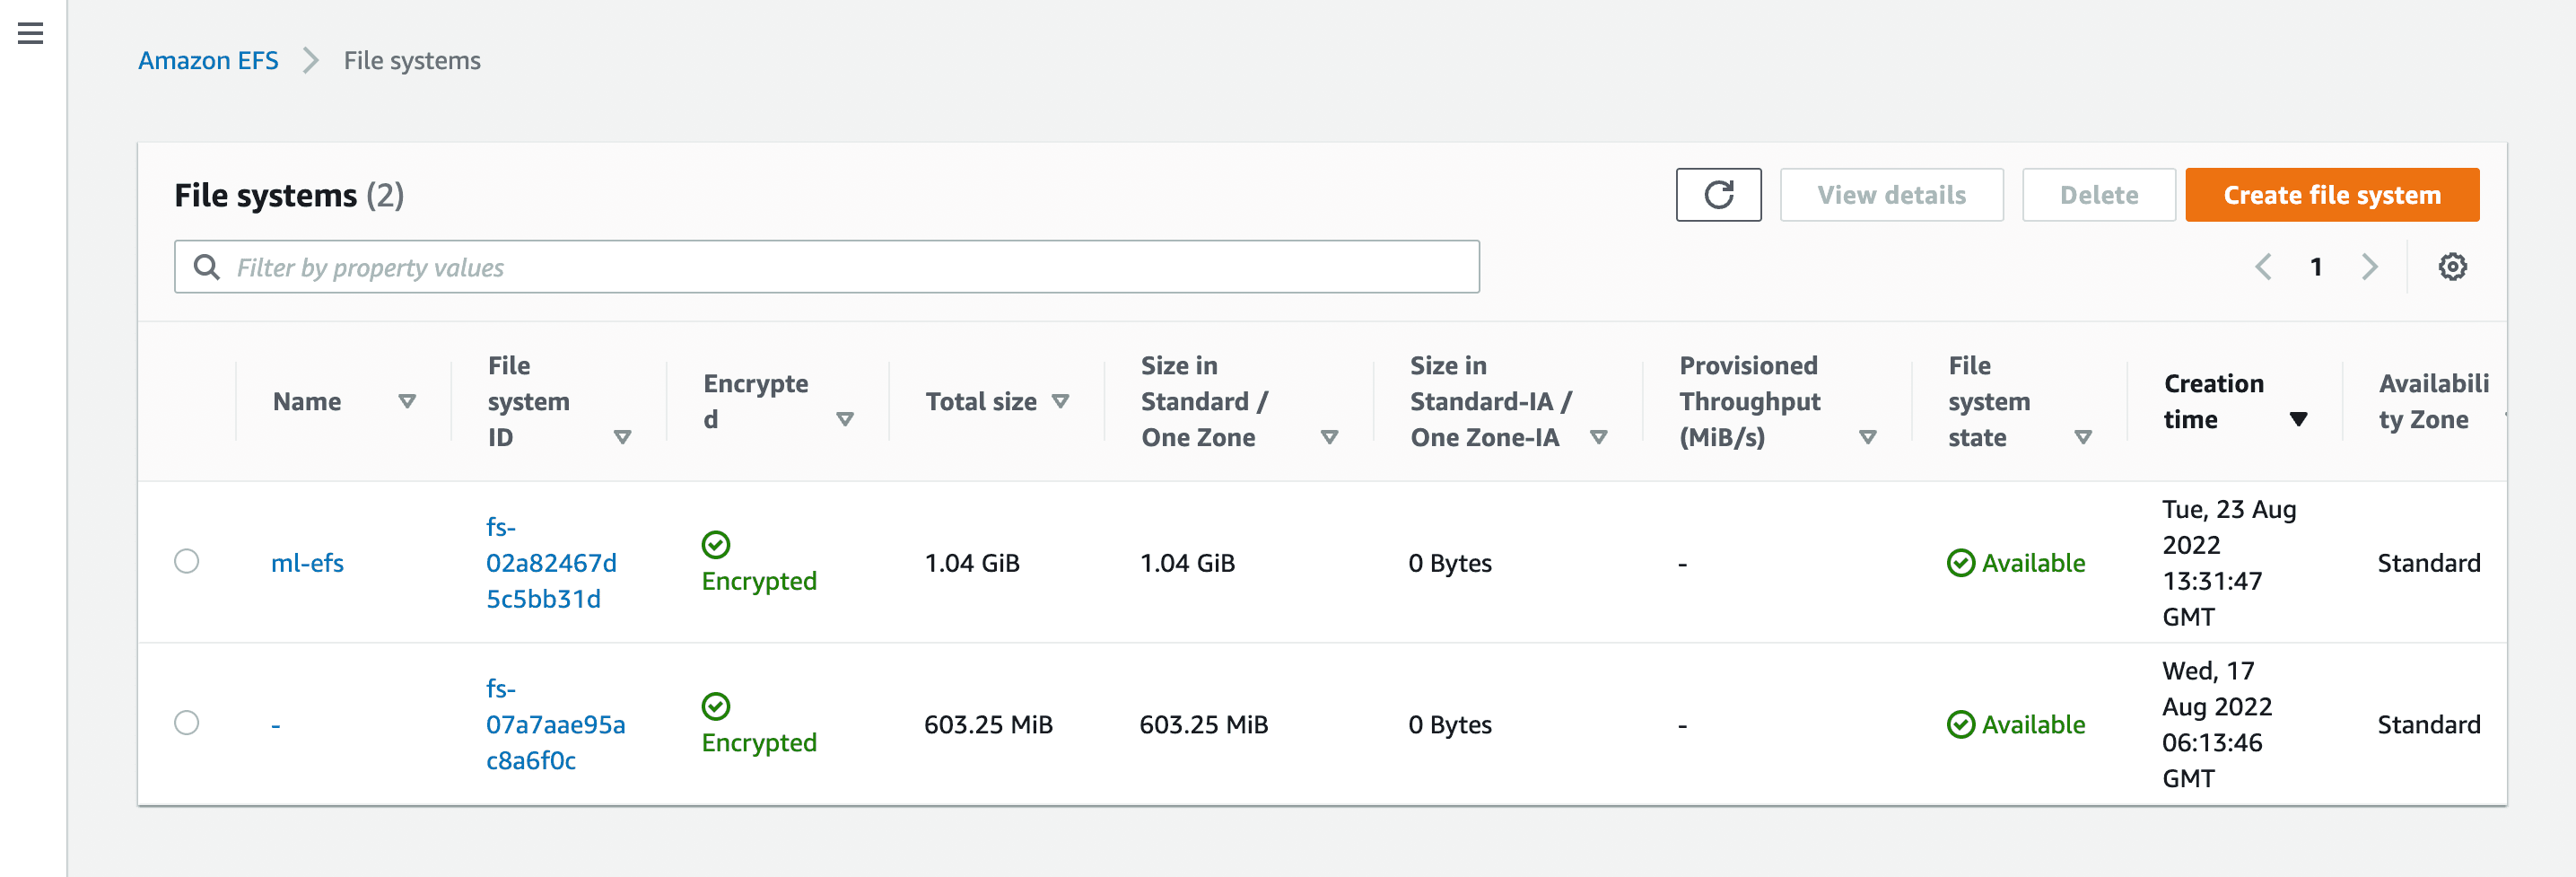
CREATE A FILE SYSTEM IN EFS
- Go to EFS Console and click Create file system.
- Enter a name for your EFS and most importantly, make sure that to select the VPC that the file system to be present under.
- You can also configure the file system to be available across all AZs(Standard) or in a single zone(One Zone). I would recommend the file system to be configured under Standard configuration.
Next, an access point needs to be created for the file system which is essentially a mount point for EC2 and Lambda.
Enter a name and a mount path for this access point.
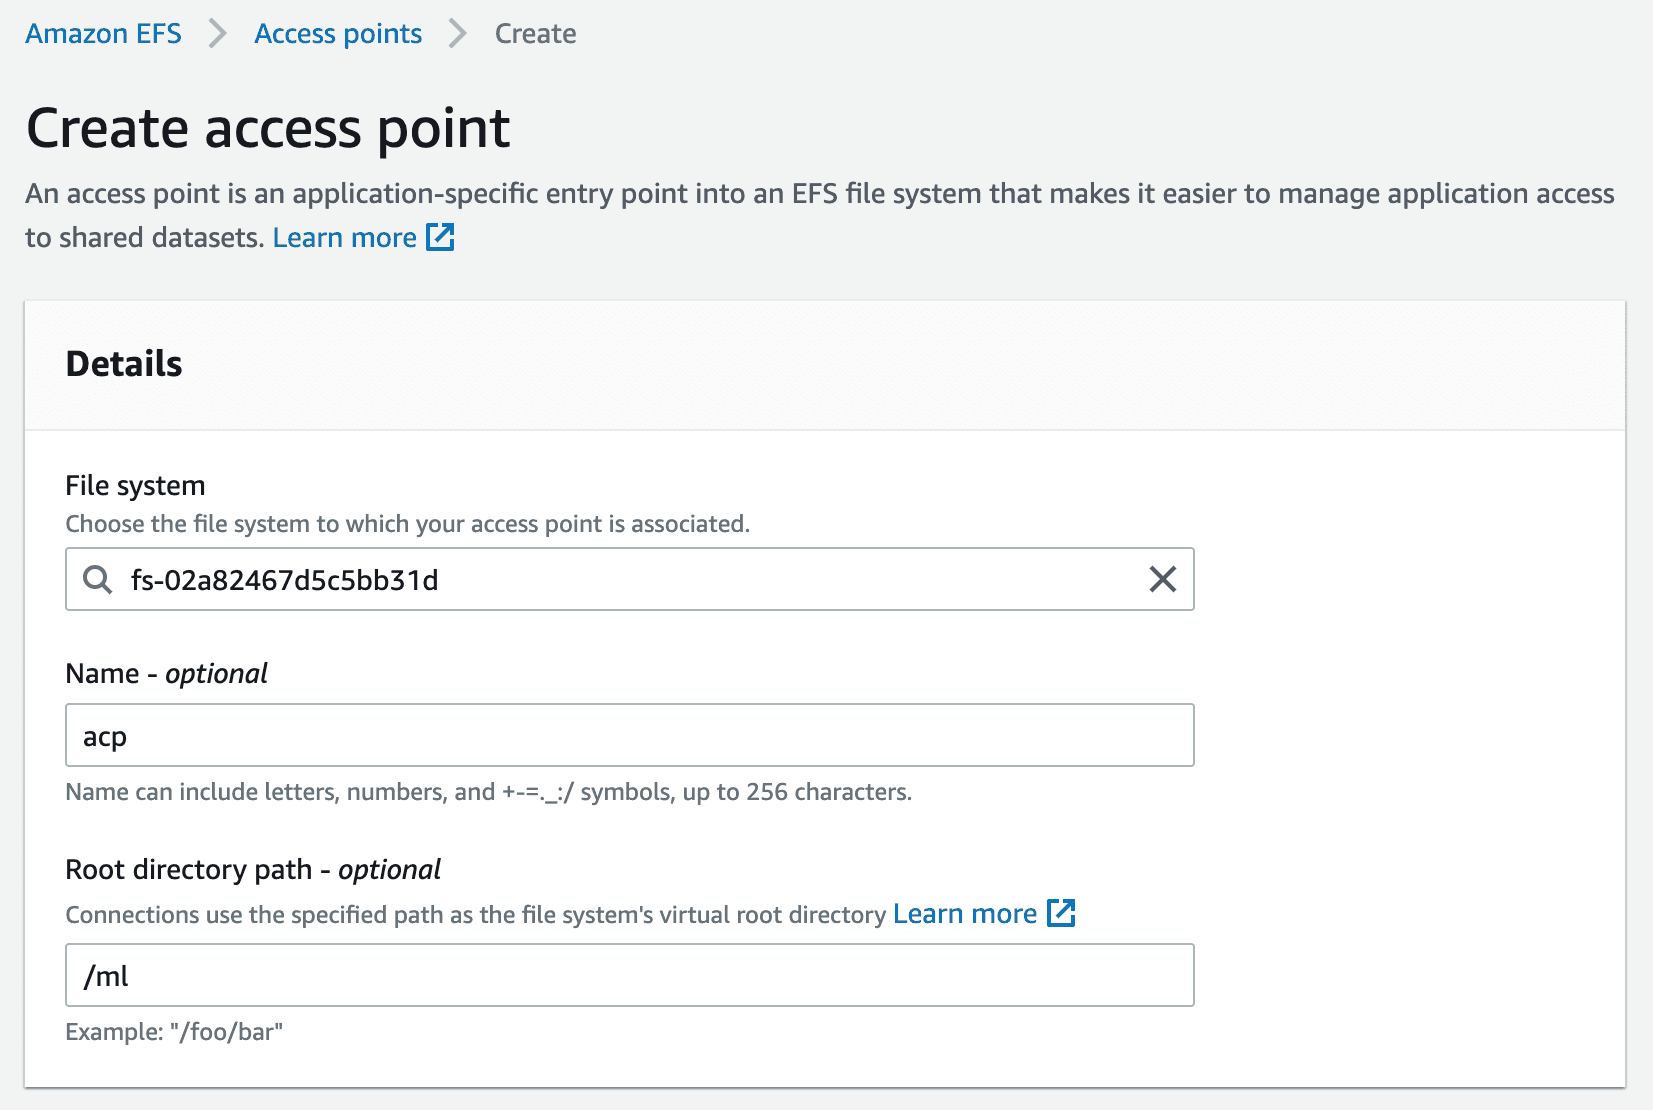
Set owner IDs to 1001 with your desired permission. Here, it is set to 777 as we do not want any access restrictions for the next set of tasks that needs to be performed on EFS.
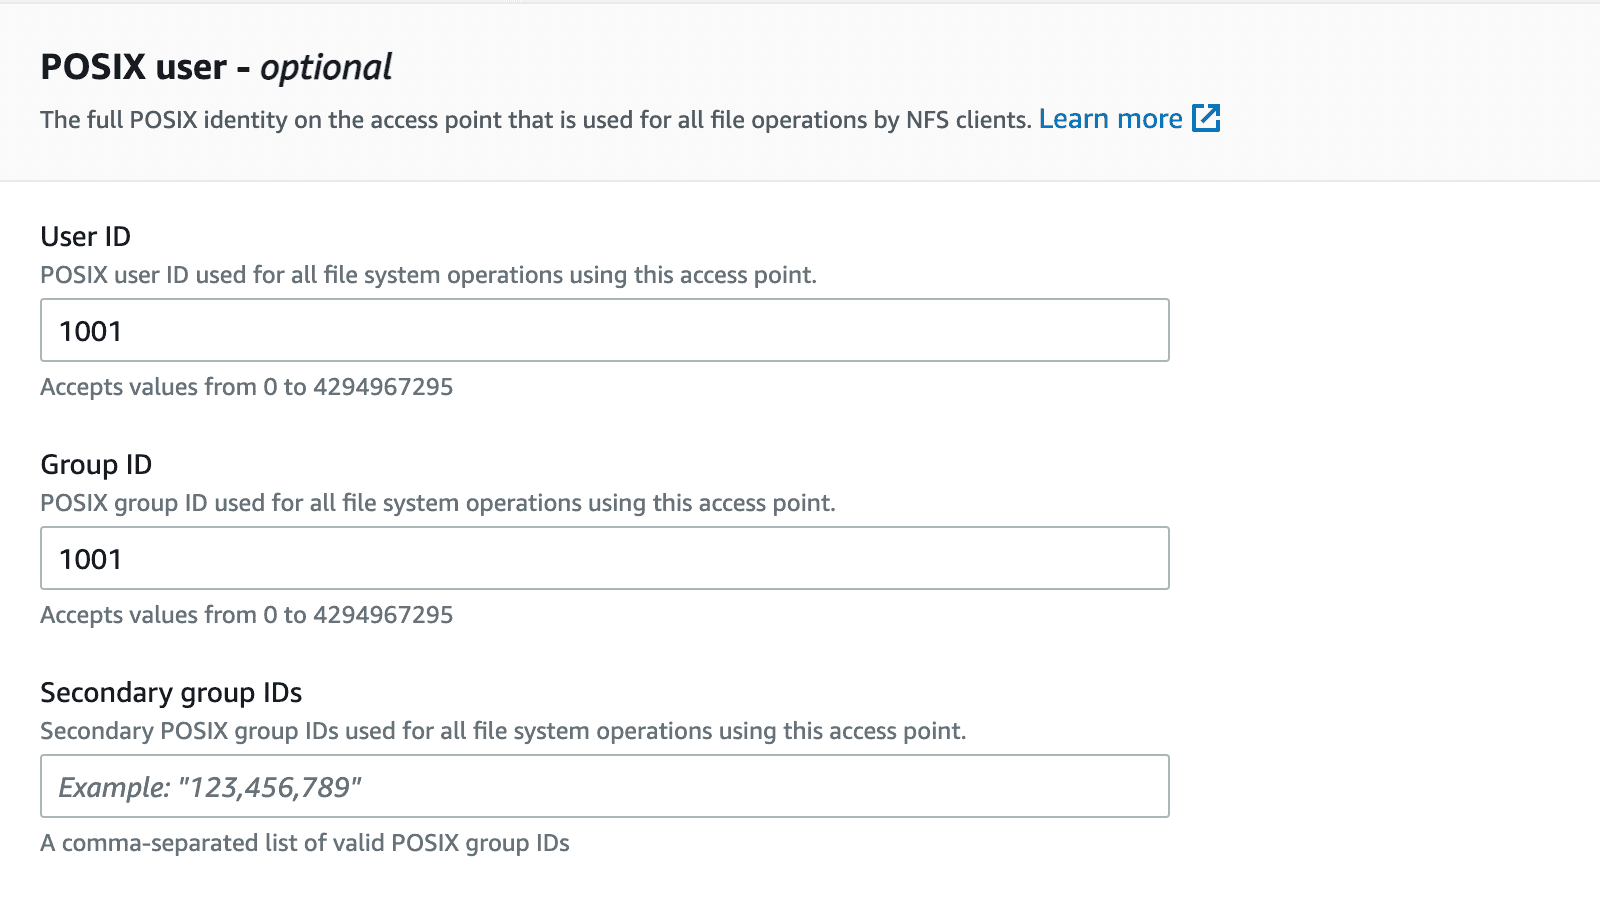
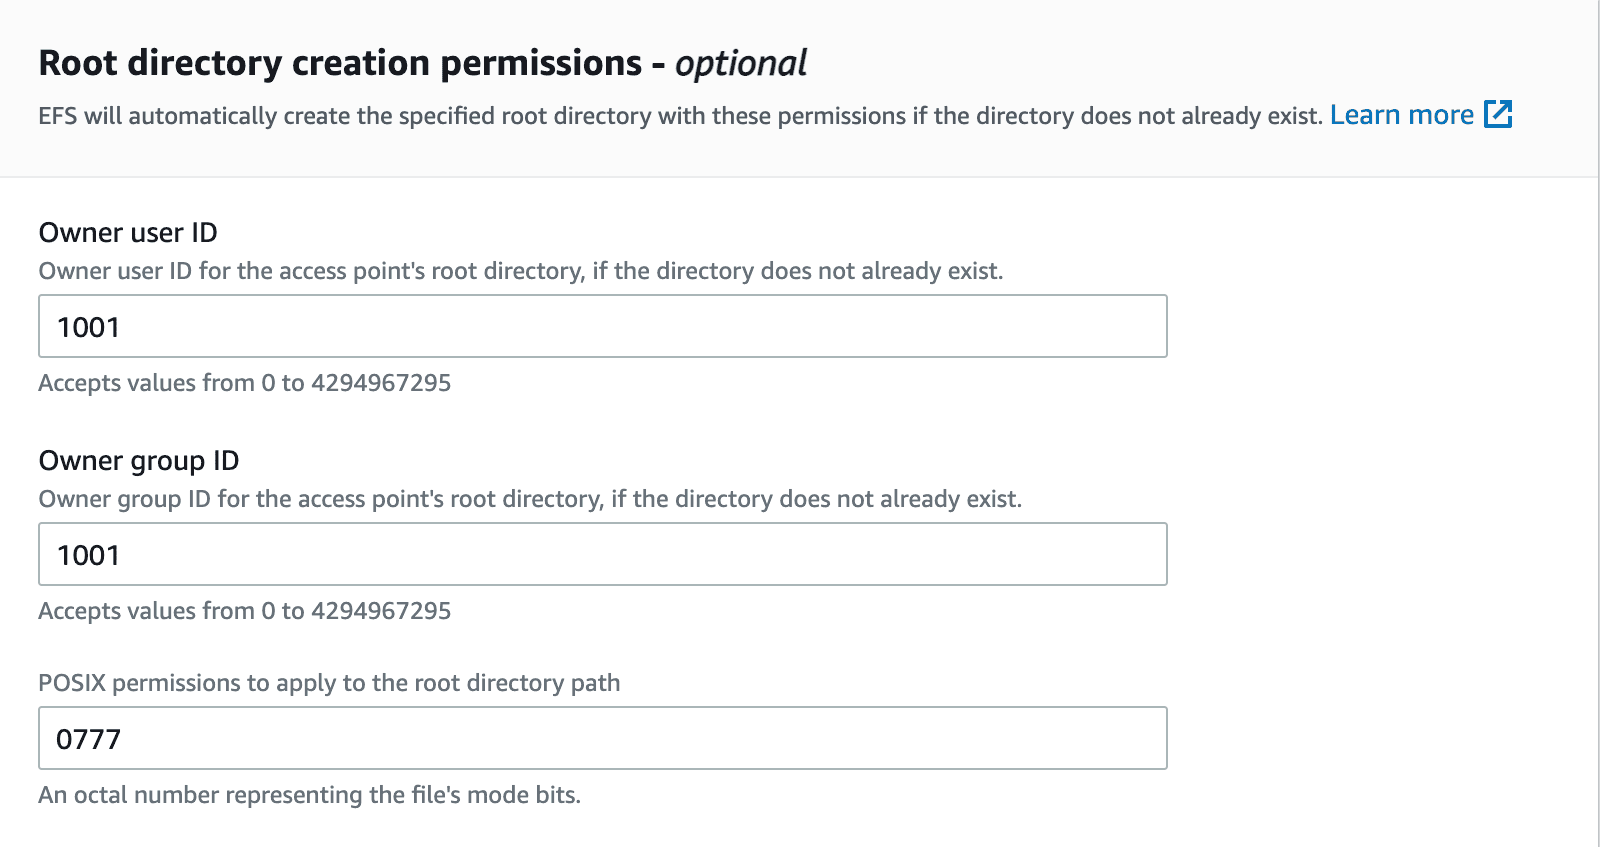
Click Create access point after entering all these fields.
Now, we will create a security group with a specific set of permissions and later attach it to our EFS.
What are Security Groups?
A security group acts as a virtual firewall that controls the traffic for one or more instances. When you launch an instance, you can specify one or more security groups. You can modify the rules for a security group at any time; the new rules are automatically applied to all instances that are associated with the security group. So here, we will create a security group that allows AWS Lambda to access the EFS after it is mounted. A security group acts as a virtual firewall that controls the traffic for one or more instances. When you launch an instance, you can specify one or more security groups. You can modify the rules for a security group at any time; the new rules are automatically applied to all instances that are associated with the security group. So here, we will create a security group that allows AWS Lambda to access the EFS after it is mounted.
Now, go to VPC/Security Groups in AWS Console and create a new security group.
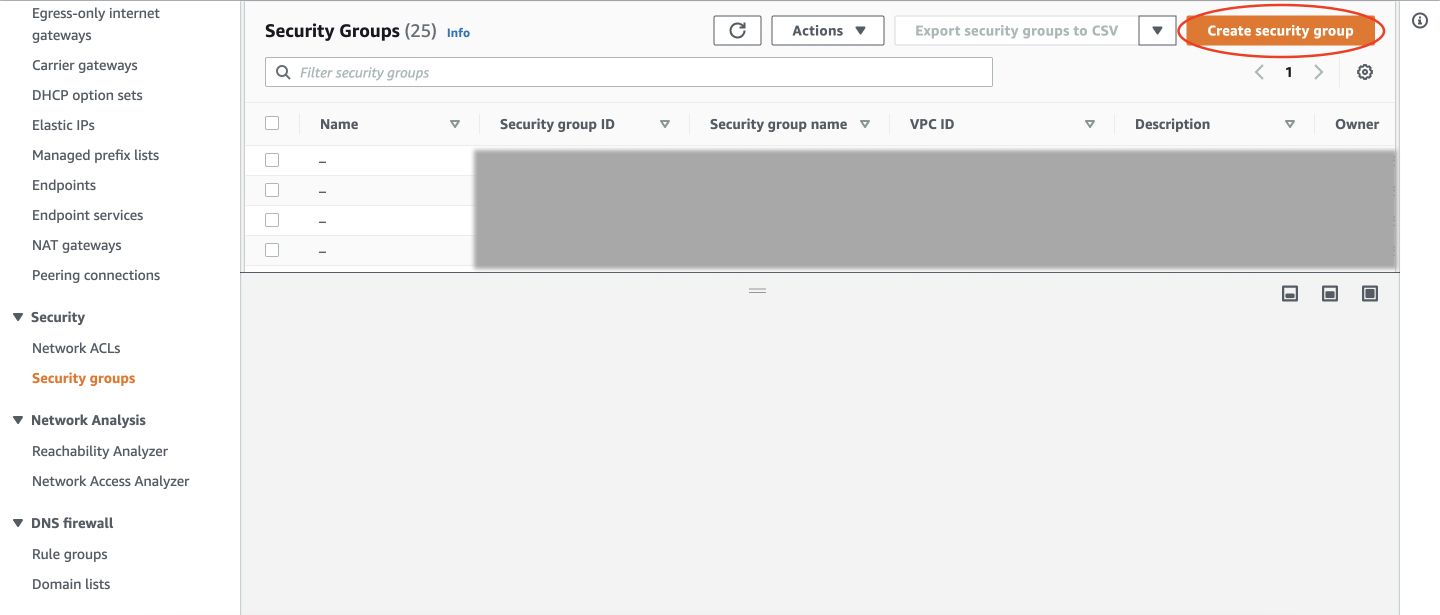
Name your Security Group and give a description.
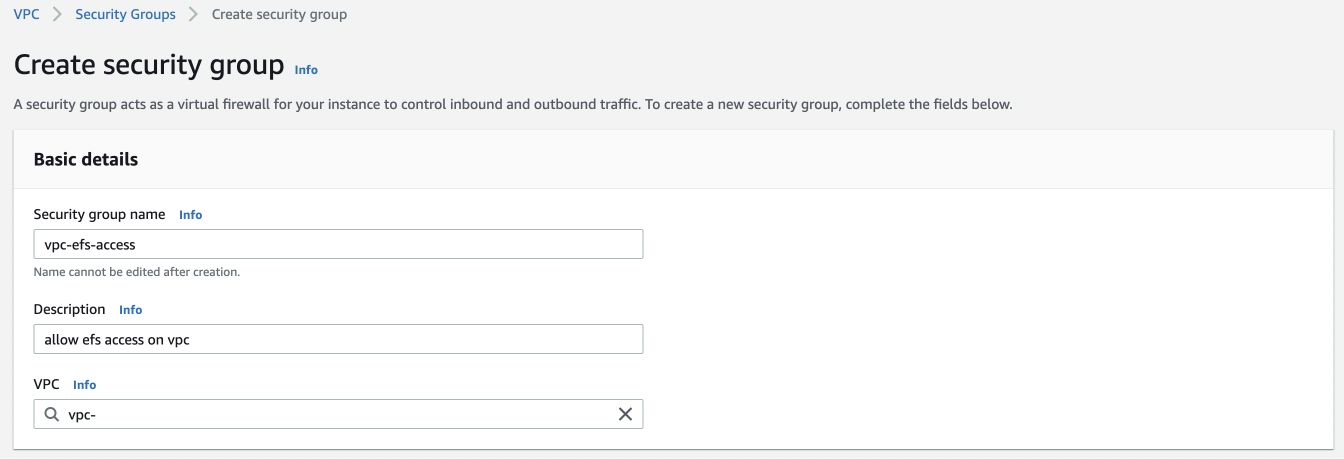
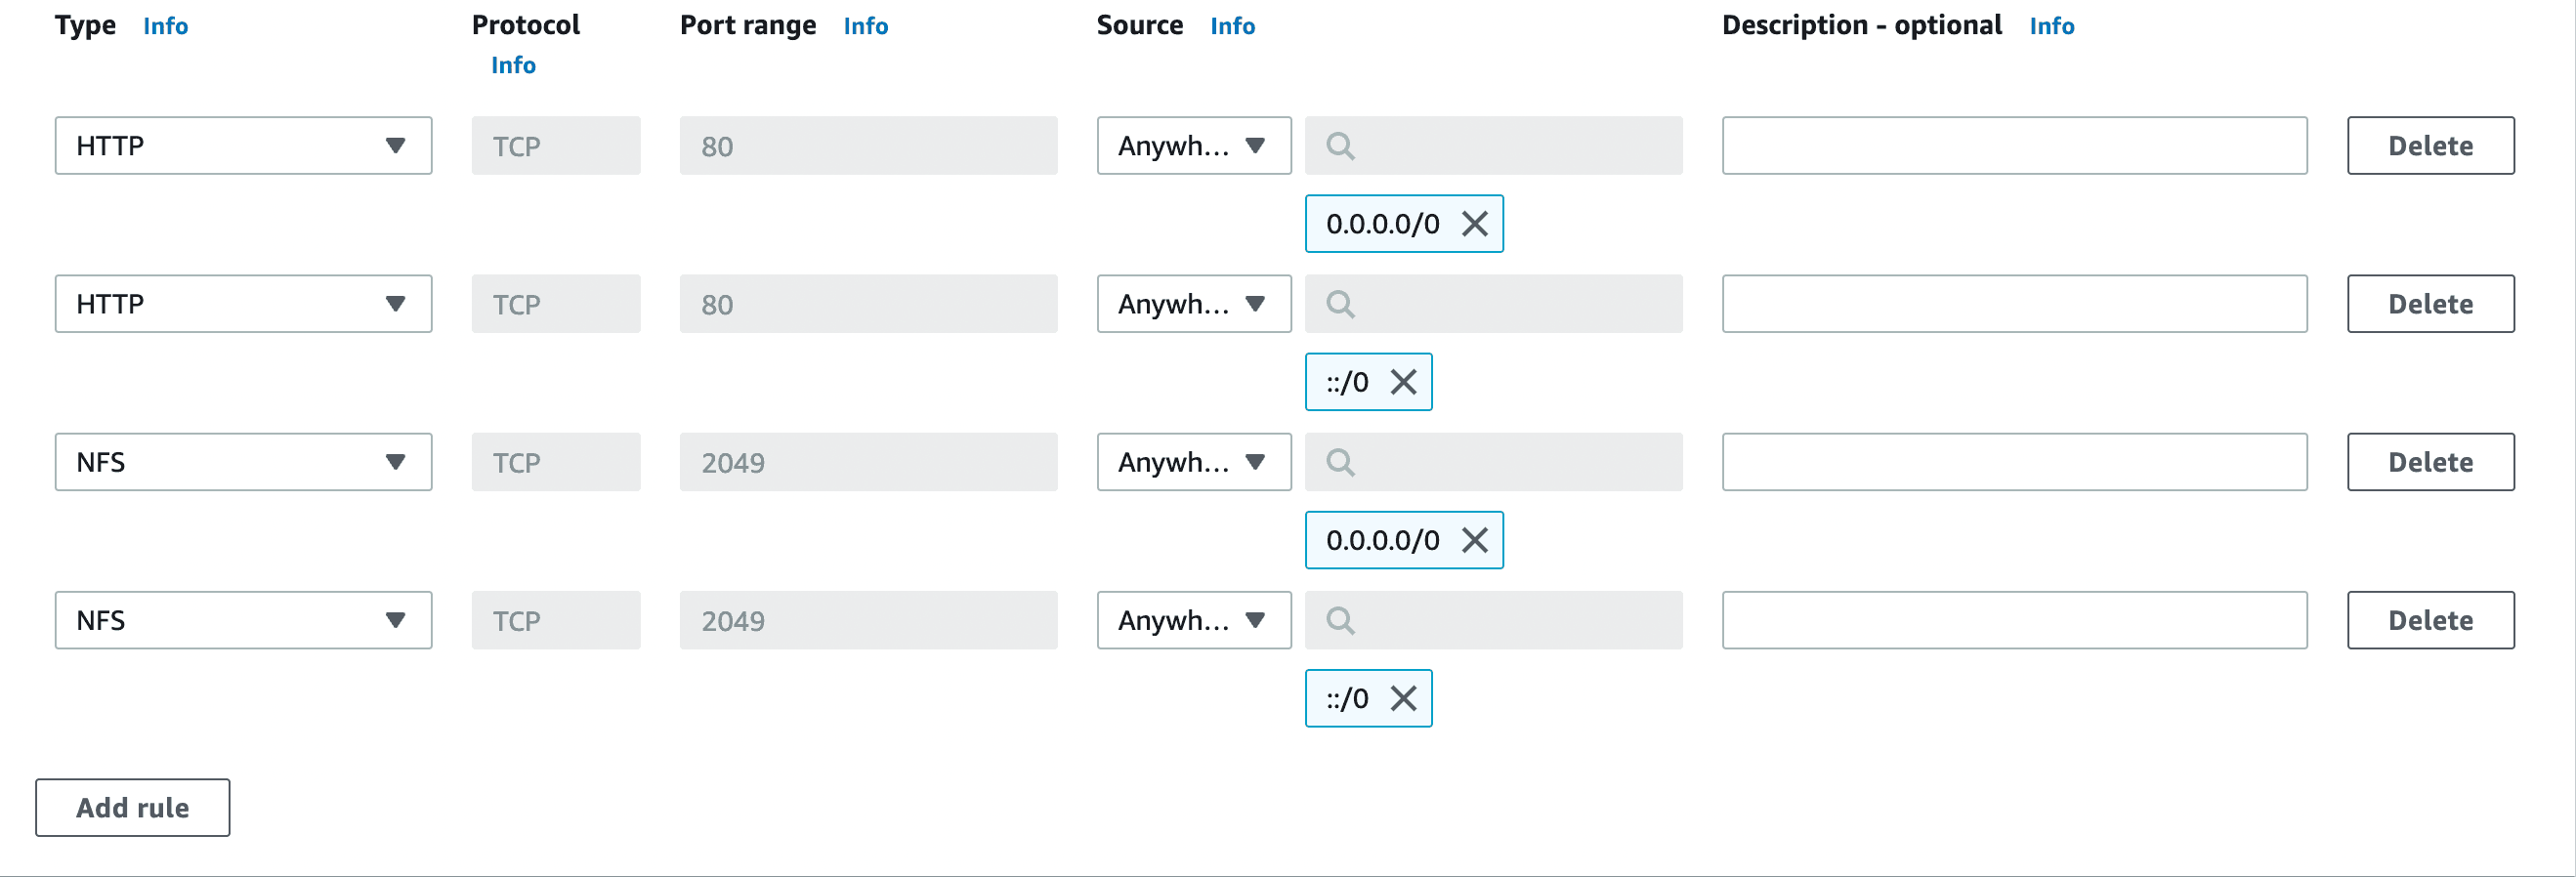
Now, in both Inbound and Outbound Rules, add 2 HTTP and NFS rules with Anywhere IPV4 and Anywhere IPV6 configurations respectively. This essentially allows us to Click on Create security group after adding these rules.
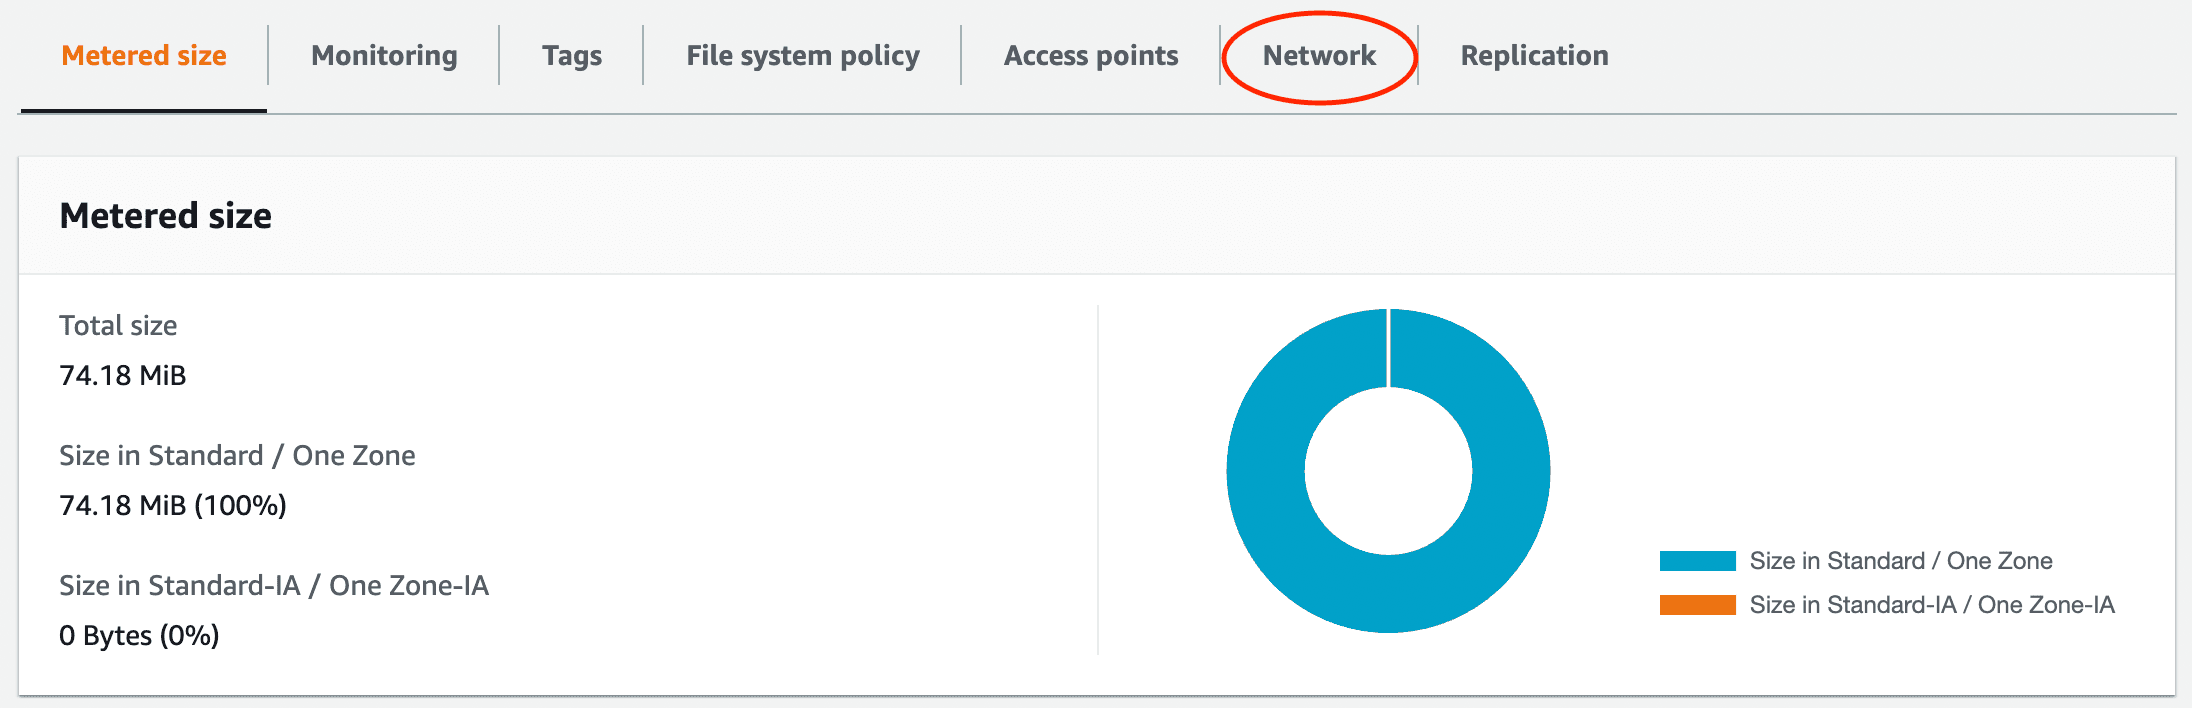
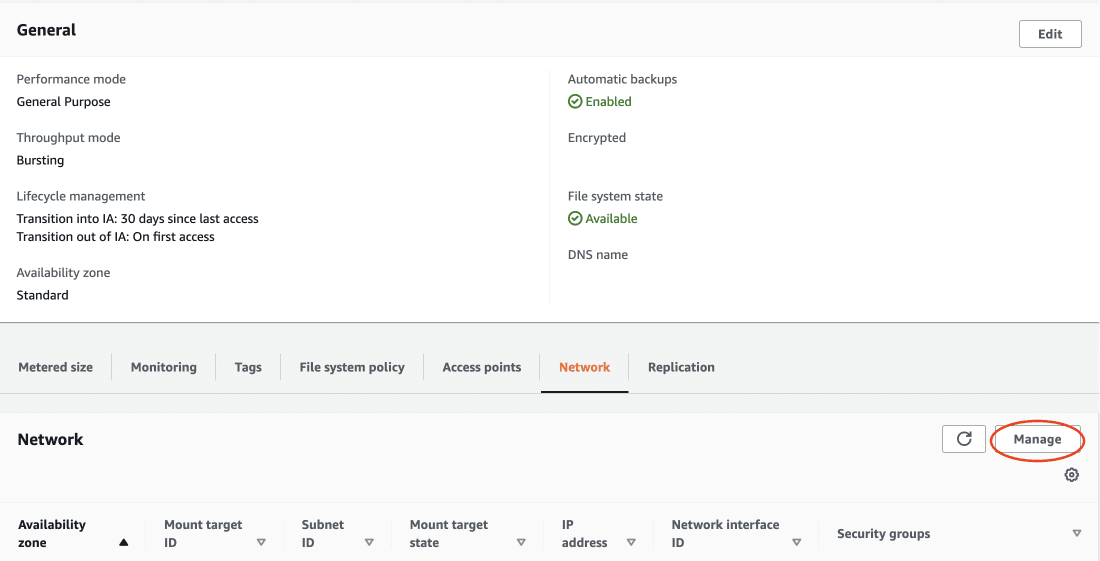
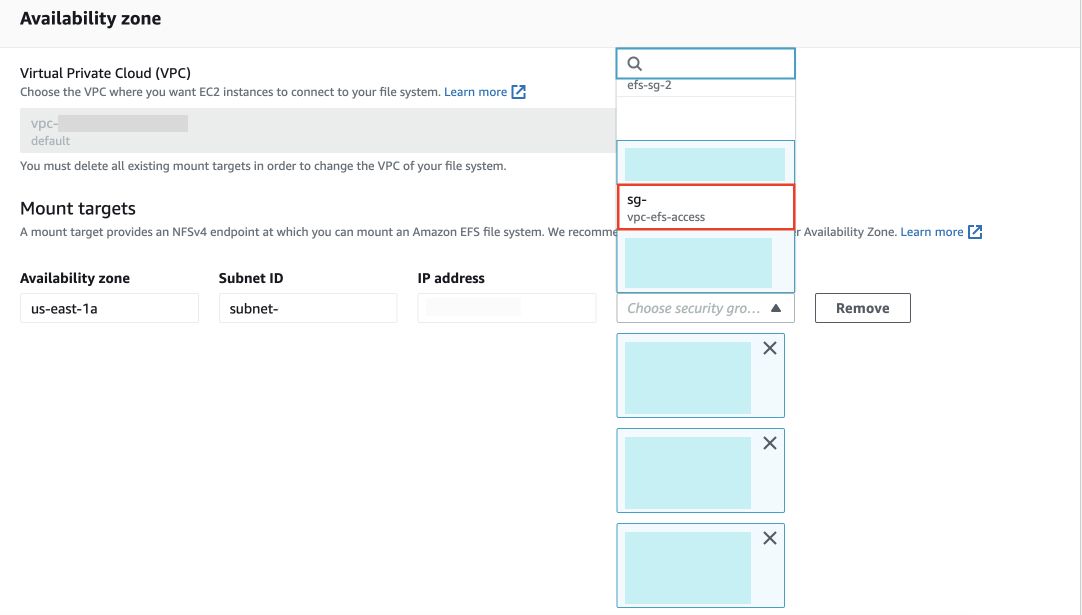
Later, go to the Network tab in your Elastic File System and click on Manage. For all the availability zones, attach your newly created security group under Security Group option.
Now, the model has to be copied to EFS from the S3 bucket. We will use AWS DataSync to copy the model.
Now, go to Tasks in DataSync and click on Create a task. Here, the source and destination locations have to be configured.
For source configuration, select S3, your bucket name and the subfolder in which the model is stored.
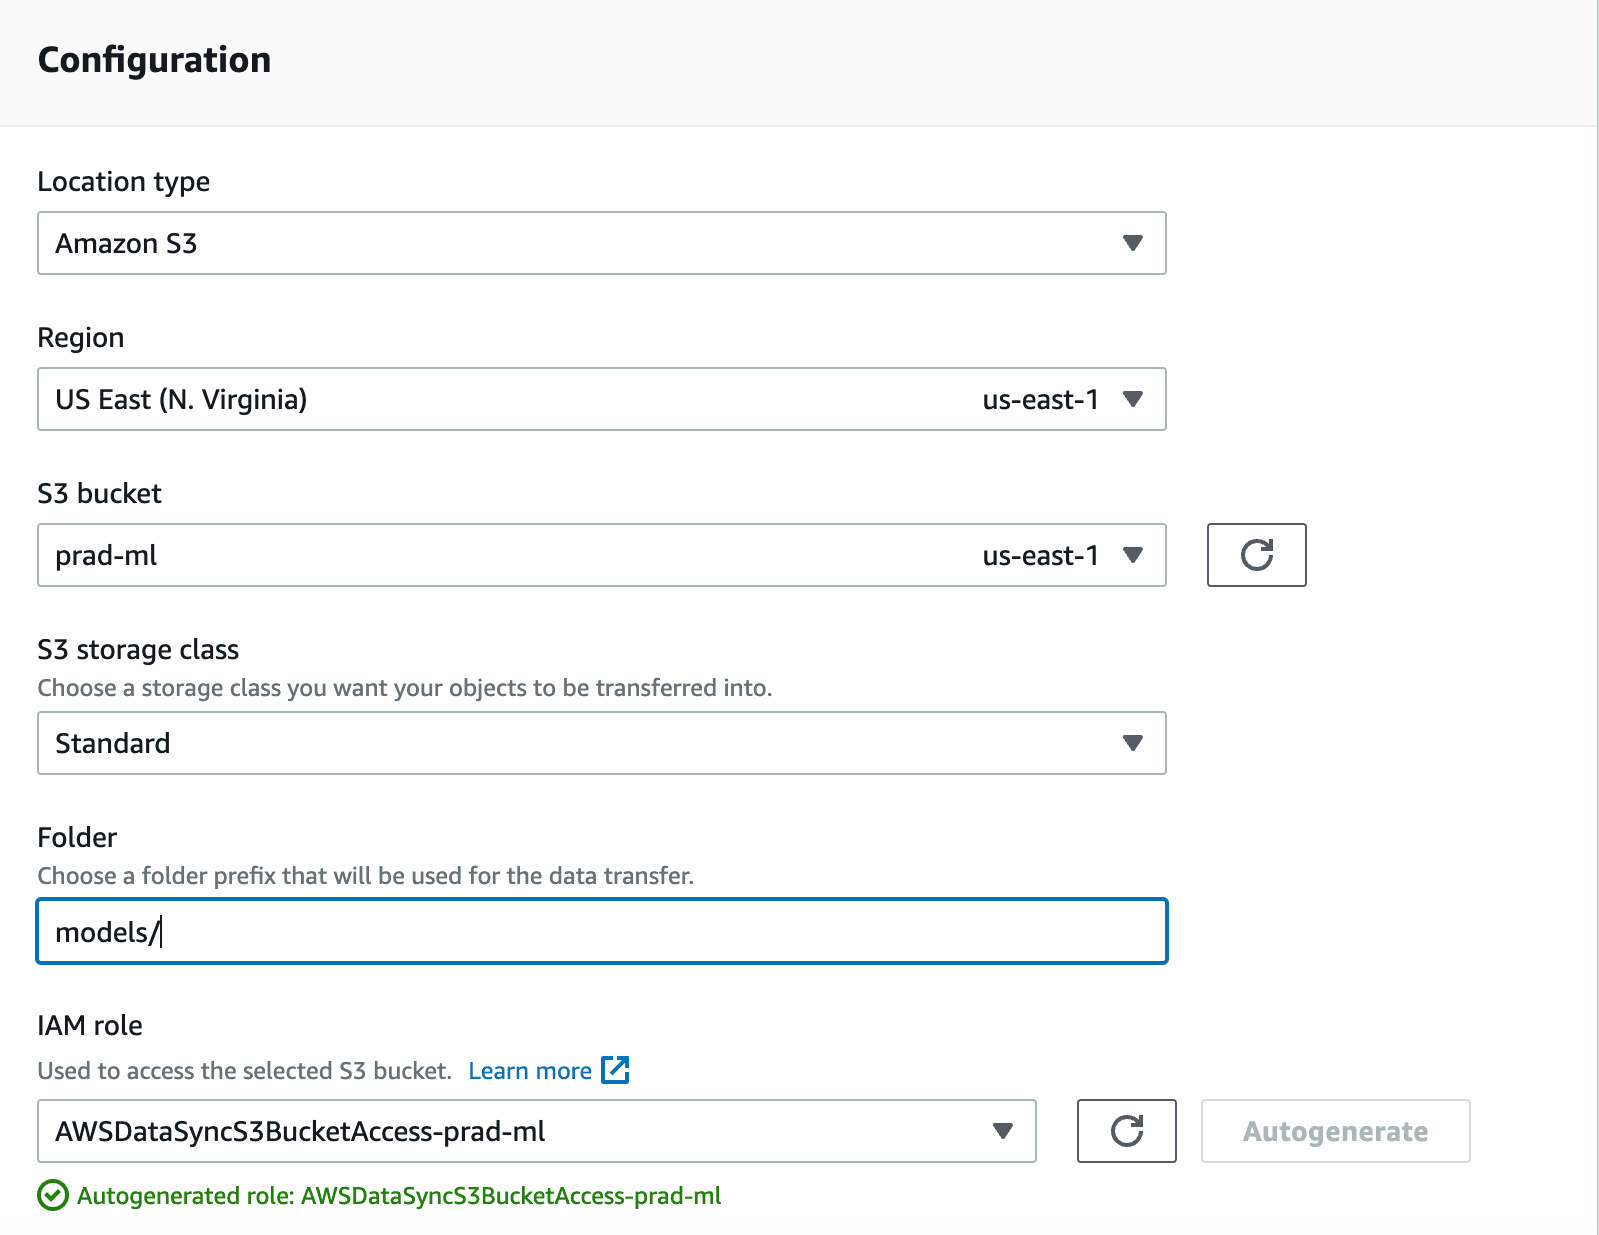
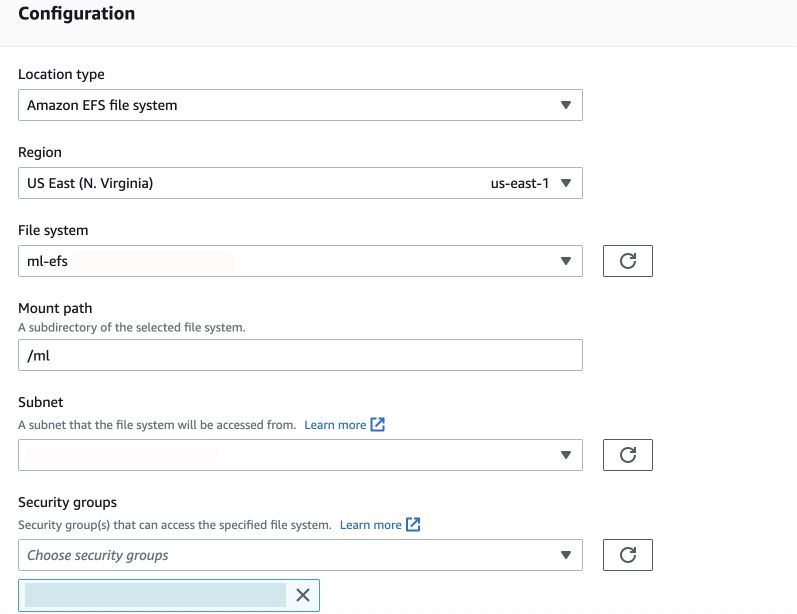
Click Next and in Destination configuration, select Amazon EFS file system, then your EFS, your mount path(specified while creating access point) and finally any one of the subnets and the security group that was created earlier. Next in review, give a task name and proceed to create a new task.
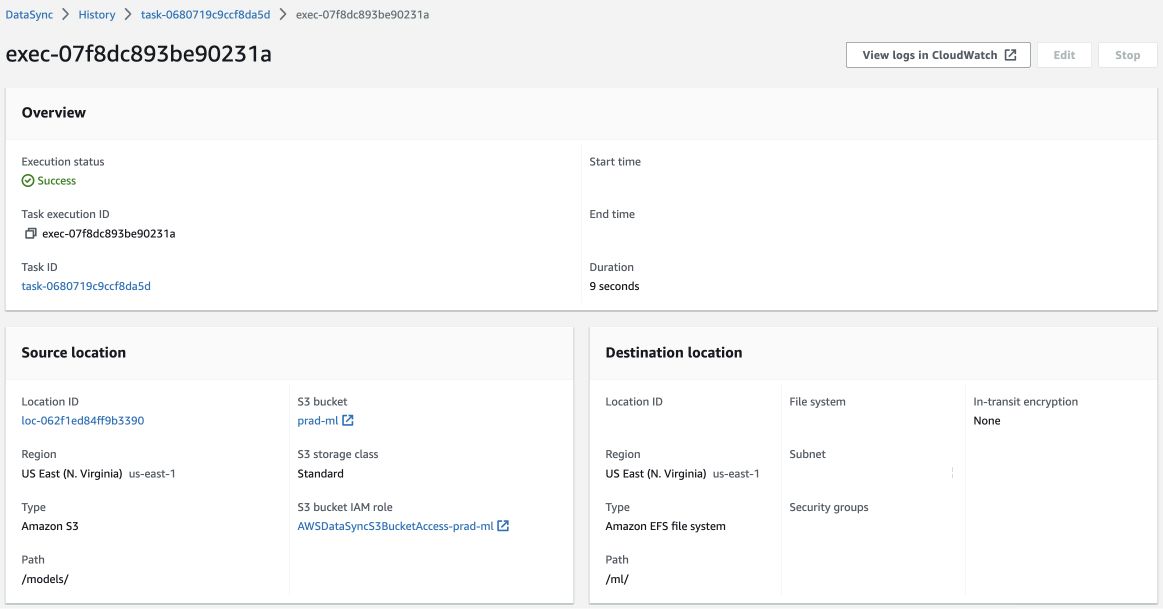
Now go to your task and click Start with defaults:
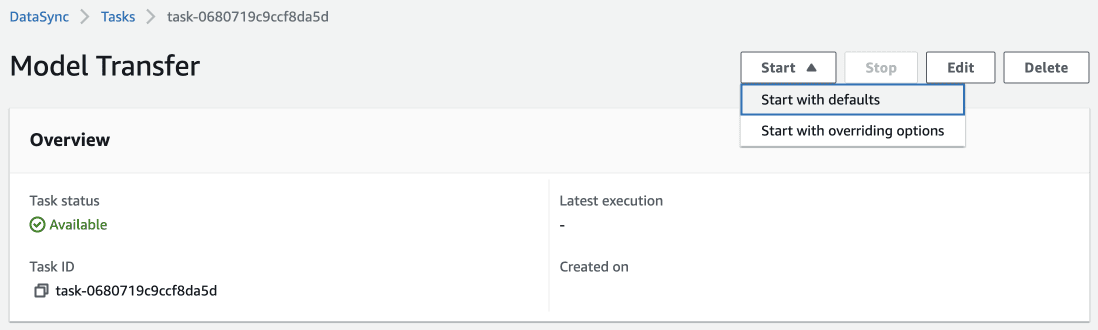
Now the task begins performing the task and after a while, a success message will be shown in the Execution Status if there were no problems while copying the model.
Part 3: Deploy a Lambda Function using SAM
In this module, we will go through on how to deploy a serverless inference with the help of AWS SAM.
If you want to know about AWS SAM, visit here. If you need instructions to install it, visit here.
WHY DEPLOY USING SAM?
There is another approach where a Lambda function is created directly on the console, code is written and the PYTHONPATH is set to an EFS directory where all the libraries are installed with the help of EC2. Later an API endpoint is created and attached to the Lambda Function.
Here is how the AWS SAM approach is better than the above mentioned one:
- Firstly, configuring an EC2 instance with a Python runtime that matches with the Lambda’s runtime can be time consuming. But here in a SAM, the Python runtime needs to be mentioned in YAML and DOCKERFILE and that is all.
- Installing Python libraries is much simpler in SAM. Required libraries are specified in requirements.txt and in the DOCKERFILE, a command needs to be entered to install them. Meanwhile in the other approach, the libraries have to be installed manually in a specific directory.
- The Lambda coldstarts are way too long in the above approach compared to ours. The coldstarts exceed the API Gateway time limit almost all the time. This is actually an app breaker because the first couple of requests fail all the time which makes for an unreliable application.
After installing SAM, follow the below steps:
- Enter sam init
- Select AWS Quick Start Templates.
- Next, select Machine Learning and choose Python 3.9 runtime.
- Finally select TensorFlow ML Inference API and give a name for the stack.
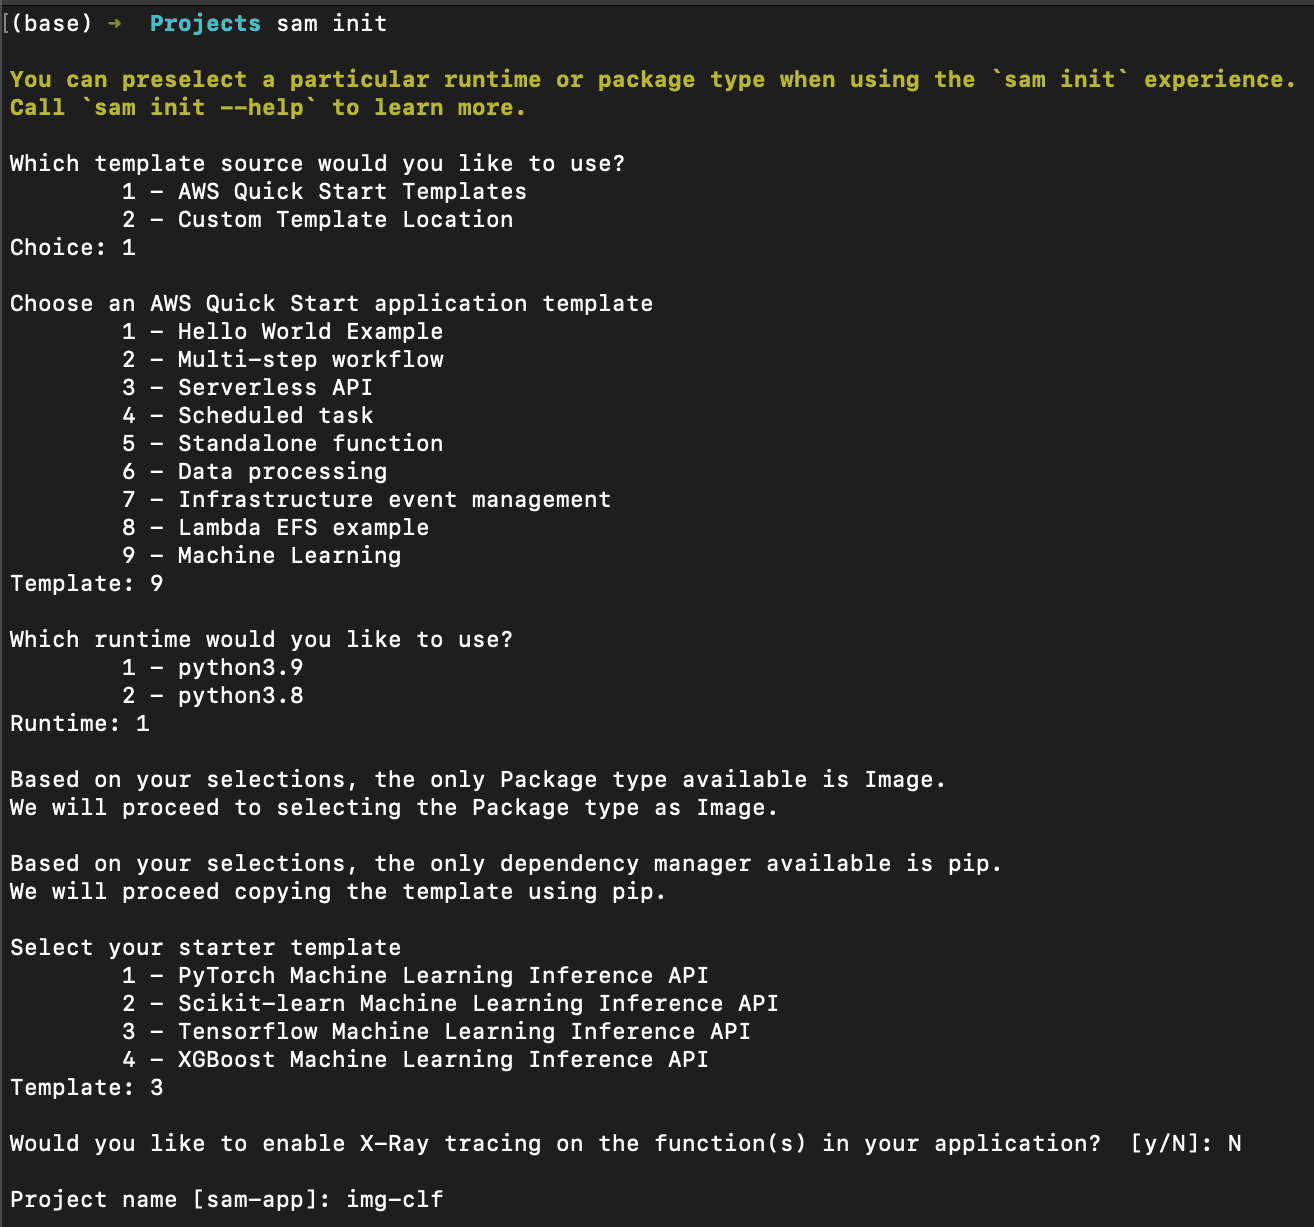
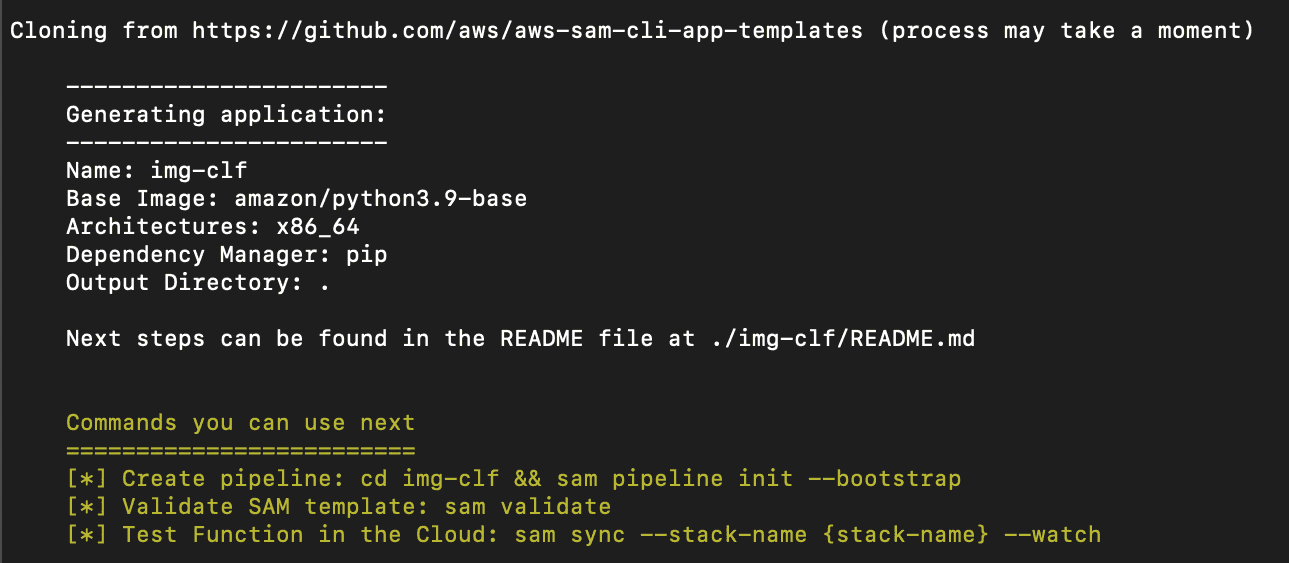
This will download a repo from AWS that has a TensorFlow ML Inference API template.
Now, open the cloned repo in your code editor. Remove the file called ‘model’ as we don’t need it.
Replace the commands in the Dockerfile with the below snippet:
FROM public.ecr.aws/lambda/python:3.9

COPY app.py requirements.txt ./

RUN python3.9 -m pip install -r requirements.txt -t .

CMD ["app.lambda_handler"]
Modify the requirements.txt with:
tensorflow-cpu==2.8.0
pillow
protobuf==3.20.*
Now, replace app.py with the below snippet,
import base64
import json
import numpy as np
import tensorflow as tf
from PIL import Image
from io import BytesIO

model_file = '/mnt/ml/SM-clf.h5'
model = tf.keras.models.load_model(model_file)
class_names = ['AC Unity', 'Hitman']

def lambda_handler(event, context):
    image_bytes = event['body'].encode('utf-8')
    image = Image.open(BytesIO(base64.b64decode(image_bytes)))
    image = image.resize((224, 224))
    img_array = tf.keras.utils.img_to_array(image)
    img_array = tf.expand_dims(img_array, 0)

    predictions = model.predict(img_array)
    score = 100 * np.max(tf.nn.softmax(predictions[0]))
    pred = class_names[np.argmax(predictions[0])]
    return {
        'statusCode': 200,
        'body': json.dumps(
            {
                "predicted_label": pred,
                "score": score,
            }
        )
    }
Notice in line 8 and 9, we are loading the model from EFS. Later in line 19, the model is used to predict the class of the image.
Finally, template.yaml has to be replaced with the below snippet:
AWSTemplateFormatVersion: '2010-09-09'
Transform: AWS::Serverless-2016-10-31

Globals:
  Function:
    Timeout: 180
    MemorySize: 5000
  Api:
    BinaryMediaTypes:
      - image/png
      - image/jpg
      - image/jpeg

Parameters:
  EFSpath:
    Type: String
    Default: /mnt/ml
  SecurityGroupIds:
    Type: CommaDelimitedList
    Default: sg-fa7133bc
  SubnetIDs:
    Type: CommaDelimitedList
    Description: The list of SubnetIDs in your Virtual Private Cloud (VPC)
    Default: subnet-80c98eae,subnet-04878f4e,subnet-e19ce486,subnet-bfc9fbb0,subnet-0bc28757,subnet-96c847a8
  AccessPointARN:
    Type: String
    Description: Access point ARN

Resources:
  InferenceFunction:
    Type: AWS::Serverless::Function # More info about Function Resource: https://github.com/awslabs/serverless-application-model/blob/master/versions/2016-10-31.md#awsserverlessfunction
    Properties:
      PackageType: Image
      Architectures:
        - x86_64
      Events:
        Inference:
          Type: Api # More info about API Event Source: https://github.com/awslabs/serverless-application-model/blob/master/versions/2016-10-31.md#api
          Properties:
            Path: /classify
            Method: post
      VpcConfig:
        SecurityGroupIds: !Ref SecurityGroupIds
        SubnetIds: !Ref SubnetIDs
      FileSystemConfigs:
      - Arn: !Ref AccessPointARN
        LocalMountPath: !Ref EFSpath
      Policies:
      - Statement:
        - Sid: AWSLambdaVPCAccessExecutionRole
          Effect: Allow
          Action:
            - logs:CreateLogGroup
            - logs:CreateLogStream
            - logs:PutLogEvents
            - ec2:CreateNetworkInterface
            - ec2:DescribeNetworkInterfaces
            - ec2:DeleteNetworkInterface
          Resource: "*"
        - Sid: AmazonElasticFileSystemClientFullAccess
          Effect: Allow
          Action:
            - elasticfilesystem:ClientMount
            - elasticfilesystem:ClientRootAccess
            - elasticfilesystem:ClientWrite
            - elasticfilesystem:DescribeMountTargets
          Resource: "*"
    Metadata:
      Dockerfile: Dockerfile
      DockerContext: ./app
      DockerTag: python3.9-v1

Outputs:
  # ServerlessRestApi is an implicit API created out of Events key under Serverless::Function
  # Find out more about other implicit resources you can reference within SAM
  # https://github.com/awslabs/serverless-application-model/blob/master/docs/internals/generated_resources.rst#api
  InferenceApi:
    Description: "API Gateway endpoint URL for Prod stage for Inference function"
    Value: !Sub "https://${ServerlessRestApi}.execute-api.${AWS::Region}.amazonaws.com/Prod/classify/"
  InferenceFunction:
    Description: "Inference Lambda Function ARN"
    Value: !GetAtt InferenceFunction.Arn
  InferenceFunctionIamRole:
    Description: "Implicit IAM Role created for Inference function"
    Value: !GetAtt InferenceFunction.Arn
In this YAML file, we are creating resources such as Lambda and API Gateway and we’re also attaching the EFS to the Lambda function. In this YAML file, several things have to be modified before deploying the function.
Starting from line 20, the default value can be replaced with your own Security Group which was created earlier. It can either be replaced in the YAML file or later entered while deploying the SAM function.
The same applies to line 24 where all the subnets of the EFS’ availability zones should be entered. To get to know your subnet IDs, follow the below steps:
Enter the below command:
aws ec2 describe-vpcs
This command describes your VPCs. From here, copy the VpcId field.
Now execute the below command:
aws ec2 describe-subnets --filters "Name=vpc-id, Values=<YOUR_VPC_ID>" --query 'Subnets[*].{Id: SubnetId}' --output text
This lists out all the subnets in your VPC. Copy and paste either to the YAML file or enter on console later during SAM Deploy.
Along with the Security Group and Subnet IDs, we also need the Access Point ARN of the EFS instance. To get this, enter the below command,
aws efs describe-access-points
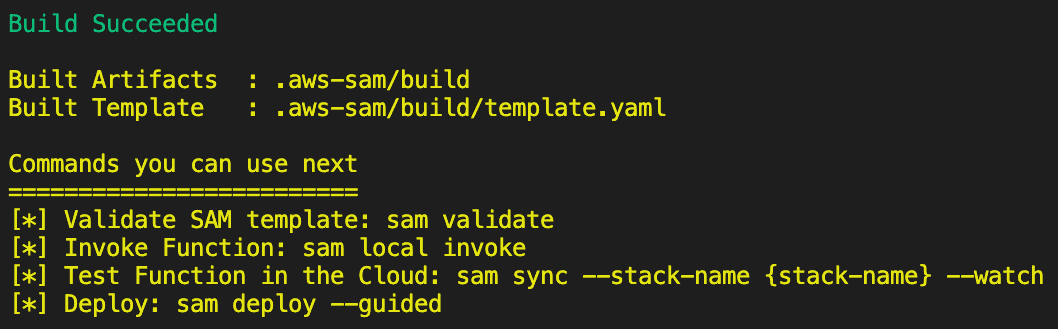
Now, we will build and deploy the application. Before building the application, make sure Docker is installed and running. To install Docker, visit here.
Make sure Docker is running. Enter:
sam build
The commands entered in the Dockerfile are executed. If the build runs successfully, the below message is shown,
Now, enter:
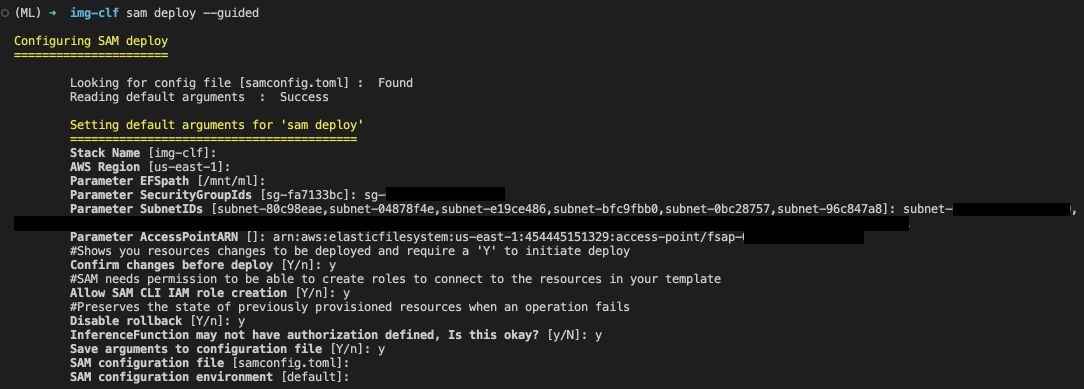
sam deploy --guided
- Give a stack name
- Set region
- Set EFS mount path
- Enter your security group ID
- Enter your subnet names each separated by a comma
- Finally, enter your Access Point ARN
- Then follow through rest of the procedures
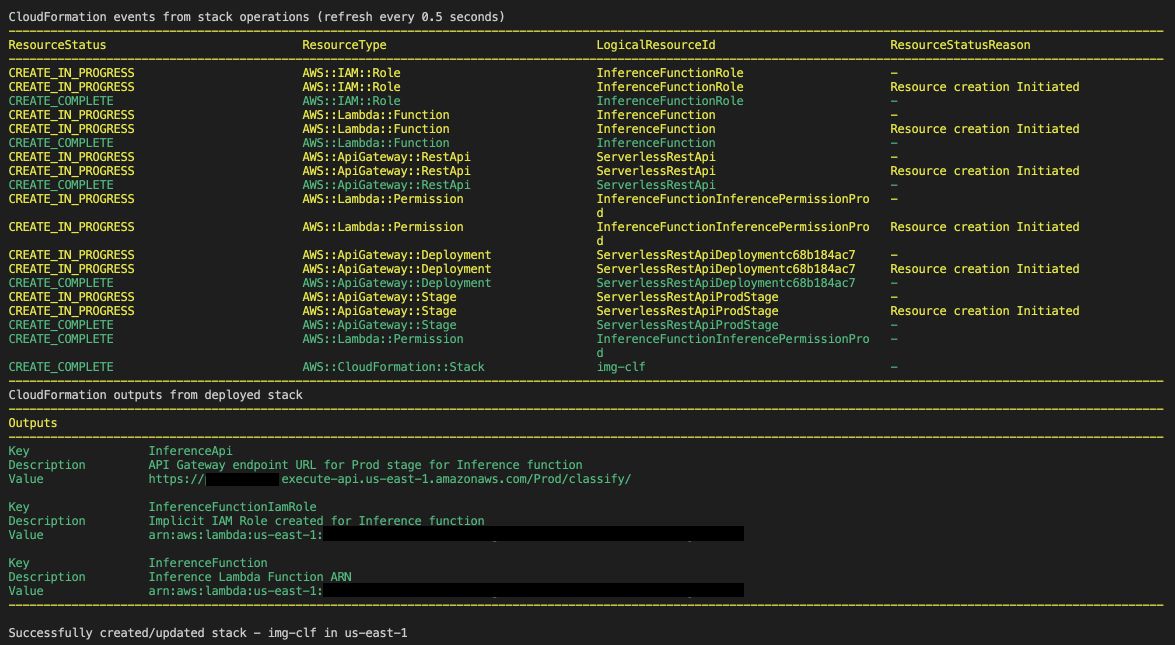
Approve the deployment,
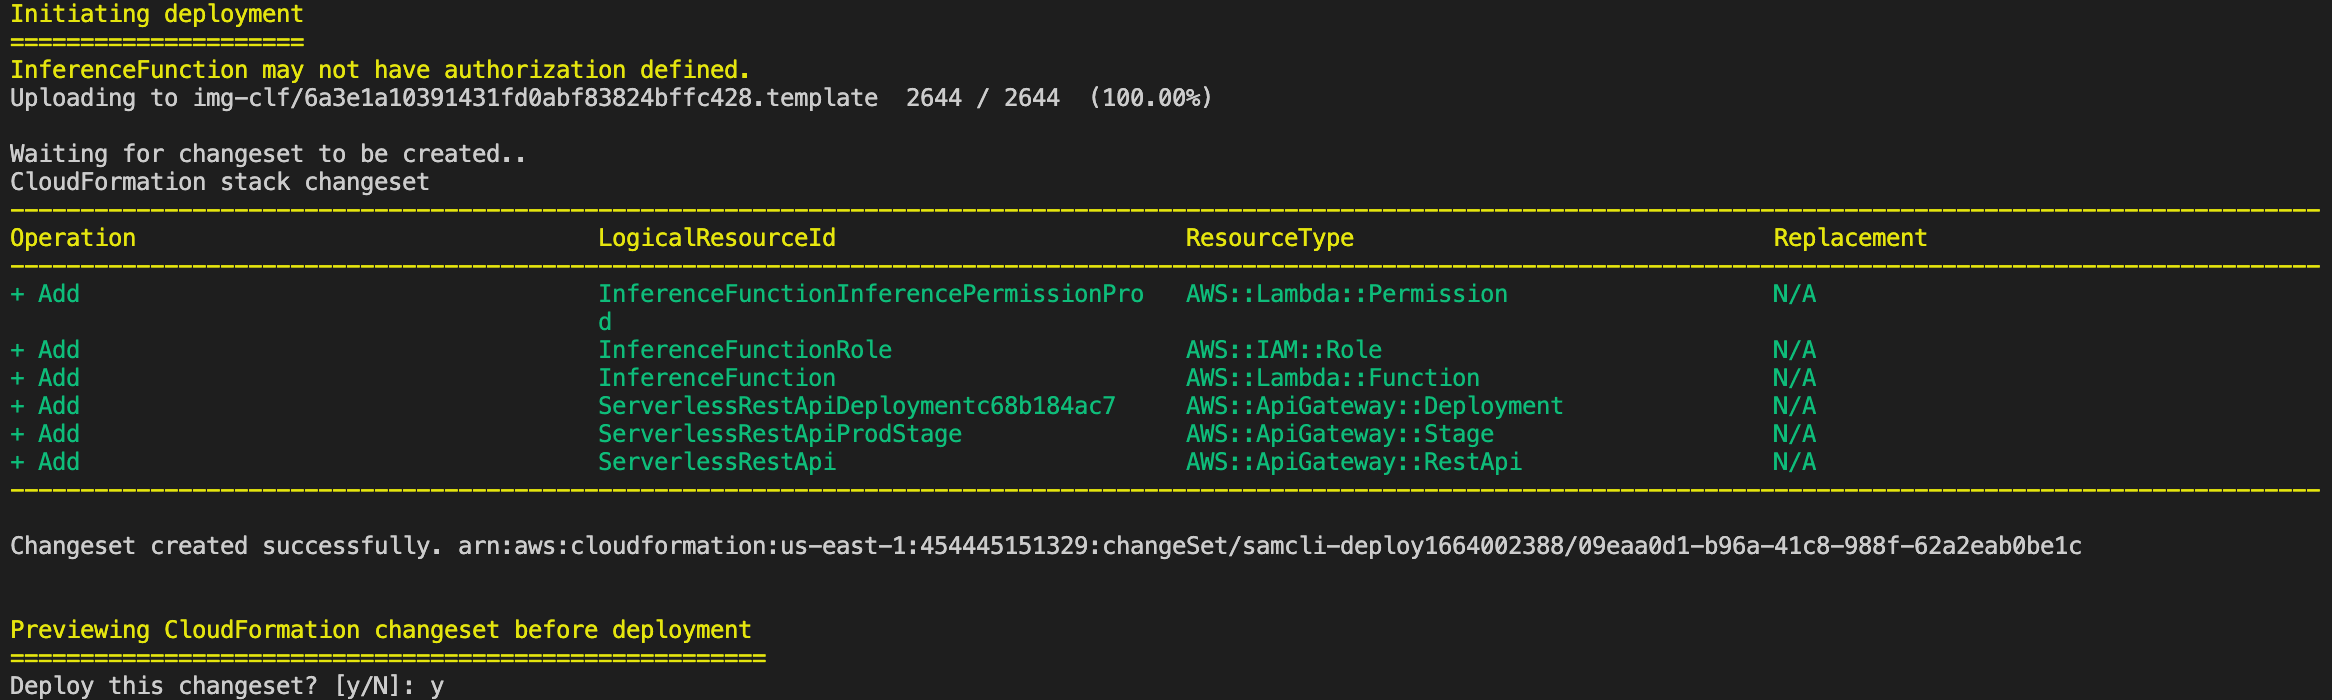
This creates all the resources required and finally the IDs of the resouces that are created are displayed.
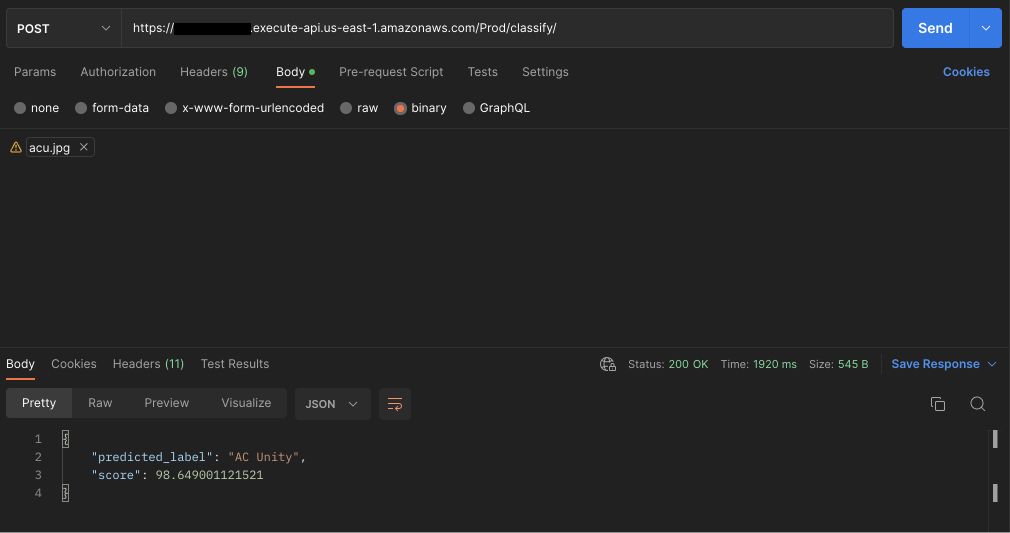
Copy the InferenceApi’s Value and test it using Postman.
Note: There might be an endpoint timeout response when testing for the first few times as the stack is newly created. This is not repeated later at any point of time.
Here is a representation in a Web App format,
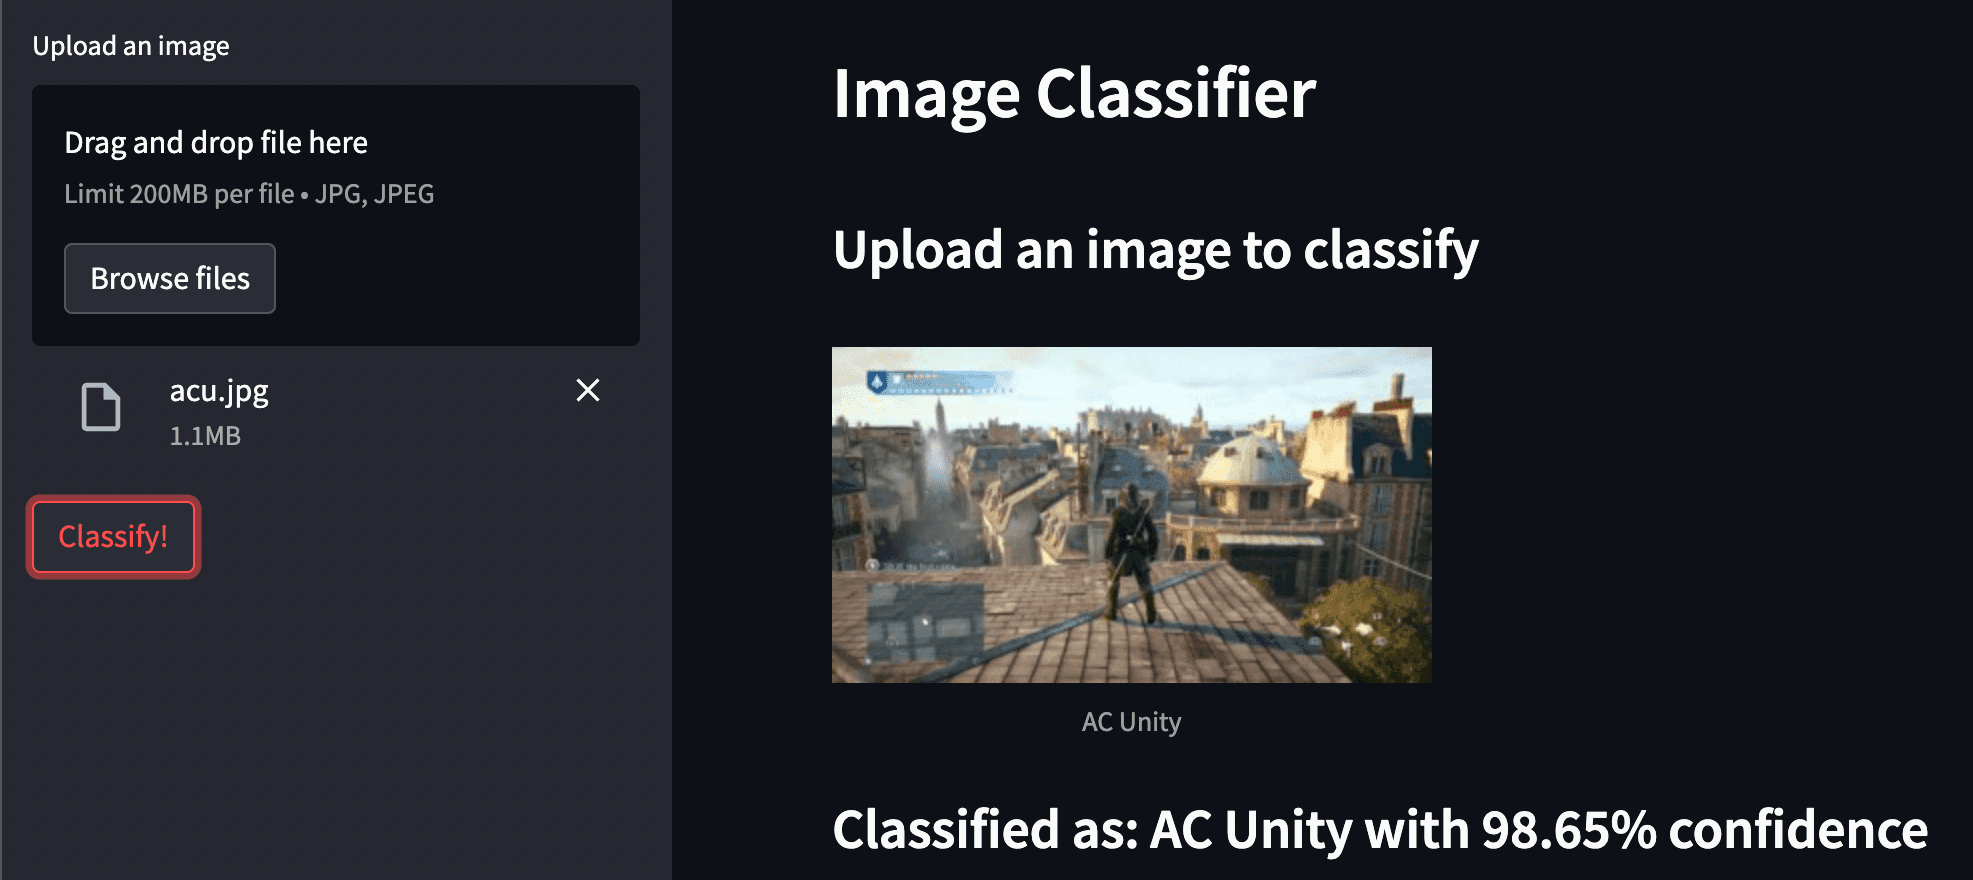
Code to the web app can be found here.
CONCLUSION
We have successfully built, trained and deployed a serverless image classifier using various AWS Services. Amazon SageMaker to build and train the model, Lambda as an inference function, EFS to store the model and also as a local storage to Lambda and finally, API Gateway for inference API.
As mentioned in Part 1, any image dataset can be used to build and train the model. One thing to note is that, as the model’s size increases, it might take longer for the function to make the prediction. You can play around with Lambda's memory values to find the ideal configuration for your function.
And it's a wrap! Hope the blog was useful and provided some knowledge about deploying Serverless ML Applications. Reach out to Twitter or LinkedIn if you have any feedback!
LINKS: