

 ChatGPT
  Perplexity
  Gemini
  Claude AI
 React Server Components (RSC) are components that are designed to run directly on the server and dynamically generate HTML that is then sent to the client.

React Server Components offer two key benefits:
- Direct Database Querying: These components allow you to query data directly from the database, eliminating the need for separate server-side endpoints or middleware.
- Improved Performance: Complex UIs can be pre-rendered on the server, reducing the initial load time. By generating the HTML on the server, these components optimize the user experience and help reduce the client–side JavaScript bundle.
How Next.js Implements React Server Components:
Next.js introduces a new approach for building Full-stack React applications, encouraging developers to adopt a different mental model. This approach involves leveraging both the client and server to optimize the application's performance.
In a typical web application, there are interactive and non-interactive components. React Server Components do not support client-side features such as Event listeners, React hooks and Browser APIs.
By splitting the application and using React Server Components for the non-interactive parts, it becomes possible to pre-render certain sections of the user interface on the server and only send HTML to the client. For the interactive portions, regular Client components are used.
The advantage of this approach is that it enables faster page loads and reduces the amount of JavaScript that needs to be sent to the client. React combines Server and Client components in the same component tree to achieve this. All Server Components are pre-rendered on the server, leaving a “placeholder” for the Client components.
The client receives the React runtime, which includes the component tree, as well as the pre-rendered HTML. React then seamlessly inserts the Client Components into their respective "placeholders" and renders the entire user interface.
How are React Server Components different from Server-side Rendering?
Server Side Rendering (SSR) involves pre-rendering HTML on the server during the initial page load and sending it to the client alongside the JavaScript bundle. Once the client downloads the JavaScript bundle, the page is hydrated and becomes interactive. Subsequent navigation behaves like a typical single-page React application.
In contrast, React Server Components operate differently. Each Server Component within the DOM tree is always pre-rendered on the server, and only the HTML is sent to the client.
Let’s explore React Server Components with Next.js 13 App Router, including an experimental feature called Server Actions in-depth by walking through an example. Our project involves creating an Anime Watchlist website.
The application will have a homepage showcasing popular anime and allow users to search, add, and manage anime in their watchlist. Users can track the status of their viewing progress and remove anime from their list.
You can access the live hosted version of our final application by clicking here.
Please note that the code snippets provided in the tutorial below serve as references to illustrate the implementation of specific features. They may not always be complete and could omit certain details.
Visit the GitHub repository for a comprehensive understanding and access to the complete code. You can follow along with the tutorial more effectively by cloning the repository or utilising it as a reference.
Initial Setup
Run the following command from the terminal:
npx create-next-app@latest
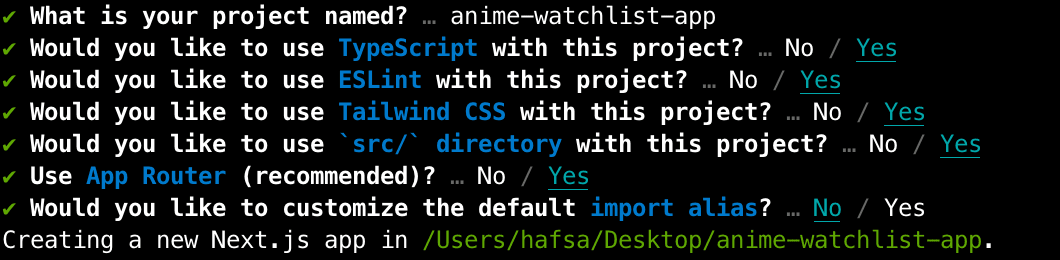
We should have a Next.js 13 application with Tailwind CSS at the end of this.
Let's organise our code. The folder structure for our application will be as follows:
├── src
│  ├── app
│  │ ├── layout.tsx
│  │ ├── page.tsx
│  │ ├── search
│  │ │ └── page.tsx
│  │ └── watchlist
│  │   └── page.tsx
│  ├── components
│  │ ├── [...]
│  └── lib
│    ├── db.ts
│    ├── utils.ts
│    ├── server
│    │  ├── [...]
│    └── types
│       └── [...]
The page.tsx in the root of the app directory represents our Landing Page. We will render a list of popular Anime on this page using the Jikan API.
import Card from "@/components/Card";
import { TopAnimeResponse } from "@/lib/types/jikan-top.types";

const fetchTopAnime = async () => {
  const res = await fetch("https://api.jikan.moe/v4/top/anime");
  const result: TopAnimeResponse = await res.json();

  return result.data;
};

const Home = async () => {
  const data = await fetchTopAnime();

  return (
    <div>
      {data.map((anime) => {
        return <Card key={anime.mal_id} {...anime} />;
      })}
    </div>
  );
};

export default Home;
All components inside the App Router are Server Components by default and you can use async and await to fetch data in Server Components as shown above, all the fetch requests in Next.js are cached automatically.
(You can read more about Caching in-depth from the Next.js documentation)
We will be using a Card component to display static information. It can remain a Server Component.

Building navigation
Let's move on to building our Nav. Our Nav can be broken down into links and a search bar. These components are interactive and must be declared a Client Component with the 'use client' directive.

When navigating through the application, Next.js temporarily caches all React Server Component payload for visited route segments and prefetched route segments (components using Next/Link). This is termed as the Router Cache.
On subsequent navigations, Next.js checks if the React Server Component payload for the specific route segment is present in the Router cache, if present, it directly fetches the data from the Router Cache on the client. If not present in the cache, Next.js fetches data from the server and populates the Router Cache.
The Cache will keep serving the old data until we do a hard refresh or wait for the automatic invalidation period to pass.
The Router Cache expires automatically after a set time, which differs based on whether the route is dynamically or statically rendered:
- Dynamic Routes: Cache invalidates every 30 seconds.
- Static Routes: Cache invalidates every 5 minutes.
Currently, it is not possible to opt out of Router Cache.
For a more in-depth information on Caching and Revalidating in Next.js, you can check out the ongoing discussion on the Next.js GitHub repository.
Since our data changes dynamically as we navigate between routes, we want to make sure that each time we visit a route, a new request is sent to the server to fetch the most up-to-date data. To achieve this, we will create a DynamicLink component, which will call "router.refresh()" to invalidate the Router Cache.
"use client";

import { useRouter } from "next/navigation";
import { ReactNode } from "react";

const DynamicLink = ({
  href,
  children,
}: {
  href: string;
  children: string | ReactNode;
}) => {
  const router = useRouter();

  return (
    <button
      onClick={(e) => {
        e.preventDefault();
        router.replace(href);
        router.refresh();
      }}
    >
      {children}
    </button>
  );
};

export default DynamicLink;
Implementing the search functionality
The Search Component will route the user to a Search Page where we will query our API and display relevant results. The Input and Search button are interactive and will require using client state and the useRouter hook to navigate.
"use client";

import { useRouter } from "next/navigation";
import { useState } from "react";

const Search = () => {
  const [params, setParams] = useState("");
  const router = useRouter();

  const handleSubmit = () => {
    if (params) {
      router.push(`/search?name=${params}`);
      setParams("");
    }
  };

  return (
    <div>
      <input
        type="text"
        placeholder="Search for anime"
        value={params}
        onChange={(e) => setParams(e.target.value)}
        onKeyUp={(e) => e.key === "Enter" && handleSubmit()}
      />
      <button onClick={handleSubmit}>Search</button>
    </div>
  );
};

export default Search;
To create the Search Page, we will create a folder under app directory called search.
import Card from "@/components/Card";
import { SearchAnimeResponse } from "@/lib/types/jikan-search.types";

const getSearchedAnime = async ({
  name,
}: {
  name: string;
}): Promise<SearchAnimeResponse> => {
  const response = await fetch(`https://api.jikan.moe/v4/anime?q=${name}`);
  return await response.json();
};

type SearchPageParams = {
  searchParams: {
    name: string;
  };
};

const SearchPage = async ({ searchParams: { name } }: SearchPageParams) => {
  const { data } = await getSearchedAnime({ name });

  return (
    <div>
      {data.map((anime) => {
        return <Card key={anime.mal_id} {...anime} />;
      })}
    </div>
  );
};

export default SearchPage;
Our application’s landing page displays a list of trending Anime. We have also built a Search bar that allows users to quickly find Anime.
Building the watchlist feature
The objective is to allow users to Add or Remove Anime from both the landing page and the search results page. Users should also be able to navigate to the ‘/watchlist’ page where they can manage their watchlisted Anime by modifying the status or even deleting specific Anime entries.
To implement these features, we will need a database to store the watchlisted Anime. We are using PlanetScale MySQL database and Prisma as the ORM.
To install Prisma ORM run the following command in the terminal:
npm i prisma --save-dev
Initialize Prisma with the following command:
npx prisma init
This will create a new Prisma directory with a schema. Connect your database with Prisma. You can read more about connecting a PlanetScale database with Prisma here.
Let’s create the model for our Watchlist
generator client {
  provider = "prisma-client-js"
}

datasource db {
  provider     = "mysql"
  url          = env("DATABASE_URL")
  relationMode = "prisma"
}

model AnimeList {
  id           String      @id
  title        String
  watch_status WatchStatus
  created_at   DateTime    @default(now())
  updated_at   DateTime    @updatedAt
  genres       String?
  year         Int?
  type         String?
}

enum WatchStatus {
  IN_PROGRESS
  NOT_STARTED
  COMPLETED
}
Run the following command to push changes from your schema to the database:
npx prisma db push
We will be leveraging Server Actions for the add and remove operations within our Watchlist feature. When a user adds or removes an Anime from their Watchlist, the corresponding server action triggers a write or delete operation in our database. This ensures that the user’s Watchlist remains synchronised with their selections.
Server Actions
Server Actions are an experimental feature and need to be enabled in the next.config.js file.
module.exports = {
  experimental: {
    serverActions: true,
  },
};
Server Actions can only be defined within Server Components and must have the "use server" directive at the beginning of the function body. Client Components only have the capability to invoke or call Server Actions.
Within server actions, we can revalidate data on-demand based on specific events such as form submission or on click of a button. This can be done in two ways, tag-based using revalidateTag or path-based using revalidatePath.
We will use revalidatePath in our server functions, and based on the path passed to revalidatePath function, the current page is re-rendered on the server. This also clears the Data Cache, Full Route Cache (Server Caches) and the client-side Router Cache.
To promote reusability in both client and Server Components, we will define all Server Actions in a separate file. By including the "use server" directive at the top level, all exports below will be recognized as Server Actions.
"use server";

import { revalidatePath } from "next/cache";
import { prisma } from "../db";
import { WatchStatus } from "@prisma/client";

export const addToWatchlist = async (
  title: string,
  id: string,
  genres?: string,
  year?: number,
  type?: string
) => {
  await prisma.animeList.create({
    data: {
      id,
      title,
      watch_status: "NOT_STARTED",
      genres,
      year,
      type,
    },
  });
  revalidatePath("/");
};

export const removeFromWatchlist = async (id: string) => {
  await prisma.animeList.delete({
    where: { id },
  });
  revalidatePath("/");
};

export const updateWatchStatus = async (
  id: string,
  animeWatchStatus: WatchStatus
) => {
  await prisma.animeList.update({
    where: { id },
    data: { watch_status: animeWatchStatus },
  });
  revalidatePath("/watchlist");
};
Server Actions can be implemented in Server Components through two methods.
Using the action prop: The action prop enables you to invoke a Server Action on a form element. This allows you to trigger a server-side action when a specific event, such as submitting a form, occurs on the form element.
Using formAction attribute: The formAction attribute allows you to invoke Server Actions on various elements within a form, such as buttons or the input element with type="submit". This means that when a specific action, like clicking a button or submitting the form, is performed, the corresponding Server Action will be triggered.
Let's add the addToWatchlist Server Action to our button.
<form>
  <button
    formAction={async () => {
      "use server";
      await addToWatchlist(title, id, genres, year, type);
    }}
  >
    + watchlist
  </button>
</form>
If you have data to be passed to your Server Action function, you would need to wrap it within another asynchronous function. This function should also have the "use server" directive specified, indicating that it will be executed on the server.
To determine if an anime already exists in the Watchlist, we will compare its ID with the IDs stored in the watchlist database. If there is a match, we will provide the user a Server Action that allows them to remove the anime from the Watchlist.
One benefit of using Server Actions is their ability to execute even in scenarios where JavaScript is disabled within the browser. This guarantees that crucial operations can still be performed by making server calls, without solely relying on JavaScript functionality.

We can similarly create the Watchlist Page and add Server Actions to delete a watchlisted anime or change the watch status.

You can visit the GitHub repository to access the completed application, which includes styles and additional examples of Server Actions. The repository also showcases a Select component that utilizes the useTransition hook for Custom Invocation of a Server Action without using action or formAction.
Challenges I faced with Next.js integration
During my experimentation with RSC, I encountered a few issues specific to Next.js:
- Currently the duration for invalidating Router Cache can not be modified. Using router.refresh() to clear the entire Router Cache for the purpose of invalidating a specific route segment might not be an ideal solution. However, there’s an ongoing proposal to introduce a feature to override the staletime duration, which you can read about in detail here
- Server Actions, being an experimental feature, had some limitations. When triggering Server Actions with JavaScript disabled, the loader (loading.tsx - uses React Suspense) would be stuck and fail to complete execution.
- There is an issue with the Next.js bundler, where functions stored in a ‘Utils’ folder were not imported correctly in components created inside the app directory. As a result, it required relocating the functions to the same file as the component itself. Unfortunately, the root cause of this issue could not be identified.
While React Server Components offer a fresh approach to building Full-stack React applications, it may take several months before libraries and frameworks fully support it, considering the significant nature of this transformative change. Therefore it is essential to be aware of these challenges, work through them and explore solutions to leverage its potential benefits.
Conclusion
React Server Components (RSC) introduces a new mental model for building Full-stack React applications, making it a significant change to the ecosystem. Currently, Next.js is the only framework that offers a stable and production-ready implementation of RSC. However, other frameworks like Redwood.js and Remix have indicated their intent to adopt RSC in future releases.
References
React Roundtable : Server Components, Suspense, and Actions
The Costs & Benefits of React Server Components : Jeff Escalante
FAQs
1. How do Server Actions complement RSC in Next.js?
Server Actions allow you to mutate data directly from the server without needing separate API routes. When combined with RSC, they simplify the data layer and reduce client-side complexity, unlocking faster, more maintainable applications.
2. How do Server Actions handle data fetching and mutations differently than API routes?
Server Actions let you colocate server-side logic with your components, often in the same file. This reduces indirection and boilerplate. However, they rely on form submissions under the hood, limiting flexibility in JS-disabled contexts or custom request flows.


